3 Spellcasters and a Dwarf
  • Home
  • Special Effect
    • Special Effect
    • The Final Return of The Indiana Jones Charity Globe Trot
    • The Warlock of Firetop Mountain Challenge
    • Return of The Indiana Jones Charity Globe Trot
    • Bard's Tale Challenge
    • Fighting Fantasy Challenge
    • The Indiana Jones Charity Globe Trot
    • Mirkwood Charity Walk
    • Middle-earth Charity Walk
    • Dungeon Daze
  • RPGs
    • The One Ring
    • The Evils of Illmire
    • Beach Patrol
    • The Surrendered Lands
  • Game Blogs
    • RPG Blog
    • Gaming Blog
  • Painting Blog
  • Contact

Gaming Blog

Next Station: Tokyo - First Play!

5/6/2023

0 Comments

 
4th June 2023

It's a Sunday and we're on Board Game Arena​ for some gaming goodness.

Being a tourist is great. You get to wander through a city's public transit network and travel the streets, see the sites, take the train and on this particular instance, do it in Tokyo.
All thanks to the transit planners and designers!

What's in a game?
  • Tokyo ​Map: The game comes with a pad of sheets, each of which depicts a identical network of subway stations represented by 1 of 4 different symbols and interconnected by dotted lines. There will also be 4 coloured stations (Blue, brown, purple & red. =) on the sheet, these correspond to the game's 4 different coloured pencils - more on this later!
    ​There are also solid coloured lines. The yellow coloured lines are used to delineate different 'areas' or districts on  the map. The are 13 districts on the map and 4 of those are smaller secondary districts found in each corner of the map. This is important for scoring.
    ​The solid green line represents a central orbital transit line.
    The bottom third of each sheet is given over to score tracking
Picture
Notice that there appears to be a Godzilla-like figure in the top-right corner of the sheet.
  • Cards: Tokyo Nest Station uses a variety of cards.
    • Station cards: There are 11 of these and they are broken down into 2 types delineated by colour. Each cards will display either a symbol that matches 1 of the 4 types of station symbol on the map sheet or symbols for either Joker/Double Rail or Railroad Switch. More on these 2 types of card later.
      Street cards: As the name suggests, these 6 pink cards depict scenes on street level and I guess they represent tourist destinations.
      Subway cards: The remaining 5 green/yellow cards show various subway stations.
Picture
All 11 station cards.
  • Special station cards: That's right these are special. What's so special about them? Well they are optional cards that can add extra complexity to the game.
    There's 2 types (Blue and orange.) and 1 of each is randomly drawn each round and combined to provide an extra scoring opportunity for that round.
  • Common objectives: These are also optional cards. At the start of the game, 2 will be randomly drawn to provide an extra scoring objective to all players.
  • Pencils: The game comes with 4 differently coloured pencils that match the the 4 coloured symbols on the map sheet. 
Picture
Blue man pencil?
There's not much to say about the component quality for Next Station: Tokyo.
The pad of maps is exactly what you'd expect, a thick pad of probably about 100 leaves. Each individual leaf is quite thin and flimsy but since they're only ever used once before discarded, it's not an issue. Although, having said that, it would have been nice to have had laminated map sheets and dry-erase markers instead.
Speaking of laminated, the cards are plastic coated and feel nice and sturdy.
Finally, the pencils that come with the game are well, they're normal pencils only in 4 somewhat garish colours. They'll need sharpening once in a while but that's about it.

Next Station: Tokyo uses a sort of abstract stickman, heavy black-line art style to represent people and locations and along with the solid bright colour scheme employed, it gives the game a distinct and eye-catching presentation.
It's also a style that sort of matches the look of modern subway maps and thus fits game's subway theme.
Arguably, it's a cartoonish art direction which I guess won't appeal to everyone but I found it to be a clean and uncluttered style, furthermore I'm generally always a fan of using bright colours so it's a thumbs up from me.

There's just over a handful of icons here but they're easily understood as most of them are only referencing themselves. The last remaining icons will quickly be learned by players. I don't imagine this being a problem for anyone.

How's it play?
Setup
  • Maps: Give a map sheet to each player.
  • Pencils: Games of Next Station Tokyo always use all 4 pencils.
    Thus give each player a pencil - colour doesn't matter and if there are less than 4 players, put out the remaining pencils between the actual players as if there were 4 players.
  • Station cards: Shuffle all the statin cards into a face-down deck.
  • Controller: Determine a starting player for the controller role.

On to play
During Next Station: Tokyo, each player will be building 4 subway networks in the 4 colours corresponding to the pencils and the game is played 4 rounds. Players will be trying to make their networks as expansive and interconnected as possible.
This is done by flipping station cards and resolving result which will allow players to connect stations to each other by drawing lines between them.

Technically, the controller is responsible for flipping cards, players then resolve all their actions simultaneously.
Each round plays as follows.
  • Flip card: The top card from the station card deck should revealed, it will show either a symbol that matches 1 of the 5 symbols on the map sheets or 1 of the 2 special actions symbols.
  • Construct network: Players must now construct their subway network as per the revealed symbol and the following construct rules apply.
    • Expand network: A player may choose to expand their network. This is done by drawing a line from either end of their current network to a station with a symbol that matches a symbol on the revealed station card.
      Thus if a triangle symbol is revealed, a player may connect either end of their current network to a station with a matching symbol.
    • Restrictions: There are of course some restrictions when expanding a line.
      Start network: Each player must start their network from the coloured spot that matches their current pencil.
      Ends only: As stated above, a line can only expand from its ends not from the middle.
      Direction: Connections must be orthogonal or diagonal.
      1 line only: Only 1 line can be drawn between to stations.
      No crossovers: A line cannot cross over another previously drawn line or indeed the green line. Nor can it 'pass through' another station on its way to the 'chosen' target station.
      This means the only way to get past a already drawn line is to go a station, then with another action exit out of that station past the drawn line.
      No double-backs: A particular network cannot connect to a station it has already connected to.
    • Exceptions: There are of course some exceptions to the above restrictions.
      • Joker/Double Rail: If a card with these symbols is drawn, the following 2 exceptions apply. Either or both can be applied.
        Joker: The player may expand their network to a station with any symbol of the player's choice.
        Double Rail: The player may draw a connection alongside a line they have already drawn between 2 stations or even alongside the green line.
      • Railroad switch: If a card with this symbol is drawn, then first, another station card must be drawn and then the 2 are 'combined'.
        This allows the player to draw a connection to the revealed symbol from any station on their network, thus creating a branch and also a new 'end' that can be used.
  • Next station card: Once all players have expanded their networks, a new station card is flipped and resolved.
  • End of round: Once the 5th subway card is flipped, the end of round is triggered. The current card is resolved by all players, then a new begins.
    • ​Scoring: Each of the 4 networks on a player's map sheet are scored at the end of the round they were created. End of round scoring works in 2 ways.
      Length of line: A point is scored for each of the 13 districts the line goes through.
      Busiest district: The single district in the network scores 1 point per connection in that district.
      End of round score: The 2 numbers above are then multiplied together to get the end of round victory points (VPs).
  • Next round: The following steps occur when a new round begins.
    New controller: The player to the left of the current controller becomes the new controller.
    Reshuffle station deck: Take all 11 station cards and shuffle them into a new face-down deck in preparation for the subsequent round.
    Pass pencil: All players pass their current pencil to the player on their left and receive a different coloured pencil which they will use to create a new different network on their map sheet.
    You will note that in a game with less than 4 players, a pencil will be passed to a 'empty' spot.
    New round: A new round commences with a station card being revealed from the reshuffled deck.
 
Endgame
Once the 4th round is concluded and all players will have created 4 networks on their map sheets, the game goes to scoring.
Next Station Tokyo provides players with various avenues to scoring points. which will be totalled to provide their final scores.
  • End of round: Total up all VPs which were scored at the end of the 4 rounds.
  • Tourist destinations: Certain districts that have been visited during the game will score VPs. Most of these districts score 5 VPs but the 4 smaller, outermost (and harder to reach) districts score 10 VPs each.
  • Unconnected green loop stations: Each station on the green loop that is not connected a next will lose the player VPs.
  • Interchanges: VPs are scored for stations which are interchanges, that is; stations which are connected to more than 1 of the networks. Including the green line, there can be up to 5 connections in an interchange.

Points are tallied, highest score wins.
Picture
First (blue) network completed.
Overall
In a game of creating transit networks to draw in tourists, using a join-the-dots mechanic to well.... join-the-stations feels pretty appropriate thematically.

Gameplay wise, I feel Next Station Tokyo definitely sits at the lighter end of complexity. It's construction rules are perhaps a touch too fiddly to be intuitive but still, are easily learned. Having said that, I'm not sure how quickly 'non-gamers' would grasp the mechanics.
However, like all well produced game, the complexity comes from the decisions presented to players.

In that regard, if you're a fan of the roll/flip/randomiser-and-write genre, you'll be on familiar ground here.
Players will find themselves planning their moves and actions but having to react to whatever the randomiser delivers to them and adapt and exploit to whatever options are presented to them. This forces players to make tricky decisions that can be risky or 'imperfect', which in my opinion, is always a good thing.

Curiously, it might seem that fact that only 11 cards are used in each round can easily be memorised and is exploitable - 2 of each symbol, 2 joker/double rail symbols and 1 railway switch but there's an there's an interesting rule at play. Which is that when the 5th subway card is revealed the round is over. As a result 5-10 cards will be revealed each round and this means at least 1 card wont be used and potentially more than half wont be used. I'm sure this is deliberate to keep proceedings unpredictable.

As I said above, players of this style of game will be on familiar ground here: Where Next Station: Tokyo differentiates itself from its contemporaries is that players are creating 4 separate networks, which they'll want to expand as much as possible but without hindering their other networks but also interchanging with them.
It definitely a novel challenge.

If I was being harsh though, I would say that this unique mechanic might not be enough to make the game stand out in the crowd. Players of similar games might not find enough to make it worth playing Next Station: Tokyo.

However: If I was being generous, I would say that this a enjoyable addition to the genre that provides an interesting challenge. If you're a big fan of that genre, this might be worth considering and if you've never played a x-and-write game, this is definitely one to consider.
0 Comments

Long Shot: The Dice Game

2/5/2023

0 Comments

 
2nd May 2023

It's a Tuesday and we're at The Sovereigns with the Woking Gaming Club​ for a game of Long Shot: The Dice Game.

What's in a game?
  • Game board: This board sports an oval track in a sort of typical rural setting with 8 lanes. The inner lanes have less spaces than the other ones - this will be important later on.
    There is also a red 'no bet' line, more on this later.
    Off the side of track there are also 3 spaces (And associated prize money.) for the first 3 horses to finish the race.
Picture
Ready to race!
  • Horse tokens: There are 8 horse tokens in 8 different colours.
    While these wooden tokens are not particularly horse shaped each one does feature a cartoony illustration of a racehorse. Additionally each horse token displays its 'number' both on the top and on the side.
Picture
Horse tokens as viewed from the side.
  • Horse cards: There are 2 sets of horse cards,  both sets have 8 card numbered 1-8 with each card corresponding to a horse token.
    They contain information on their respective horse, including:
    Purchasing cost, in the top right corner.
    Special ability in the centre.
    Odds to win along the right edge of the card.
    'Secondary movement bar' along the bottom. This bar will have a spot for each of the other 7 horses and some of these spots will be filled in by default. What is the secondary movement bar? More on that later.
Picture
Nitro Nellie for the win, probably not according to those odds!
  • Dice: Unsurprisingly for a game called Long Shot: The Dice Game, it comes with some dice, 2 to be precise.
    • Movement die: This is a six-sider but is numbered 1-3 twice instead of 1-6.
    • Horse die: This die is eight-sided and each side/colour corresponds to one of the eight horses.
Picture
Dice!
  • Starting cards: A start card is given to every player and each one provides some asymmetrical starting setup, they are used in conjunction a player board. 
Picture
Example of a starting card.
  • Player boards: One of these is given to each player. They look quite busy and display quite a lot of information.
    • Concessions: Shown along the left side the board is the 4x4 'concessions' grid, this means there are 16 'spot' on the grid with 2 matching each horse. During the game players will have the opportunity to cross spots off of this grid to gain one of the bonuses listed below the grid.
    • Horse info: In the central area there are 8 numbered and uniquely coloured lines, each line contains information pertinent to the relative horse. This includes whether the player has the helmet/jersey for that horse
      Bets: The other part of the horse info is concerned with betting and odds. 
      A space is used to track how much they have bet on that horse. Related to the betting and further along it shows the odds that pay out for it finishing in 1st to 3rd position. This matches what is shown for that horse its horse card.
      Thus the number 5 horse has 1st place odds of 7/1, 2nd place odds of 6/1 and 3rd place odds of 5/1.
    • Lucky horseshoe: Each player board has 3 horseshoes, these can be used to change the options available to a player during a turn, more on this later.
    • Cash in hand: On the right side of the board is a space actually showing cash in hand which is used to track how much cash the player has.
    • Score tracker: Finally, in the bottom right corner are some boxes to track player winnings at the game end.
Picture
A player board with setup from a starting card added.
Component quality throughout Long Shot: The Dice Game is good.
While not actually horse-shaped, the horse tokens are chunky, made of wood and feel satisfyingly weighty to handle.
The dice are plastic and not wooden (Which is always my preference.), they still feel solid and well made, additionally their icons are not printed and are shaped in relief.
Since this is a roll-and-write game, many of the components such as the player boards and horse cards can be written on. They are sturdy as you would expect. As is the race track board.

The game also makes good use of bright solid colour, everything is brash, colourful and eye catching. There's also a definite humorous element to the cartoony artwork and illustrations that matches the game's luck-driven light gameplay.

The game's iconography is a bit of a mixed bag.
The player board is a busy looking affair with lots of stuff presented to the player and definitely can feel a little intimidating. However, in practice, it's not that bad. Much of the information is conveyed through numbers/colours. There are a handful of icons but for the most part they are easily understood after a round or two.

How's it play?
Setup
  • ​Game board: Put out the game board into the central playing area.
    Horse tokens: Put out the horse tokens in their starting positions on the track.
    Horse cards: Select 1 of the 2 sets of horse cards or alternatively, cards can be chosen from both sets - provided only 1 of each number gets selected.
    Then put out the cards face-up into the central playing area.
  • Players: Give each player a player board.
    Starting cards: Shuffle the starting cards into a face-down deck and randomly deal 1 to each player.
    Each player should then mark off their starting setup on their player board as dictated by the starting card. This will include marking off some spots on the concession bids and adding a couple of starting bets on their board.
    Finally, each player should note $12 in the allotted spot.
  • First player: Determine a starting player.

On to play
Money counts in large amounts. Long Shot: The Dice Game is all about winning the most cash, this is done not just by players only betting on the winning horses but also 'manipulating' the outcome of the race.
Long Shot: The Dice Game sort of has a traditional turn order but since players get to act in all other players' turns, it's only relevant for rolling the dice which is done by the active player.
Each turn basically has 2 phases.
  • Roll the dice: The active player rolls both dice at the same time. This will determine which horse moves and how many spaces it moves.
    ​Move horse: Take the horse token that matches the colour/number that was rolled on the horse, then move it a number of spaces forward that is indicated on the movement die (Which will be 1-3 spaces.).
    Secondary movement: Now check for secondary movement.
    Look at the horse card that matches the horse that was just moved and check which other horses have been marked off on the secondary movement bar: All marked off horses should be moved forward 1 space.
    Finishing: After a horse has crossed the finish line, it should be moved to it's finishing position on the side of the board.
    Finish line: If any horse that has to be moved is already past the finish line, do not move it.
  • Actions: This is where the bulk of the game occurs and each player can perform exactly 1 action from a choice of 5. This is done in turn order with the active playing acting first.
    • Bet: A player may place a bet on the horse indicated on the horse die, this can be for $1-3.
      Finish line: A horse past the finish line cannot be bet on.
      No bet line: As the name suggests, once a horse passes the no bet line it cannot be bet on unless the betting player has acquired that horse's helmet.
      Free bets: during the game, players may acquire free bets, these follow the same rules as usual bets.
    • Buy: A player may buy a the horse that matches the result on the horse die provided it has not already been bought by another player.
      Finish line: Once a horse has crossed the finish line, it cannot be bought.
    • Concession: A player may mark off a spot on their concession grid which matches the result on the horse die.
      When a row or column is completed, the player crosses off one of the bonus boxes below the concession grid and gains its benefit. This may include extra money, a free bet, marking off a helmet or jersey and moving a horse forward or backward. It should be noted that a horse cannot be moved across the finish line this way or in fact moved backwards across it either.
    • Helmet: The player may mark off the helmet for the horse that matches the result on the horse die.
      As mentioned above, this allows the player to still place bets on a horse past the no be line.
    • Jersey: A player may mark off the jersey on a horse that matches the result on the horse die.
      When a horse's jersey is marked off, the player may also mark off another horse on that horse's secondary movement bar. This means there will be more secondary movement when that horse is moved again.
      Additionally; when both the helmet and jersey for a horse has been marked off, the player gains extra cash at the game end.
  • Additional rules: There are some additional rules that can apply during the game.
    • Horse ability: Each horse has a special ability which can be applied during the game. However, only the owner of a horse has access to this ability and choose when and whether to trigger it - although some abilities will have specific timing.
    • Horseshoes: If at any time a player cannot take an action because of the result on the horse die (Because they've taken all the available options for that horse I guess.), then they can cross off a horseshoe to use it as a wild result. This allows them to mark off something for any other horse.
      If all 3 horseshoes are marked off when the player cannot take an action, then they spend their action to clear a mark off of one of their horseshoes.
  • End of round: Once all players have taken their action in turn order, the round is over.
    The die are passed to the player on the left of the current first player who now becomes the new first play. They begin a new round by rolling the die.

Endgame
Once the third horse has crossed the finishing line and been placed on it's finishing spot, the end game is triggered, the current round is completed and the game then goes to scoring or winnings. There are numerous ways to accumulate cash.
  • Finishing place: The owner of a horse earns cash according to its finishing position. This of course only applies to horses that finished 1st-3rd and will earn $15-$35 accordingly.
  • Bets: Players now calculate their winnings from bets from each horse they bet on, this will depend on where the horse finished and how much was bet on it.
    1st - 3rd place: Multiply the bet placed on a horse by its finishing odds.
    E.g., if a horse came in 2nd place and had 2nd place odds of 4/1 and the player had placed a bet of $6, then that horse pays out 4x6; $24.
    No bet line: If a horse has crossed the no bet line but not the finish line, it pays out at 1/1, i.e., the player gets back what they bet.
    Other horses: If a horse has not crossed the no bet line, then the player has lost their bet.
  • Sets: Each matching set of helmet and jersey for a horse that a player has will earn them $5.
  • Cash: Any unspent cash is counted.
  • Abilities: Some horse abilities may also money.

Cash is tallied, highest value wins.


Overall
With it's colourful presentation, Long Shot: The Dice Game fits its theme well. Players will be putting bets on horses, then watching and hoping those horses win.

While there are various ways to accumulate cash (Buying horse that win! Getting sets and completing concession lines.). Probably the single biggest method for gaining money is betting. 
There's more to it of course, since players will also have the opportunity to influence the outcome at least to some degree. This means they need to balance their actions between betting and other options.

The game provides various avenues to achieving this. Chief amongst these I think, is the secondary movement bar. A player can pick a horse bet on early and heavily, then spend actions marking its number off other horses' secondary bars. This means that the picked horse will move more often when other horses do so.
Players can also cross off lines on their concession grid to move horses (Or gain other benefits.).
Using helmets in conjunction with the no bet line can provide an alternative way to score big wins on bets. Players can spread their bets and hope to get bets several top 3 finishing horses. and getting helmets for horses is useful here. It allows players to bid on horses right up until their on the finish line and the finishing order is more apparent.
One last thing to mention is the odds, the lower numbered horses on the inside of the track have to move less to pass the finish line, this is reflected in the odds, which are shorter for these horses.
The number 8 horse (The titular ling shot.) pays out more or less twice as much as the number 1 horse for finishing in the top 3.
The provides some asymmetrical opportunities for players and real risk-and-reward mechanics to choose from.

While actions other than betting will probably pay out less, it's unwise to ignore them. They are still a source of money, useful benefits and influence over the game.

There's also a higher level of play going on; all information is open and it's possible to try and anticipate what other players are trying to achieve. If it seems like another player is betting heavily on a horse for example, other players may also bet on that horse to 'piggy-back' off its success.

Long Shot: The Dice Game is a fairly light game that is easily understood and accessible with a theme most people will find relatable. Although, it has to be said that luck and dice rolls can play a big part here; which to be fair, feel appropriate for a game about betting on horse racing.
I'm sure that the gambling theme and luck driven gameplay wont appeal to everyone but treat the game as just some fun and not to be taken too seriously (Much like actual gambling I would suppose.), then you'll probably have a good time.

I found it to be a lightweight but enjoyable experience.
0 Comments

Welcome To... - First Play!

25/6/2022

0 Comments

 
23rd June 2022

It's a Thursday evening and we're in Aldershot for some gaming goodness!

Welcome to the jungle, we got fun and games
We got everything you want, honey, we know the names
We are the people that can find whatever you may need
If you got the money, honey, we got your disease


OK, Welcome To... isn't a game about Guns N' Roses or in fact jungles. It's full name is 'Welcome to... your perfect home' and it's about suburban planning - and that's just as equally as glamorous!

What's in a game?
  • ​Player sheets: The top half of these sheets depicts a pleasant looking leafy suburb with 3 rows of residential streets of slightly varying length. Along these streets are fencing markers between properties while some of the homes have pools. Additionally, alongside each row is a tracker for 'parks'.
    The bottom half of the sheet is filled with trackers for the various different ways of scoring VPs,, importantly, it also tracks building permit refusals.
  • Construction cards: These are double sided cards, one side shows a house porch along with their street number ranging from 1-15, these numbers are not evenly distributed and the extreme numbers, e.g., 1, 2, 14 & 15 occur less often on the cards.
    ​The other side of each card shows an icon related to one of the game's actions or effects.
  • City plan cards: These provide additional scoring objectives for the game and are further subdivided into 3 types. They are based on creating housing estates of the specified size.

​The player sheets come in a pad of 100 pages and thus are used up over games, although they will probably last a long time. Now, this is only a personal gripe of mine but I'd rather have a handful of dry erase sheets instead. There's something unsettling about having your game slowly but inevitably eroded. Would dry erase sheets cost so much more?
The cards are the average quality you'd expect from a modern game.
Finally, I will add that the game does not come with any pencils or pens which feels a bit like an omission to me

The game has a subtle 50's Americana aesthetic to it's art direction, since there isn't a great variety of art used throughout the game, it's not immediately apparent (Other than on the cover!). Artwork on the construction cards are essentially a variation on a theme.
Having said that, the art that is used is attractive enough and looks good to me.

The game uses iconography for its 6 effects and also to convey information on the city plan cards. None of it is hard to learn and won't pose an obstacle.


How's it play?
Setup
  • Players: give each player a blank sheet.
  • City plans: Sort the city plans into their relevant types, then shuffle each type and draw 1 card from each. This gives players a variety of 3 extra scoring opportunities or goals.
  • Construction cards: Shuffle all the construction cards, then deal them into 3 decks in a line with the house number side face-up.

On to play
In Welcome To... players are attempting to create the best neighbourhood with their urban planning skills by creating houses and housing estates.
Welcome To.. does not use a traditional turn order, since players do not influence each other, all players' actions are resolved simultaneously.
In each turn, the following actions are performed.
  • Flip construction cards: 1 card from each of the 3 decks is flipped over and placed adjacent to the deck it came from.
    Thus, there will be 6 cards showing - 2 lines of 3 cards. One line shows house numbers and its adjacent line shows effects.
  • Choose combination: Now each player chooses 1 pair of cards from the 3 available pairs, that is 1 house number card and its adjacent effect card. Players cannot choose 2 house numbers or 2 effects cards, nor can they take from different pairs.
    Once a pair has been chosen, the player must write down the house number and resolve the effect.
  • Write house number: The player must write down the house number they chose in one of their available empty houses with the following restrictions.
    • Sequential: Numbers can be written anywhere along a street, however the numbers must always be sequential. E.g., numbers must go from left-to-right and increase in value.
      Gaps: It's perfectly acceptable to leave 1 or more spaces between houses. A player can put a '1' in the first house in a street, leave the on house on the right empty and place a '5' in the third house.
      Skipping numbers: It's also acceptable to skip numbers, using the numbers above it would be fine to put the '5' in the 2nd house on the right directly to the '1' in the first house.
      So long as the numbers always remain sequential it is acceptable. Obviously there are some risks inherent with some of the choices players will have to make but more on this below.
      Can't use a house number: If a player cannot use any 3 of the currently available house numbers, they cross off a box on their building permit refusal tracker.
    • Effects: Now players may resolve the effects that they've chosen. There are 6 effects. When used, most effects will result in something being crossed off in the score tracker in the lower half of the player sheet.
      • Bis: This effect allows the player duplicate a house's number on a empty space house directly adjacent, furthermore this can be done with a house multiple times. However, use of this effect will cost VPs at the game end.
      • Landscaper: This effect allows the player to create parks in the same street where they placed their house number, allowing them to cross off boxes on that street's park tracker.
      • Pool Manufacturer: If the player puts their house number into a house with a pool, that house will gain a pool, allowing the player to cross of a box on the pools scoring tracker and earning VPs at the game end.
      • Real estate agent: This effect allows players to cross off spaces in the housing estate tracker and increases the VP value of each completed housing estate (See below for more on housing estates.).
      • Surveyor: With this effect, the player may put fences between 2 houses. 
        Estates: When 2 fences have been put into a row AND all the houses between those 2 fences have been numbered, it is considered a completed housing estate, housing estates can contain 1-6 houses.
      • Temp Agency: This effect allows the player to alter the house number they are about to use by 1 or 2, thus increasing the range of numbers to 0-17.
    • City plans: If a player creates all the necessary housing estates to fulfil a city plan, then it is scored on their player sheet. The first player to fulfil a city plan earns the larger VP score, all subsequent players score the lesser VP value.
    • End of turn: Once all players have resolved their house number and associated effect, the turn is over. The 3 construction cards showing house numbers are flipped over on to the effects cards, thus revealing 2 new house numbers while their other sides now show 3 new effects.
      Then a new turn begins.

Endgame
There 3 criteria by which the game can end.
  • Once the 3rd box on any player's building permit refusal tracker is crossed off.
  • If any player completes all 3 city plan objectives.
  • If any player has numbered all house in all 3 rows on their player sheet.
Following this, the game goes into scoring.
There are a large number of scoring methods in Welcome To... and may come from:
generally, the first un-crossed off value is the score for that particular tracker.
  • City plans: The combined VP of any city plans a player completed are scored.
  • ​Parks: The combined score from all 3 park trackers.
  • Pools: The score from the pools tracker
  • Temp agency: This is a little different. Whoever has ticked off the most temp agency boxes will score 7 VPs, the player with the 2nd highest amount earns 4 VPs and 3rd place earns 1 VP.
  • Housing estates: Ok, this is a little complex.
    At the basic level a housing estate has a VP value equal to it's size, so will range from 1-6 VPs each.
    However, crossing off spaces in columns in the housing estate tracker will increase the value of those sized estates.
    Thus, crossing off a box in the 'size 1 estates' column increases the value of each  size 1 estate from 1 to 3. Crossing off all the boxes in the size 6 estates column increases the value of each 6 point estate to 12.
Additional, they are 2 trackers which deduct VPs.
  • Bis: Each time a bis effect is used, it will cost VPs.
  • Building permit refusal: Each box crossed off will cost VPs.

Points are tallied, highest score wins.


Overall
Welcome To... is a fairly easy to learn game that has a brisk playtime that does not outstay it's welcome (SIC), having said that though, it can end very quickly if the wrong numbers come up at the wrong time!

The game provides players some meaningful, interesting decisions to make, this is because there are '2' axis of decision making at work here - house numbers and effects.
If the game only utilised house numbers, then it would be too straightforward but by pairing them with effects, it provides intriguing propositions.
Players will frequently find themselves in situations where they will want to use a certain effect but don't want the associated house number or possibly, having to think about choosing an effect that won't benefit them in order to a house number they want. 

Players will need to adapt and make use of what they're given to work with, find ways to exploit the effects they've had to use and make them work.

In the case of house numbers, quite often this will mean taking house numbers that are not immediately useful and putting them into one of the streets.
This can present various problems for players.
Leaving too small a numerical gap between houses can be risky because only specific numbers can go there. E.g., having a 7, then a gap, then a 9 means only a 8 will fit in the gap later on.
Conversely, leaving too big a gap will mean wasting numbers. Having a 7, then a gap and then a 12 means that most of the numbers in the 8-11 range will be locked out and cannot be used elsewhere in that street anymore.

This is the classic dilemma players face in a lot of roll and write style games: Having to try and plan ahead, hoping what you need will come up at some point later on the game. It's essentially a bit of gamble. 
In this regard, it's something Welcome Too.. does very well and is a solid entry in the roll and write (Or flip and write if you really want to be pedantic.) genre.

It means that if this style of game is not your thing, you probably won't like Welcome To.. but if roll and write games are you thing, Welcome To... is definitely worth a try.
0 Comments

Boomerang: USA - First Play!

15/4/2022

0 Comments

 
15th April 2022

It's a Friday and we're logged into Board Game Arena for some afternoon gaming.

​Take a road trip across America, visit the landmarks, go wildlife spotting, play some sports, end where you started? Send a postcard (Or write a letter from America.), walk 500 miles, maybe walk 500 more...
OK, enough of the tenuous references. 
​Boomerang: USA combines set collecting and roll and write mechanics into a point salad of a scoring game.

Caveat: We've only ever played Boomerang: USA digitally.

What's in a game?
  • Score sheet: This shows a map of the continental United States and a network of connections between 28 different cities or tourist location from coast-to-coast and which are labelled A-Z (With @ and # making up the last 2.). The locations are divided into 7 regions of 4 cities each.
    The sheet also features various boxes for scoring, mostly on the right side.
  • Cards: There are 28 cards in Boomerang: USA which as you would imagine is 1 for each location on the score sheet. Each card also features some artwork representing that city or landmark.
    Throw number: In the top left of each card is it's 'throw number' which ranges from 1-7. More on throw numbers below.
    Sets: Each card will have 2 icons pertinent to 2 of the game's sets.
    Landmark: This will be a letter/symbol that represents that city/landmark and matches it's location on the score sheet.

The only artwork in the game appears on the 28 cards and is obviously referencing the locations the cards represent. It's pretty artwork too, with blue skies and bright colours.

Using letters/symbols for cities is a smart move and easily understood. Boomerang: USA makes use of 4 types of sets to collect and each set will feature its own range of icons, it means that the game has a fairly large array of icons. Luckily, it's clear which icons belong to which set and players don't need to reference a rulebook to know what they mean since the game is about matching icons in their respective sets.

How's it play?
Boomerang: USA is played over 4 rounds and uses a drafting mechanic where players pick a card from their hand and then passes the remaining cards to their left, then all chosen cards are revealed (Or not for the first card.) simultaneously. This continues until all cards have been selected and players have acquired 7 cards.
  • Setup: Shuffle the cards into a face-down deck and deal 7 to each player. Each player should also have a scoring sheet.
  • Drafting: Player's should pick 1 card from their available hand and put it face-down in their playing area, then pass the remaining cards to the player on their left.
    Throw card: The very first card a player selects will be their throw card and is kept face-down until scoring at the end of the round.
    Throw cards are scored as normal but also feature own scoring (Using the throw number no less.).
    Reveal card: The remainder of cards picked during the round are placed face-up. Cards are not actioned until all cards have been picked by players.
    Catch card: The last card a player gets (The one they have no choice about.) is their catch card. As the name implies, this relates to their throw card.
    Once all cards have been played, the game goes to scoring.
  • Scoring: Boomerang: USA is a set collecting game with a variety of scoring methods which differ from set to set.
    • Boomerang!: Each player reveals their throw card.
      Then the throw value on their throw card is compared with the throw value on their catch card.
      If the catch card has a equal or higher value than the throw card, they score VPs equal to their throw card.
      Throw, catch, boomerang, geddit!
    • Cities/locations: Players score 1 VP for each location they visit and should mark it off on their score sheet. Players only ever get 1 VP per location.
      There is also additional scoring for locations as follows:
      • Coast-to-coast: When a player visits adjacent locations as per the connections depicted on the score sheet, they should draw a line between the adjacent locations.
        The first player to connect the east coast to the west coast scores 7 VPs, other players can also score coast-to-coast but with diminishing VPs.
      • Regions: On the score sheet, each of the 7 regions contains 4 locations. The first player to visit all 4 in a region scores a bonus 3 VP. Only 1 player can score per region.
    • Americana: Players score for sets of Americana symbols here with slices of American life such as baseball, American football and mom's apple pie, OK, there's no apple pie but you get the idea.
      Scoring Americana is initially easy, each Americana icon is worth a certain number of points, they are all combined to get a score for that round.
      Next Round: The catch with scoring Americana points is that in the following round, the Americana score must be higher than the previous round, otherwise the score is set to 0!
    • Wildlife: There are various types of wildlife worth differing amounts of VPs and players score for each pair of matching animal icons they collect.
    • Activities: There are 4 different types of activity, such as hiking or dining. Players choose any one type only to score in a round, the more cards they've collected of the chosen type, the more they score. So 3 hiking symbols would score 4 VPs but 4 dining symbols would score 7 VPs.
      Once per game: The catch with scoring activities is that each activity can only be scored once per game, so it's one and done and since there's 4 rounds, there will be opportunity to score all 4 activities.
  • Next round: Once all cards have been scored, play progresses to the next round: All cards are put back into a deck, shuffled and dealt out again in preparation for drafting again.

Endgame
Once the 4th round is completed and scored, players then total their final score from across all 4 rounds.

Points are tallied, highest score wins.

Overall
​On a basic level, Boomerang: USA is a straightforward drafting game. It's point salad of scoring mechanics makes the game complex, most of the blog above talks about the 7 ways to score VPs.
Some of the scoring methods have pretty standard elements, collecting matching pairs or 1 kind of set are common, however, restrictions on how these are scored, particularly for Americana activities add an unusual twist.
The throw and catch mechanic is the standout here, presenting players with a clear risk and reward choice right at the start of a round especially when this is when they'll have all 7 cards to choose from.
Play a 1 as the throw card and it's guaranteed to score but is only worth 1 VP.  Playing a 7 as the throw card earns 7 VPS but requires a 7 as the catch card; since player have no control over what their last card will be it's a risky proposition. 

Typical for a game of this type, it's more or less impossible to score well in all categories at the same and the dilemma of what a player should prioritise is what drives the gameplay.
Should a player concentrate on getting locations and regions (Which are another type of set really.) over other sets?
Is it a good idea to have a steadily increasing Americana score over round, or go high then score 0 to score high again?
When is a good time to try and get a good score in a particular activity?
A lot of this will be contextual or unpredictable, it's the nature of this kind of drafting game. Players will probably start a round with no clear direction and will need to adapt to a strategy and recognise what to prioritise as it emerges from whatever cards they pick.

There's also a higher level of play where players can watch their opponents to try and gauge what they're concentrating on and deny it to them: If it looks like an opponent is trying to complete coast-to-coast, a player might chose and play a card with the location needed themselves in order to deny that other player.
Although I'm not sure that denial tactics are that effective though, it's entirely possible blocking a opponent will involve blocking yourself as well.

I felt like the travelling, roll and write element was a bit out of place here, adding extra layers of what seem like unnecessary complexity the game. So while the game has depth thanks to all these scoring opportunities, it actually felt like it was perhaps a little detrimental to the experience, increasing thinking time and inducing some analysis-paralysis as a consequence.

Otherwise I can't really find fault with Boomerang: USA, it's not a bad game by any stretch, it just somehow didn't appeal and seemed a little unengaging. Maybe the theme of being a tourist did quite gel with me?
I feel that there are other mechanically similar games that are a little more accessible and quicker to play.
Obviously, YMMV, a fan of card drafting games who plays them often might find the roll and write part of Boomerang: USA a fresh take in the category.
0 Comments

Can't Stop Express

24/1/2022

0 Comments

 
24th January 2022

It's time for some impromptu Monday gaming in lieu of Sunday and we're logged into Board Game Arena.

Can't Stop Express is the roll & write cousin to the excellent push-your-luck dice game; Cant' Stop.

Caveat: We have only ever played this game digitally.

What's in a game?
  • Dice: Can't Stop Express comes with 5 six-siders, which is 1 more than Can't Stop, so something is definitely different.
  • Scorecard: Each player gets their own scorecard which is a sheet full of checkboxes and looks suspiciously like a spreadsheet.
    In essence there are 11 rows numbered 2-12 (For each potential result from rolling 2 six-siders.) and each row has 10 checkboxes, 4 in 'negative', 1 in 'neutral' and 5 in 'positive.
    Each row also has a 'scoring value', this varies according to how likely that number is to come up on a roll of 2 six-siders; the rarer the number, the higher the value. The extremes 2 and 12 are worth 100 VP per positive checkmark, while the most common result 7, is only worth 30 VP per positive checkmark.
    Finally, there's another 3 rows of 8 checkboxes for tracking the 5th die.

And that's it!, Can't Stop Express is a very minimal game and that applies to all of it. I can't comment on the quality of the components, there's no art to speak of in the game and no iconography either.

How's it play?
Give each player a scorecard and you're ready to go.

​Can't Stop Express has in one regard a similar mechanic to Can't Stop, which is that after every dice roll, players are putting together 2 sets of 2 dice, the 5th die has a different role (Sic). Where Can't Stop Express differs is that once the dice are rolled, the results are used by all players simultaneously.
  • Roll the dice: Once the dice have been rolled, everybody performs the following 2 actions:
  • Assign pairs: All players create 2 sets of dice that will create 2 numbers from 2-12. Then, on their scorecard, all players mark off checkboxes for those numbers (Going from left-to-right.). If a player has a 4 and a 9, they would mark off the leftmost empty checkboxes on the rows for 4 and 9.
  • 5th die: So what does the 5th die do? After assigning the 2 pairs, the player must​ assign the value of 5th die to one of the 3 rows in the 5th die area of the scorecard and mark off a checkbox. So if the 5th die was a 6, the player would write '6' in one of the rows and mark off the first checkbox.
  • Next roll: When all players have finished assigning all their dice, the game then proceeds to the next roll and players again assign 2 sets of dice to their scorecard.
    Once again the player will need to assign the 5th die, except now it must be to one of the 2 remaining 5th die rows. This number must have a different value to the number they previously assigned, using the example above, the player must assign a value different to 6 (And mark off a checkbox.).
    After the third roll, a final unique number will be assigned to the last row. Now that 3 numbers have been to the 5th die rows, a new rule comes into play when the dice are rolled.
  • 5th die restriction: From now on, whenever a player chooses which dice to assign to the 2 sets, the value of the remaining 5th die must match 1 of the 3 numbers in the 5th die rows. This means it's likely that players will not always get to choose all the dice they want for their sets because a die may be needed for it's 5th die row instead. Furthermore, every time a value is assigned to the 5th row, one of its checkboxes is marked off.
    If none of the dice match any of the 3 numbers in the rows, then they is no need to assign a 5th die.
  • Scoring: There are 3 types of checkboxes in each scoring row, negative, neutral and positive, they are always marked off from left-to-right. This means starting with the 4 negative boxes which must be marked off before the neutral, which must be marked off before the positive boxes.
    Negative: Even a single marked off checkbox here reduces that row's score to -200, that's right -200! This doesn't change until after all 4 negative boxes are marked off.
    Neutral: Once all 4 negative boxes are filled, then the 5th box, i.e. the neutral checkbox can be marked off. This takes the row's score up to 0! Bargain!
    Positive: Finally, when a player gets to the positive checkboxes, each one marked off scores that row's scoring value. Each marked off positive checkbox in the 2 row would score 100 and each one in the 7 row would score 30! Bonus - literally!
    Each row has 5 positive checkboxes, so the maximum the 7 row can score is 150, any dice assigned to a maxed row add nothing to the score.
Play progresses with the dice being rolled and assigned until the endgame is reached.

Endgame
When a player fills the 8th and final checkbox in any one of their 5th die rows, then they stop scoring and the game is over for them.
Once all players can no longer score dice, the game is over and players calculate their scores for all scoring rows, rows that have no boxes checked off score 0.

Points are tallied, highest score wins.

Picture
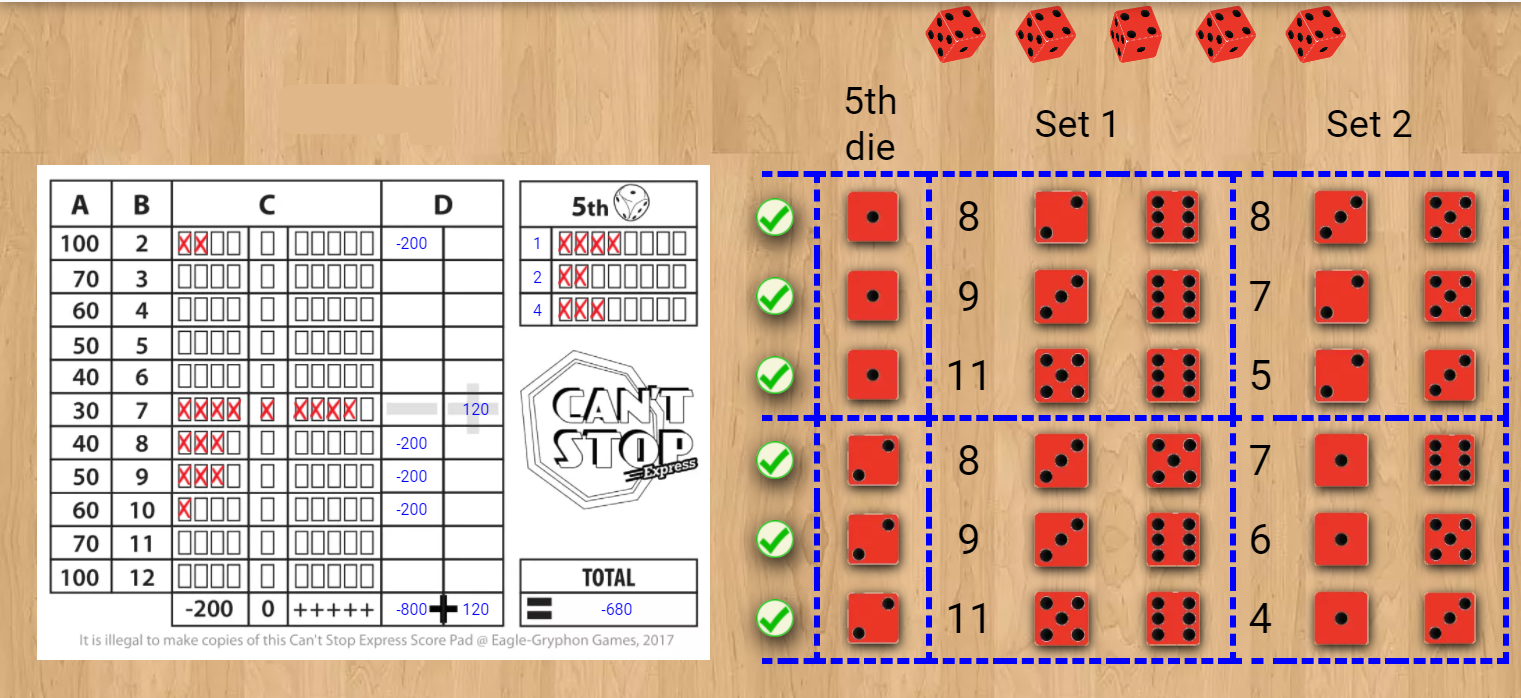
Mmm.... spreadsheets!

Overall
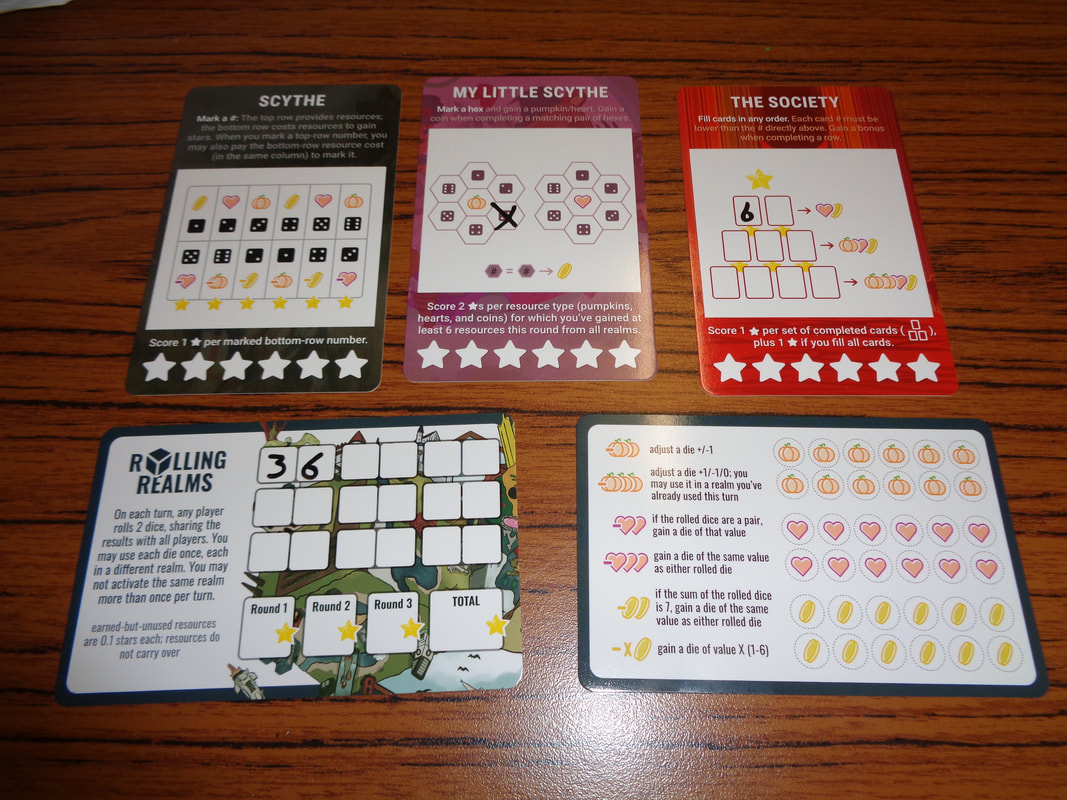
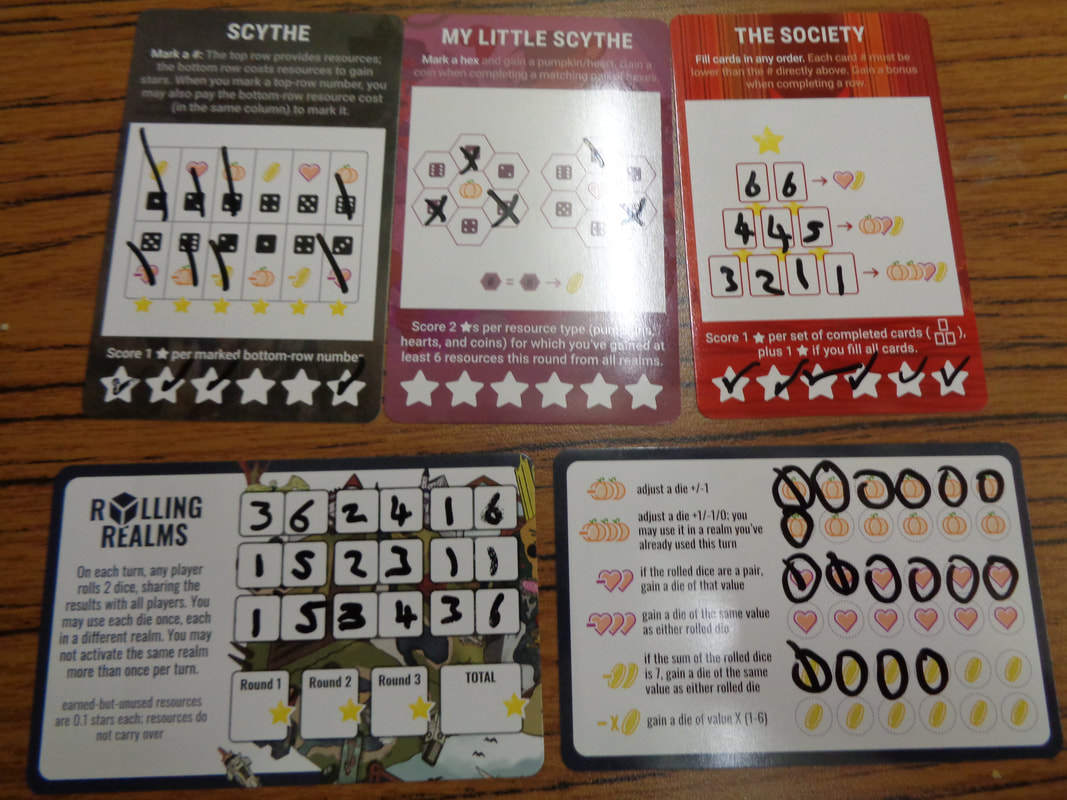
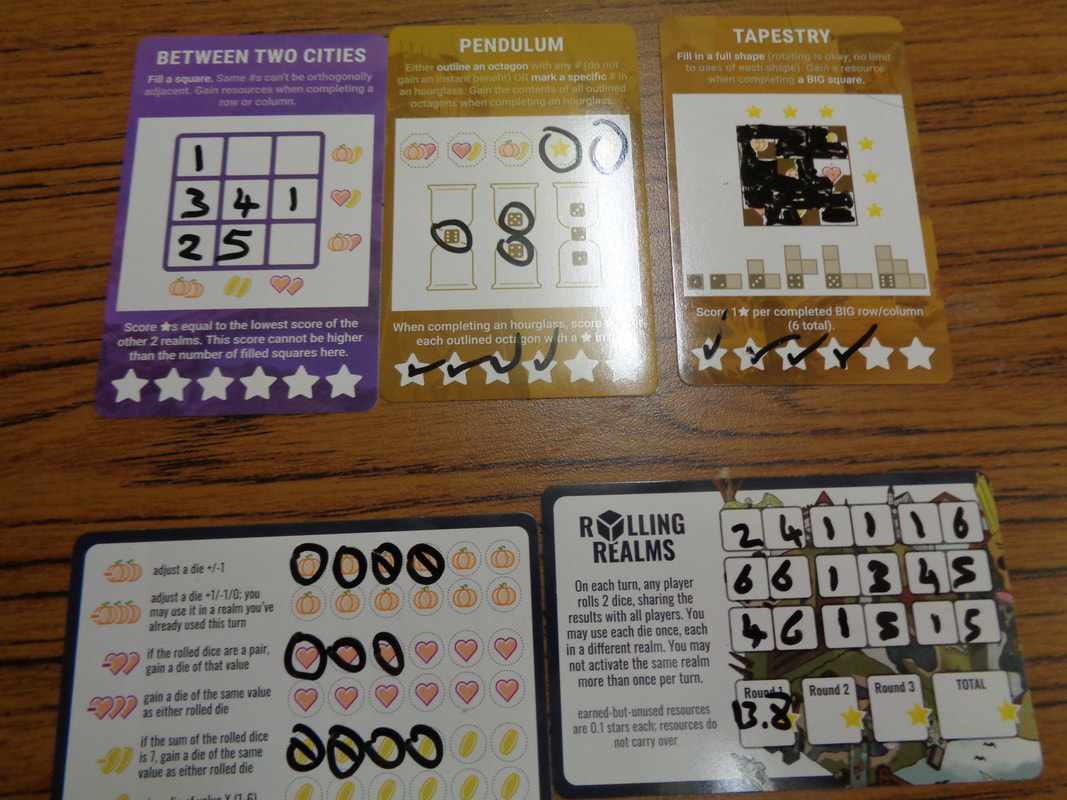
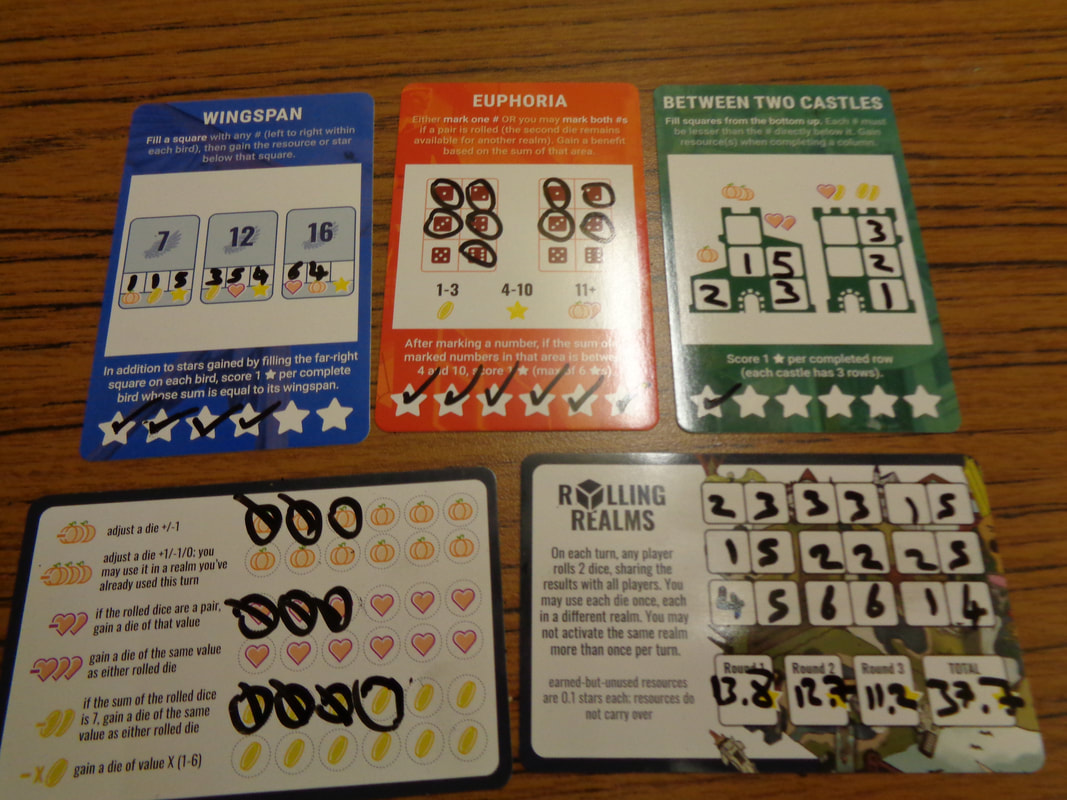
One thing I found interesting about Can't Stop Express is how it twists the paradigm of Can't Stop.

In Can't Stop, the objective is to reach the top of any 3 tracks using the results of the dice rolls, which tracks are used is unimportant; they all score a point each. Since it's much easier to get a 7 than a 2, this is balanced out by needing to get many more 7s to reach the top than you would for 2s.
The points have equal value but getting them requires varying numbers of dice results depending on the number.

In Can't Stop Express players are also trying to move along tracks but it is changed around. To reach a scoring position for both 2 and 7 requires getting the same number of pertinent results, either six 2s or 7s, but in Can't Stop Express, they score differently.
Six 7s will score 30 but six 2s will score 100 and in fact seven 2's would more than all ten 7 results.
The dice results required for each track to score are equal but they score varying amounts depending on the number.

Anyway, talk about mechanics aside, I found Can't Stop Express to be a bit of a middling game.
I like how it shares a concept with Can't Stop of setting aside 2 sets of 2 dice and it probably plays a little quicker. There's no going bust, so no 'wasted' rolls - at least in theory. Luck can mess with players in Can't Stop Express, just in a different way!
The push-your-luck element works very differently here, there are no extra dice rolls to make here. Instead players will need to judge which rows to try and fill out and it's in the planning where players push their luck, when a player decides to start marking off the checkboxes in a specific row, they're essentially gambling on that number reappearing again and again.
The 7 row is the safest bet but is not much of a scorer. The further away from 7 you move, the greater the rewards but also riskier it is to fill out 6 or more checkboxes.

​In terms of what I don't like Can't Stop Express is a game completely lacking in theme and feels a little dry (Although to be honest Can't Stop's mountain climbing theme is paper thin.).
My biggest bugbear though is the scoring; those first 4 checkboxes that penalise players 200 VPs, occasionally being forced to mark off checkboxes in rows you don't want to and watching your score drop by hundred of points can be very frustrating.
I know why it's there, it replaces drawback of going bust from Can't Stop, even so, it makes the game feel negative and I'm not fond of it.

I don't think Can't Stop Express is a bad game, mechanically speaking it's pretty solid but it lacks the extra bit of thrill that comes with deciding to re-roll the dice from Can't Stop and doesn't really bring anything new or different to the table.
I'd have no issue with playing Can't Stop Express more times but if given the choice between this and Can't Stop, I'd pick the latter every time.
0 Comments

Rolling Realms

15/1/2022

0 Comments

 
15th January 2022

The Wogglecon day of gaming continued with Rolling Realms.

They see me rollin'
They hatin'
Patrollin' and tryna catch me ridin' dirty

OK, Rolling Realms isn't about rapping but it is about rolling and is a quirky little roll-and-write mini-game collection.

What's in a game?
  • Realm cards: These are mini-game cards, there are 6 sets of 11 identical cards in different player colours.
    Each mini-game references a game already released by the publisher such as the Wingspan mini-game which loosely emulates the 3 habitat tracks from Wingspan. 
    Each card has a different layout and is played and scored differently and will provide resources and VPs in their own way.
    Along the bottom of each realm card is a row of 6 stars which translate into VPS.

  • ​Dice: Rolling Realms wouldn't be much of a roll & write game without something to roll. The game makes use of pair of normal six-siders which are slightly oversized and chunky with distinct hexagonal pips, the dice feel weighty and satisfying to roll.
  • Resource tracker cards: There is 1 in each player colour and they are used to track the game's 3 sets of resources; peaches, hearts and coins.
  • Score/dice tracker cards: Again there is 1 in each player colour. It contains 9 sets of 2 squares to track dice rolls and along the bottom are 3 squares to track scoring and a end square to track the final score
That's pretty much it for components other than pens and wipe-cloths.

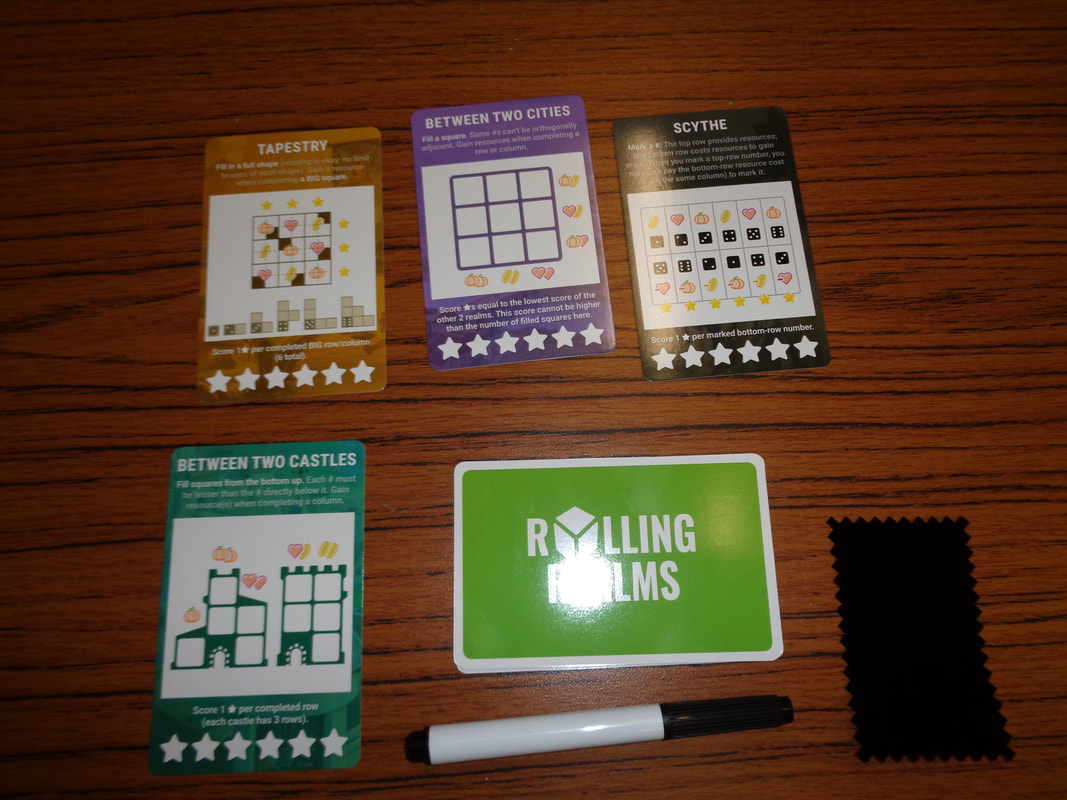
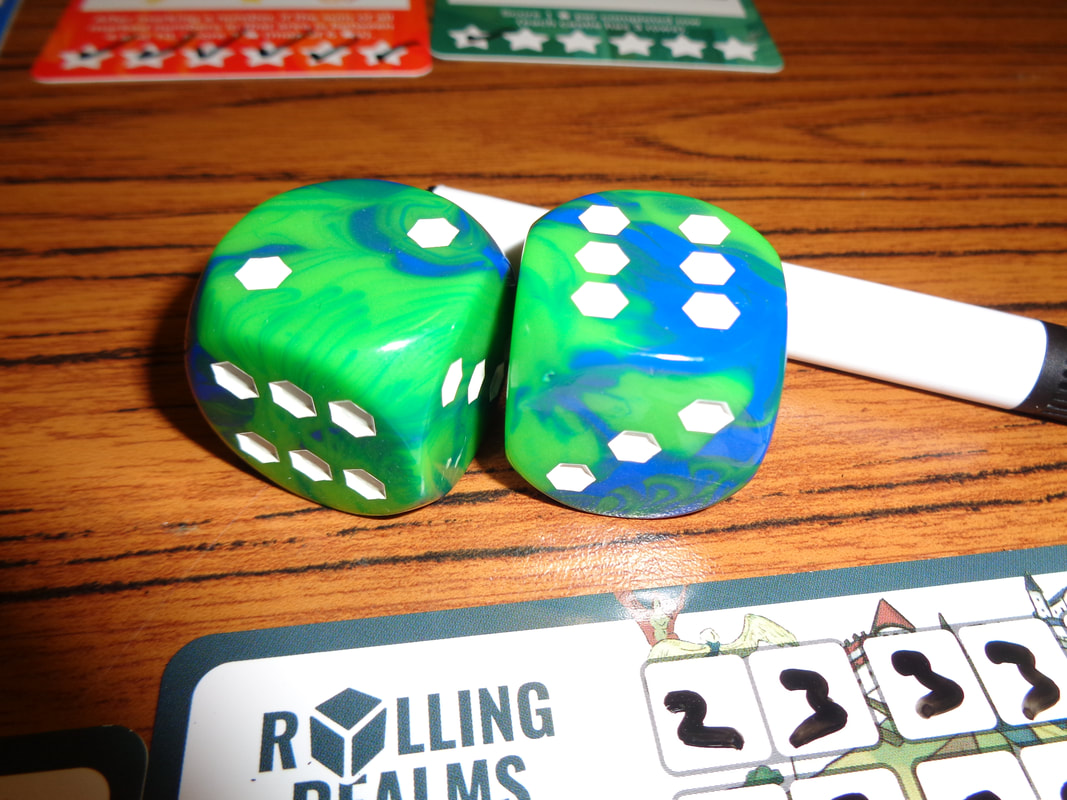
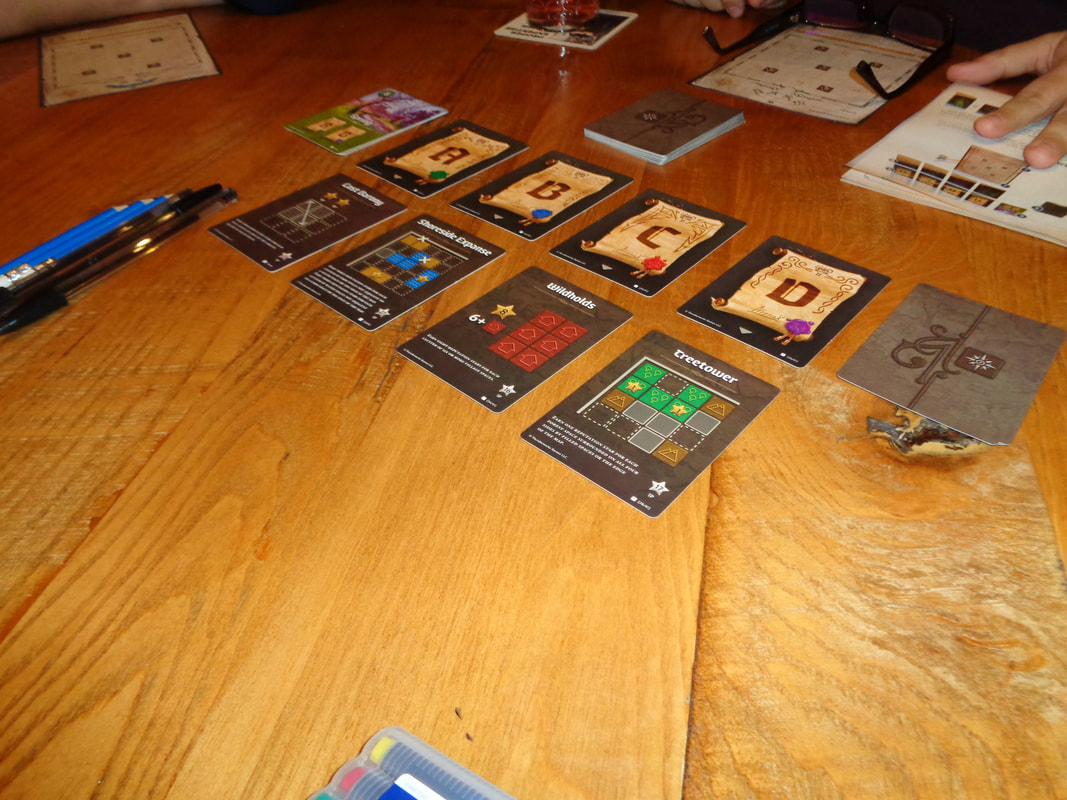
All the cards in the game feel reasonably sturdy especially since they're laminated. 
The dice are definitely a nice touch and have been manufactured with rounded corners, they're about as good as non-wooden dice can get.

Rolling Realms features almost no art except some stylistically simplistic illustrations on a few cards, which is fine as otherwise it would probably interfere with whole roll & write thing.

The game's core iconography which appears across all cards is easily comprehensible, however, each individual mini-game is likely to contain its own unique icons which must all be learned.


How's it play?
Setup
  • Cards: Give each player the realm cards, score and resource tracking cards in their colour. All players should set out the scoring and resource cards in their personal playing areas.
  • Prepare realms: Select a player to shuffle their realm cards into a face-down deck, draw 3 and put them out. Put the remaining realm cards aside as they will be used in later rounds
    All other players should find the same realm cards and place them out.
  • Dice: Choose a player to roll the first set of dice.

On to play
Rolling Realms is played over 3 rounds and each round consists of 9 turns, which means 9 sets of dice are rolled each round, there is no turn order in the normal sense and players resolve their choices simultaneously.
  • Roll the dice: The 2 dice are rolled and each should record the result as individual results on their score tracker, a result '3' & '5' should be written as '3' & '5' on the tracker.
  • Resolve dice: Players then apply the dice to the mini-games as they see fit, with the following restriction.
    Each die can only be used once and each realm can only be activated once: Thus 2 realms will be activated once per turn. Although the expenditure of resources can change this. Once all players have finished their actions, play progresses to the next turn.
  • Use resources: A player may spend the resources they've accumulated at any time.
    Peaches: These resources allow players to modify the result of a die up or down. They may also be spent to allow a die to be used on a realm that's already been activated, thus allowing 2 dice to be used in a single realm in a single turn.
    Hearts: Spending these resources allows a player to duplicate a die result that has been rolled, giving them an extra die to use in the realm they haven't activated.
    Coins: Coins can also be used to gain a 3rd die, its value is equal to the coins spent.
  • Next roll: The dice are rolled again and players record the results again, then they choose how to use the dice again.
  • End of round: Play progresses on until all 9 turns have been completed and scores are then calculated.
    Mini-games can score up to 6 points each, unspent resources score 0.1 VPs each. Points are then tallied in the allotted space.
  • Next round: Players wipe all their resources off their resources card, regardless of whether they were spent or not. Then the tracked dice numbers should be wiped off the score tracker, obviously the round score should not be wiped off!
    ​New cards: Next, from the unused realm cards set aside earlier, randomly draw 3 more, all other players should put out the same realm cards.
    Now we're ready to begin the next round.

Endgame
Once 3 rounds have been completed, that is 9 realm cards have been used, then the game is over. Players should calculate their results from all 3 round.
Points are tallied, highest score wins.


Overall
Rolling Realms is undeniably unique and inventive, a game about mini-games based on games that the publisher has already released. It's impressive how the mini-games generally manage to distil a game's mechanic and/or them down to a simple, related iteration and one that makes use of numbers 1 to 6!
The game comes with 11 realm cards and the publisher has released a bunch of expansions and promo cards go along with it.

Rolling Realms balances its priorities quite well and mostly makes player decisions meaningful. Players will naturally want to focus on using dice to gain VPs but neglecting resources will give them lass flexibility later on
Because the game uses a randomiser, it's hard to plan ahead, that 6 you really need to earn you those last couple of points on a card might never appear.... That means that players need a dollop of adaptability to manage unwanted numbers and that's when resources come in useful.
Particularly useful are the abilities to generate a 3rd die result, it can essentially increase your gains by 50%.

It's hard to summarise Rolling Realms because there is a lot of little things going on, but I did enjoy it, the variation provides an interesting challenge and every round brought a new set of challenges. A game that uses a lot of mini-games risks being a mixed bag and couple were a bit more obtuse than the others but there were no outright stinkers.

Having said that, it felt like a bit of a chore having to go explain 3 sets of rules to unfamiliar players each round, especially since it seems there will always be this one player who just doesn't get something.
I also felt the game sat in weird middle-ground of being a bit too long for a filler but a bit too short for a main game for the night. The box says 30 mins, but that's highly ambitious in my opens.
These are minor quibbles though.

The mini-games are reasonable light but provides enough depth and definitely variation to keep most players engaged. It's one I'd play again
0 Comments

Railroad Ink

5/7/2021

0 Comments

 
4th July 2021

It's a Sunday evening and I'm logged into Board Game Arena. the next game of the night is Railroad Ink. Do you spend a lot of time coming and going? Because that's what you'll be doing in Railroad Ink.

Caveat: we've only ever played Railroad Ink digitally online. Additionally, we've only played the basic version of Railroad Ink Blue without the rives and lakes dice.

What's in a game?
  • Game board: Railroad Ink has a game board for each player.
    Most of the game board is taken up with a 7x7 square grid, along each of the 4 outside edges of the grid are 3 exits, 12 in total and they alternate between railway lines and roads.
    Above that is some space for calculating and tracking scores.
    Up further are illustrations of all the possible results on the standard route dice.
    Finally, at the top are depictions of the game's 6 special routes. These are not actually dice that are rolled in game, but represent different types of routes and stations that a player can make use of.
  • Route dice: These six-siders don't have numbers, instead each face shows one of various different types of rail and road routes. Railroad Ink has 2 different types of route dice, 3 of one kind and 1 of the other, which makes 4 route dice in total.
    Type 1: These dice depict the following different routes that players can use on their board:
    A straight.
    A 90' turn
    A T-junction.
    They are depicted once each for both railways and roads, thus six times in total.
    Type 2: This die only has 3 symbols, each of which is printed on 2 of the die's faces. The routes depicted here are a little more specialised.
    Overpass: This allows a railway and a road to cross over each other (They do not connect.).
    Straight station: A station allows a route to change from a railway to a road or vice-versa.
    Curved station: A 90' turn that's also a station which allows transfers between railways and roads across the turn.
  • Rivers and lakes dice: These special dice can be introduced into games to add some extra complexity. We never made use of them.
That's pretty much it for the components.
Since we only played railroad Ink digitally, there's not much that can be said about the quality of the components.
Neither does the game have any significant artwork to speak of, the boards look bright and cheery, but that's about it.

Picture
An example of connections and scoring.

How's it play?
​Setup
  • Each player is given a player board and well.... that's it!
On to play
​Railroad Ink is played simultaneously by all players over 7 rounds.
  • Roll: All 4 route dice all rolled and thus 4 routes will be shown.
  • And Write: All players must draw all 4 routes on their game board according to the results of the dice roll. There are specific rules when doing this as explained below:
    Connection: At least 1 part of a route must connect to either; an exit at the edge of the grid, or a pre-existing route, this connection must be of the correct kind, i.e., rail-to-rail or road-to-road.
    When drawing the route, the dice result may be rotated into any orientation, or flipped/mirrored.
    ​Special routes: Each special route is a 4-way connection and can only be used once per game, furthermore, a player may only use 1 special route per round and total of 3 special routes in a game.
That's it for rules, pretty straightforward.

Endgame
Once all 7 rounds have been completed, the game goes to scoring.
Railway: Each player scores their single longest unbroken railway line, gaining 1 point per connected square.
Road: Each player scores their single longest unbroken road, also at 1 point per connected square.
Centre: Each of the 9 central squares on the grid scores the player an additional point for a railway or road that runs through it.

Exits: Each player scores their single biggest network of connected exits, it scores differently to railways and roads and there's a chart to calculate this. Generally each exit in the network scores 4 points, except if you manage to connect the 12th and final exit, which scores 5 instead!
Dead end: Each player loses a point for each route that is a dead-end, i.e. does not connect to anything or does not connect to the edge of the grid (does not necessarily need to be one of the 12 exits though.).
Final amounts are tallied, highest score wins!

Overall
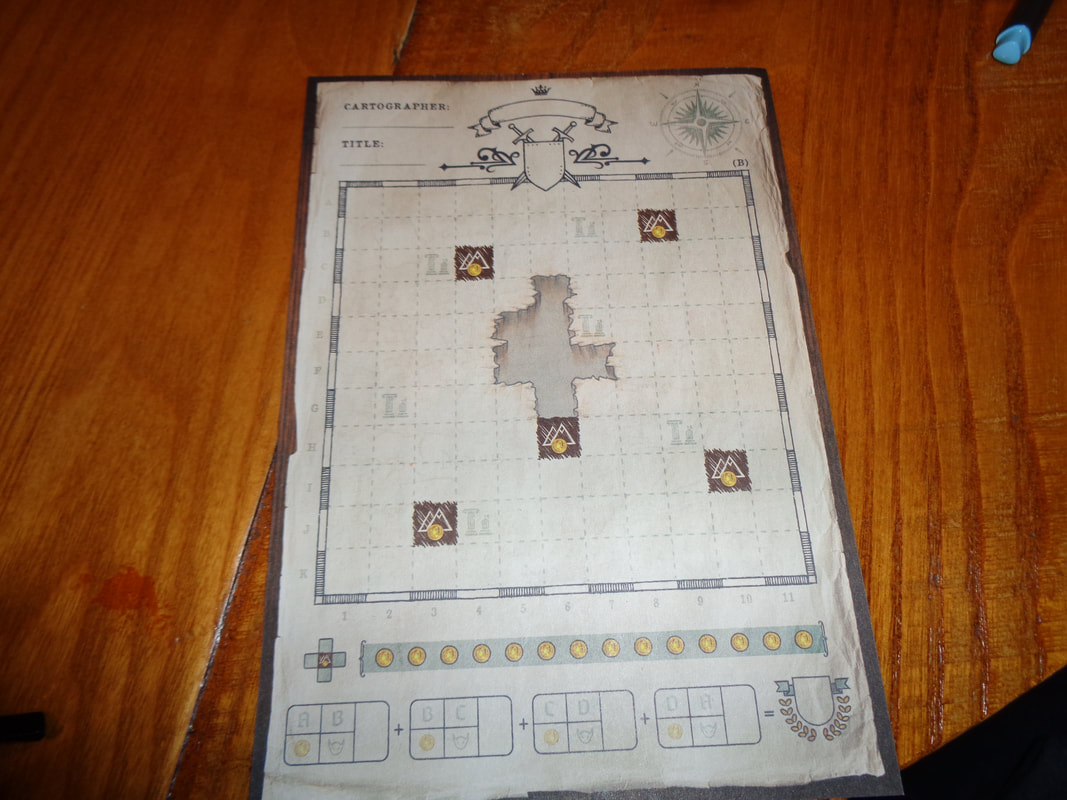
Railroad Ink is a game that hits that sweet-spot between rules-simplicity and depth-of-choice that has good potential crossover appeal to non-gamers.
From the relatively short length of this blog, you can see that it's an easy game to learn, consisting mostly of; well, drawing what you see!

However, it also gives players lots of choices, all of which will have impact right from the start of the game. The game's grid has 49 spaces and the maximum that can be filled in (In a basic game!) is 31, enough room to manoeuvre and also enough room to commit error.
Players must try to maximise networks and connections and also minimise their potential losses. This involves equally trying to anticipate what they need and also adapting to rolls that don't give them that.
It's a game of shifting optimisation.

Railroad Ink has a lot of randomness and for gamers who like strategizing, this can be an anathema, but in Railroad Ink, the randomness is partially mitigated because it more or less affects everyone equally, i.e., everyone uses the same dice results.
Obviously one player may be luckier than another if the rolls go their way, but it never feels like the dice are treating you worse for you than any other player. Ultimately, despite the dice rolls, it feels like player decisions are still of paramount, finding a way to use a route die that initially seemed bad can be satisfying and it's this blend of randomness and decision-making is what I like about Railroad Ink.
0 Comments

Cartographers

9/4/2020

0 Comments

 
17th March 2020

Tuesday has rolled around again and we're at 'The Sovereigns' with the Woking Gaming Club.

​The club members agreed that due to the threat of the Covid-19 virus, this would be the last get-together for the club until we were no longer required to socially-distance ourselves.

The first game of the evening was 'Cartographers'.
Do you fancy getting out and about, doing a bit of exploring? Perhaps finding a forest or two, or even a river? Then this game may be for you.
That's right, in these days of self isolation and being stuck at home; we played a game about going outside!

Cartographers is a style of game I've yet to play called 'roll and write'.

What's in a game?
  • Pad of blank maps: There are 100 of these blank double sided maps. One side features the wilderness and the other the wasteland, the wasteland is the harder map play with. Both sides contain a 11x11 grid with 'mountains' and 'ruins', as well as space for scoring and personalisation. The wasteland side also features an area of wasteland.

Picture
The wilderness side.
Picture
The wasteland side.

  • Season cards: There are 4 season cards for 4 seasons! Each season card determines which 2 scoring cards apply that season. A Season card also has a numerical 'time value' that determines the length of that season. 
  • Scoring cards: 4 of these are randomly drawn from a deck of 16. Each one is used to determine how scoring occurs at the end of 2 of the 4 'seasons' (Or rounds.). Thus there will be 4 ways to score during the game.
  • Edict cards: Labelled A to D, used in conjunction with scoring cards.
  • Exploration cards: Generally, each landscape card depicts 1 of the game's 4 main types of terrain. The card will also show 2 shapes a bit like Tetris shapes, sometimes one of these shapes will also a coin next to it. Some exploration cards feature a 'ruin' instead. Exploration cards also have a numerical value that is used to determine the length of a season.
  • Ambush cards: Ambush cards contain the game's 5th terrain type - monsters! Each card also contains a shape. There are 4 of ambush cards. These cards allow other players to mess with your exploration.
  • Pencils: The game comes with 4 pencils.
All of the components are of an acceptable quality. The cards are mostly covered in information, but what little art there is, is of a reasonable quality.
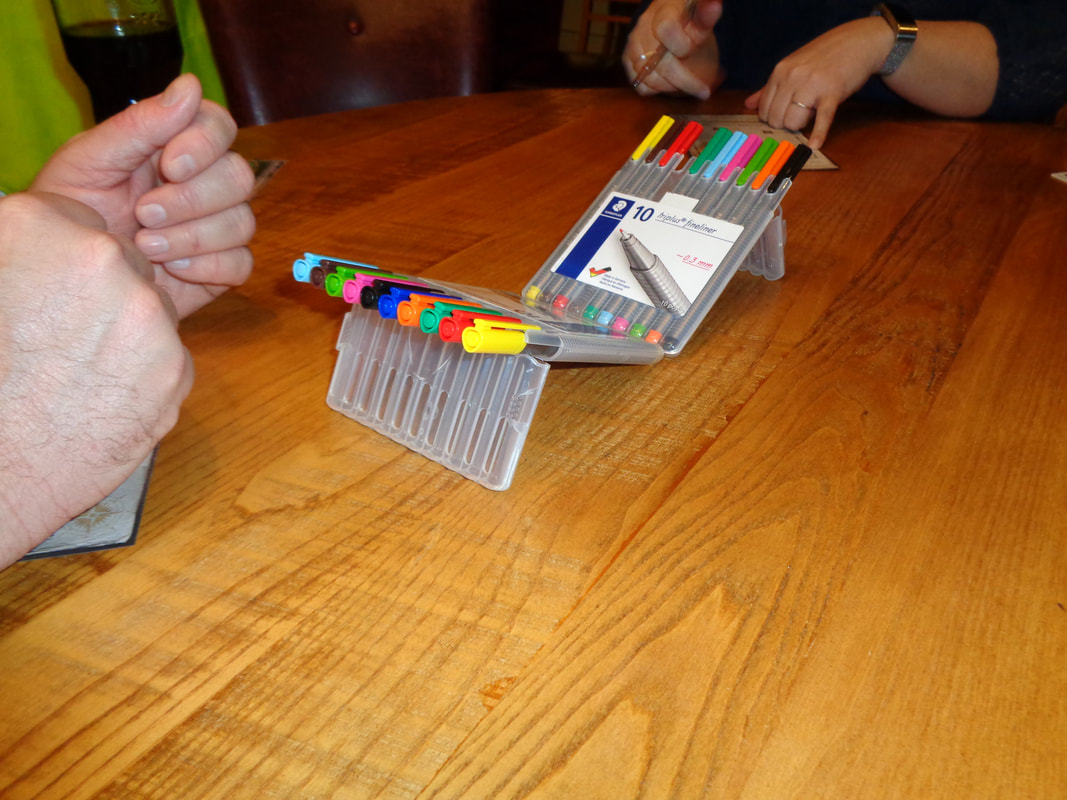
The only bugbear with the game is the pad of blank maps, which you tear out and give to each player. Even though 100 sheets enough for a lot of games, the idea of it makes me wince!
If you do run out of sheets however, you can download and print extras from the website.
​
Special note!
Dave, the game's owner had the wisdom and foresight to also purchase a couple of sets of coloured fine line markers to use with the game (More about that below.).

Picture
Edict cards and scoring cards.
Picture
Some coloured fine line marker pens.

How's it play?
First there's setup.
  • Put out the season cards in a face-up stack in seasonal order, starting with spring.
  • Put out the edict cards in a row, sequentially from 'A' to 'D'.
  • Shuffle the scoring cards and draw 4, place one under each of the edict cards. 
  • Shuffle the ambush cards, draw 1 ambush card face-down and add it to the exploration deck. Now shuffle the exploration deck and place it in a face-down stack next to the stack of season cards.
We're now ready to go.
Play begins by turning over an exploration card.
  • If it's a normal exploration card, it will have a terrain type (Farm, forest, village or water.) and 2 different shapes. Each player must choose one of the shapes and draw it as the depicted terrain type on their map sheet. The drawings need to clearly show the type of terrain it is. The chosen shape can be rotated or flipped in any way the player wishes and marked as the terrain type used. Some shapes allow the player to earn a coin.
  • If it's a 'ruins' card, then flip over another card. The shape used from the second card must include a ruins space from the map sheet.
  • If it's an ambush card, then each player must pass their map sheet to a neighbouring player, that player then draws the shape on the ambush card on the map sheet. Obviously they should place it in the most inconvenient manner possible! After a ambush card has been resolved, it is removed from play.
  • Rift card: If a rift card is drawn, each player gets to draw a single 1x1 box of any terrain type, anywhere normally allowed.
So that's the main rules. There are some clarifications below.
  • When drawing a shape, it cannot overlap over a previously drawn shape, a mountain, wasteland or the edge of the  map. It can though, overlap a ruins space and depending on cards drawn may require a ruins space.
  • If a player cannot draw a shape for whatever reason, they draw a 1x1 box with any terrain on any legal space instead.
  • If a player surrounds a mountain (Orthogonally - diagonals count for nothing in this game!), then they earn a coin.
  • When all players have drawn their shape, the next exploration card is drawn. Each exploration card has a 'time value' which is a numerical value. When the combined value of all exploration cards drawn equals or exceeds the time value on the season card, then the season is over. Different seasons have different time values, winter has the least 'time' as winter has less daylight.
Scoring & end of season
Scoring occurs at the end of every season and is broken down as follows (As well as end of round actions.):
  • Scoring cards: The 2 scoring cards for that season are scored.
  • Coins: Each coin a player has acquired earns a victory point. They are scored over every round a player has them. Thus a coin earned in the first round, will be also scored in all subsequent rounds.
  • Monsters: Monsters don't score points, but they do deduct them! Every empty space that is adjacent to a monster space, loses that player a victory point.
  • Points from all sources are tallied for the round.
  • A new ambush card is added to the exploration deck and all played exploration cards are shuffled back into a new stack. If the ambush card from the round just completed wasn't encountered, then there will be 2 ambush cards in the stack!
  • The season card from the completed round is removed from play and the next season is revealed (With new scoring and time value.).
Endgame
Once the score for the winter season has been calculated, the score for all 4 seasons is tallied. Highest score wins. ​


Overall
​Cartographers is a fun and interesting game.

Interesting because of how the scoring works, it gives players short term and long term goals. Not only are there 4 scoring objectives, each objective is scored twice and they are scored asymmetrically.

Objective 'A' is scored in rounds 1 & 4. So working towards it in rounds 1 & 4 will earn a player points. Objective 'A' scores no points in rounds 2 & 3, however working towards objective 'A' in rounds 2 & 3 can pay dividends when it's scored again in round 4. This may mean neglecting other scoring opportunities though.

​Objective 'B' on the other hand, scores in rounds 1 & 2, after that it's worthless. So to make the most of this scoring opportunity, players will have to concentrate on it for the first half of the game.

All of this makes players think about short, long and mid term goals and how to maximise scoring opportunities.
Additionally, players cannot predict what terrain/shapes will appear if at all or the order they appear. Nor can they predict when ambush cards will appear. Players also need to be flexible and be able to change their plans.

This culminates in giving players lots of factors to consider and decisions to make - which is good.

Another interesting thing about Cartographer is the number of players it supports. It's essentially only limited by the drawing implements/time required. You could use the entire pad and play with 100 people at once if you had the time/space/pencils!

There is theoretically no downtime as everyone draws their shapes at the same time. I say theoretically, because they'll always be that player that takes too and wants to draw in too much detail! 'Do you really need to draw the chimneys on the houses in your village. What! Now you're doing the smoke too!'. You know what I mean.

The addition of the coloured markers - whilst an extra expense added quite a lot to the experience. I imagine using the pencils a little duller. It's a shame they couldn't include coloured pencils or something along those lines. Obviously costs need to be kept down though.

Even so, I found it a good game and would play it again.
0 Comments

    Author

    I play, I paint.
    ​This is where I talk about what I play.

    Archives

    March 2025
    March 2024
    June 2023
    May 2023
    April 2023
    March 2023
    February 2023
    January 2023
    December 2022
    November 2022
    October 2022
    September 2022
    August 2022
    July 2022
    June 2022
    May 2022
    April 2022
    March 2022
    February 2022
    January 2022
    December 2021
    November 2021
    October 2021
    September 2021
    August 2021
    July 2021
    June 2021
    May 2021
    April 2021
    March 2021
    February 2021
    January 2021
    December 2020
    November 2020
    October 2020
    September 2020
    August 2020
    July 2020
    June 2020
    May 2020
    April 2020
    March 2020
    February 2020
    January 2020
    December 2019
    November 2019
    October 2019
    September 2019
    August 2019
    July 2019
    June 2019
    May 2019
    April 2019
    March 2019
    February 2019
    January 2019

    Categories

    All
    2 Player Only
    50 Fathoms
    Abstract
    Annual Quiz
    Area Control
    Asymmetrical Play
    Auctioning
    Bidding/gambling
    Black Hack
    Bluffing
    Board Game
    Campaign Play
    Card Game
    Clockwork & Chivalry
    Cooperative
    Cthulhu Hack
    Deck/Bag Builder
    Deduction
    Dice Game
    Drafting
    Engine Builder
    Hand Management
    Hidden Movement
    Hidden Role
    In Darkest Warrens
    Legacy
    Memory
    Merry Outlaws
    One Vs Many
    Oubliette
    Party Game
    Programming
    Push Your Luck
    Real Time
    Renaissance
    Resource Management
    Roll And Move
    Roll And Write
    Route Builder
    RPG
    Sand Box
    Savage Worlds
    Set Collecting
    Storytelling
    Tableau Builder
    Team Based
    The Month In Gaming
    The Year In Gaming
    Tile Placement
    Trading
    Traitor
    Trick Taking
    Voting
    Wargame
    Wasted Hack
    WFRP
    Wogglecon
    Word Game
    Worker Placement

    RSS Feed

Powered by Create your own unique website with customizable templates.
  • Home
  • Special Effect
    • Special Effect
    • The Final Return of The Indiana Jones Charity Globe Trot
    • The Warlock of Firetop Mountain Challenge
    • Return of The Indiana Jones Charity Globe Trot
    • Bard's Tale Challenge
    • Fighting Fantasy Challenge
    • The Indiana Jones Charity Globe Trot
    • Mirkwood Charity Walk
    • Middle-earth Charity Walk
    • Dungeon Daze
  • RPGs
    • The One Ring
    • The Evils of Illmire
    • Beach Patrol
    • The Surrendered Lands
  • Game Blogs
    • RPG Blog
    • Gaming Blog
  • Painting Blog
  • Contact