|
26th July 2022 It's Tuesday! That means it's time to meet up with the Woking Board Gaming Club at the The Sovereigns. Time to steal the idol... and escape, Indiana Jones has nothing on this real-time, cooperative dice game, well at least until those crappy rolls inevitably turn up! What's in a game?
Escape: The Curse of the Temple has good quality components. The tiles all feel suitably thick and sturdy. The acrylic gem tokens are kind you see in a lot of games which use them to depict gems, they are a sparkly, pleasing shade of green though. The bespoke dice and meeples are wooden which is always a nice touch. There's not much art to speak of, the tiles show flagstones and that's about it. It's clear artwork that does not get in the way. About half a dozen icons are used throughout the game, luckily they most relate to the dice and there's never a need to refer to the rules - which is a good thing since this is a real time game with a countdown. How's it play? Setup
On to play In Escape: The Curse of the Temple players are collectively attempting to explore a lost temple to find the exit and escape before becoming trapped. It's not so simple though; not only must they find the exit, they'll also need to activate the gem tiles and spaces to make their escape possible. The game is played over 3 rounds and does not use a typical turn structure. Instead, turns are actually synchronous, in other words, players perform all their actions at the same time and in real time! This involves all players rolling their dice and resolving their actions simultaneously. How is this all done? Read on.
Endgame When the 3rd and final round begins, all players must get to the exit tile and successfully perform the escape action.
The soundtrack has a total countdown across all 3 rounds of 10 minutes. If one or more players are still in the temple when the countdown has finished, then they collectively lose the game. If all the players have escaped before the time runs out, then the players collectively win! Overall
I'm going to start by saying that I'm a bit ambivalent towards real time games. I've played some good ones and can see how they have their place in gaming but for me but broadly speaking, it's not why I like and play board games. I like to think out my decisions and choices at least a little bit. Add to the mix a push-your-luck dice mechanic and you've a game of a lot of quick frantic rolling. You really don't want to roll those dice off the table! Having said all of this, I think Escape: The Curse of the Temple is a solid game and there's a lot to like about it. Firstly, rules and theme mesh together well. Chucking dice as quickly as you can to escape feels good. The synchronous dice rolling is a clever little system. Generally real time games are always trying to impress upon players that they're up against the clock, this can be a little jarring in a game where players are having to wait for another player's time to run our and get their turn. By having synchronous actions, it heightens the sense of urgency as everyone is in it together. Being able to provide assistance another player on the same tile is equally clever. It's an elegant mechanic that also feels organic and makes sense. This means it would seem like a good idea to have players explore the temple as a group, it would make shifting gems and unlocking dice easier... But there's a couple of rules that throws a spanner into that strategy. Firstly; exploring as group can slow down that exploration. Players can't escape if they don't shift enough gems or find draw exit tunnel from the stack. Secondly; players will want to avoid creating single long corridors, they will need to return to the starting tile twice and the further away they are from it, the further it is to get back. This will force players to split up or go in pairs or stick close by if they have the option, at least for the first 2 rounds. This can change contextually when certain tile are revealed or have to be put in play in a certain way or a player get too many locked dice and so on. Players will have to think quickly and decisively as well as adapt to emergent events. Escape: The Curse of the Temple obviously has a quick playtime - 10 minutes! That feels a little strange because the setup and explanation time almost feels longer than a single game. It's reasonably easy to learn, I can't imagine novice gamers struggling to learn the concepts here. It also not a game to be taken too seriously and leans heavily on luck which is not unusual for cooperative games. Although, even accepting this, a bad run of rolls can sour the experience. But treat Escape: The Curse of the Temple as a cooperative, silly, fun, filler of a game and it will be a enjoyable time. So long as your luck is better than mine... much better!
0 Comments
30th June 2022 It's a Thursday and we're at Aldershot for some gaming goodness. Burger Boss! What's better than being a king? Being a boss of course! Be a boss of those burgers in this game of resource management and worker placement or if you want to be specific; dice-placement. What's in game?
All the game's cards are finished in vinyl/plastic and as such feel quite sturdy. The dice plastic, although they have nicely rounded corners. Wooden components are always a plus in my book. The discs used to represent burgers and ingredients are obviously wrongly proportioned but if they were correctly sized, they'd have to be much bigger, otherwise they'd make the handling ingredients even more fiddly than it already is - which is quite fiddly and is my one criticism of the components. Presentation wise, Burger Boss uses a cheerfully brash palette along with cartoonish illustrations. It's a bright, colourful art style that suits the game's light-hearted approach perfectly. There's little iconography used in the game and it's easily understood, mostly consisting of symbol ingredients and and dice values. The manager's special cards use text to provide information, which is a little sparse and will probably have players referring to the rules. It's not something that will occur too often though. Packaging I don't usually talk about a game's packaging - because usually it's just a box. Burger Boss however, comes in a giant burger! Inside are several layers to hold all of the game's components. Yes I know that it won't stack with other games and the manual doesn't fit in the burger and it'll just have to be put all back into it's normal, typical box anyway which technically defeats the purpose of the burger packing - but it gives the game a unique, eye-catching presentation and I like that. Yes, I also know it's just a gimmick but I like gimmicks! How's it play? Setup
On to play The objective in Burger Boss is to fulfil customer orders to earn money, this is done by gaining and cooking the required ingredients. All of these actions are achieved by putting dice on cards, many of these cards will require dice of specific values. The game does not have a traditional turn order and instead uses a mechanic that mixes randomness and player choice to determine player order. Once player order is established, whenever someone becomes the active player, they can take an action by using a die. Each round consists of the following phases.
Endgame The endgame is triggered when the customer card deck is depleted - although there will be customer cards in play. There is then 1 final round of playing then the game goes to scoring. Players total money from the following: Money earned from selling food to customers. Money earned from their secret objective card. Anything still on the grill earns $1 apiece; food in storage earns nothing. Cash is tallied, highest amount wins. Overall
Burger Boss is a light-to-midweight game, as written above, the rules seem a bit complex but in practice they're fairly straightforward. That's not say it's a good game for beginners - because it's not! There are several mechanics and concepts in Burger Boss that that require thinking ahead and someone nuanced decisionmaking. Quite often, it'll be impossible to complete a customer's order in a single round and generally there isn't enough cold storage to hold the required ingredients. This means that players will probably have to put ingredients on to their grill and hope to complete them in a later round. Mistake's can be costly and $1 is scant compensation for losing food. Which brings me to customers. There's a balance to be found between completing a customer order as quickly as possible and waiting for a later turn to earn more money but risking another player getting that customer first! While there is no direct interaction between players in Burger Boss, the game has a lot of open information and it definitely pays to watch what other players are doing; what they've got on their grills, where they're putting their workers and responding to this. This ties in with the turn order mechanic, sometimes players will want to use less workers to go earlier. Worker spaces to gain ingredients are limited and turn order can play a vital role when fulfilling customer orders, in both cases, going later and being stymied by other players' actions (Whether accidentally or deliberately.) can be infuriating. Burger Boss also has a a bit of the unexpected, manager's special card can also throw spanners into the works with unexpected special actions, especially when used judiciously. Despite this, the game provides options to gaining other benefits - or benefits other ways, if the baker or butcher is inaccessible for any reason, there's always the supermarket. There's a pretty generous number of worker spaces on the card for the aforementioned manager's cards. All of these means that rarely is a player presented with meaningless decisions which is always a good thing in games. I found Burger Boss to be a colourful, visually appealing game of making burger (OK, they stacks of ingredients, but still it looks good.) and fun worker placement and resource management game with a reasonable play time and gameplay that's tricky enough to tax the brain enough to be engaging, along with a side order (SIC) of competitiveness. 15th May 2022 It's a Sunday and we're logged into Board Game Arena for some online board gaming fun. Diced Tomatoes, a game about tomatoes that uses dice - what it says on the tin er... box! Caveat: we've only played this game digitally. What's in a game?
There's not much art to speak of in Diced Tomatoes, understandably, the minimalist art is red-themed. How's it play? Setup
On to play Points are scored in Diced Tomatoes by creating vertical lines of 4 dice (Vines if you will.) in either straights or sets of-a-kind. In a turn, the active player takes their actions which will involve rolling and placing dice, which may result in them or other players scoring points.
Endgame There are 2 criteria that can trigger the game end. If there are no dice left in the central pool at the end of the active player's turn, then the game immediately ends. Alternatively, once any player has filled all 6 spots on their scoring board, they score 2 bonus VPs, current round is played out and the game ends. Players now calculate their finishing scores from the following sources.
Points are tallied, highest score wins. Overall
Despite Diced Tomatoes being a fairly light game with an unusual implementation of trick-taking mechanics (In that you don't really take other players' tricks - well you can ruin them instead!), it does give players lots to think about. Firstly players will want to create their own vines. The order in which seeding dice are scored can be very important because getting it right will earn bonus points. This is particularly true for the early scoring spaces. A value 1 seeding die earns 6 VPs when placed on the 1 slot but a value 6 seeding die placed on the 6 slot only earns 1 bonus VP. Secondly, because players can put dice on to the vine tokens and vines of other players, it means that they can try to complete them to gain karma. Alternatively, they can try and mess with other player vines to disrupt their scoring. E.g., if another player has a vine with 3 '1s' which they are intending to put into scoring slot 1, adding a 1 value black dice would complete the vine, but the black die would lower the seeding die's value to 0 - wiping that vine out. Or adding a gold die would add 1 point making the seeding die worth 2 when completed, this means the other player would not gain the star fruit bonus when putting it on scoring slot 1. So while they've gained a VP from the gold die, they've lost the bonus from not matching the scoring slot, collectively losing 5 VPs! So it seems sometimes, players will want to wipe out their own vines to keep a scoring opportunity open! As you can see, Dice Tomatoes provides quite a lot of interaction between players and a quite lot of opportunities for 'take that' moves and depending on how you feel about this style of play, may or may not be your kind of thing. Personally I'm a bit ambivalent about it - especially in a game that's a quick and light filler. One thing I'm not a fan of is having your vines wiped when your score goes above 6. I know why the rules are that way but it feels a bit mean spirited and counter-intuitive to lose points by gaining points. Diced Tomatoes is a not difficult to learn, fairly quick to play filler game. Mechanically it's fairly solid and has a unique spin on trick-taking. I'm struggling to find any genuine criticism but then, I'm also struggling to find any reason to play it again. I feel that the ease in which players can interfere in each other's plans is a bit of a frustration and it left me unengaged. It also feel like it prolongs what could be a short and sweet game. It's not a bad game but there's just other game's I'd rather play. Of course YMMV and maybe you'd get more out of it but Diced Tomatoes isn't one for me. 30th April 2022 It's a Saturday afternoon and Wogglecon 3 with the Woking Gaming Club is in full swing. The next game of the day was Machi Koro 2 which is the follow up to the most excellent original Mach Koro and which you can read about here. Like its predecessor, Machi Koro 2 is a tableau and engine building card game all about constructing a city, What's in a game?
Components in Machi Koro 2 are all good. The cards are pretty standard cards as you'd expect. The coins feel solid and the dice are slightly larger than usual dice, they're plastic but also rounded, chunky and have a bit of heft to them. Machi Koro 2 uses an art style that's identical to the original. Brightly coloured stylised almost cartoony illustrations of establishments and landmarks. The colours are very distinct, which is good because colour plays an important part in the game. There are a few icons in Machi Koro 2, for the different types of establishment and types of effects on landmarks. It's all pretty clear what they mean and it won't provide an problems for players. How's it play? Setup
On to play Machi Koro 2 uses the traditional turn order with the active player playing their turn before the the player to their left becomes the active player. During their turn, the active player has 3 phases to play through.
Endgame When any player purchases their 3rd landmark, they immediately win the game. Overall
Machi Koro 2 is a that's fairly easy to pick up and play light-to-mid weight game that has a quick playtime. The game generally presents players mostly straightforward but meaningful decisions about buying cards. Should a player spread their cards over a range of numbers to get better coverage, or concentrate on fewer numbers but getter pay outs when the numbers come up. Players will also need to consider what those numbers are. e.g., 6-8 will come up most often - provided players are rolling 2 dice have a good chance of being activated. Speaking of rolling dice, in Machi Koro 2 players are able to choose to roll 1 or 2 right from the start. This is another decision that players can make, sometimes they'll want to roll certain numbers or avoiding rolling them and using 1 or 2 dice can alter odds of doing this. Much of this ties in with how the activation numbers are distributed across the cards. A lot of the 1-6 cards will immediately generate cash but the cards that combo off of them tend to be in the 7-12 range. Going to 2 dice was described by a player as 'going up a gear'. It can be pretty hard to slowly build up cash over rounds to get landmarks because other players can essentially 'nickel and dime' it away, gearing up makes it easier to get big cash in a single roll to avoid this. And talking of nickel and diming, another strategy to consider is the red card strategy. Using red cards to fleece other players of their coins is a pretty effective strategy, it denies them coins and earns them at the same time - but you won't make any friends that way! The downside of this approach is that canny players will try their best to spend all their coins, the game's timing explicitly states that red activations occur before any other, thus if opponents have no coins, you can't collect them with a red since their blues/greens/purples activate after red. It means that in a quirky reflection of real cities, players will want to be as close to bankruptcy as possible! Unlike blue/green cards, reds are not guaranteed to generate income. Machi Koro 2 is a little on the light side (Not that I consider that an issue.) and perhaps a little too quick to end, which may not be to everyone's taste. One other thing to mention is that there's definitely a dollop of luck to the game, I'm fine with it and actually think it's an important part of the Machi Koro experience but some players will find this off putting. I do have a couple of relatively minor issues with Machi Koro 2. In the original Machi Koro, the card variety in the base game was fairly low, when 'The Harbour' expansion was added to the base game, Machi Koro went from being a 'nice' game to a 'great' game. I feel the same is true of Machi Koro 2 as well. There are only 20 different types of establishment and 10 will be visible right from the start. After playing a few games, players will have more or less seen everything the game has to offer at a basic level and and will habitually fall into familiar patterns or strategies depending how establishments emerge. An expansion would shake that up, I would love to see extra cards for Machi Koro 2. Finally, the rules for landmarks having actions that all players can activate in their turn is a little inelegant, requiring players to remember what landmarks other players have acquired or be reminded of them by those other players. Otherwise, I think Machi Koro 2 an un-taxing (Sic.) fun and breezy game to play that's worth trying if lighter games are your thing. How does it compare to Machi Koro? I've heard Machi Koro 2 described as Machi Koro 1.5 and there's definitely a sliver of truth to that. Anyone who's played the original will be familiar with nearly everything in Machi Koro 2. If it's not broken... So apparently there was also some criticism of the original where it was stated that there was a lot 'whiff' in the early game - where players would roll the dice and nothing would be activated. There was further criticism that the original had too long a play time. It's clear that Machi Koro has tried to address these issues. The 3 rounds of buying will allow players to have a better spread of numbers at the start. Having to only buy 3 landmarks will also make play quicker (Although the cheaper landmarks are way more expensive than the cheapest landmarks from the original.). Landmarks with ongoing effects that activate in any player's turn also make the game quicker and can add an extra layer of interaction between players, although I've frequently seen players avoid these cards, instead optioning for once-only landmarks and I sort of feel that way myself. This is the only thing I see as a possible misstep. Changes to the game have made the red cards a bit more powerful, there's little opportunity to punish players who buy red cards in Machi Koro 2, other than one of the landmarks (Machi Koro had the publisher card to do this.). I don't think this is too much of change though and YMMV. So anyway, all of this makes the game clearly quicker to play but I feel that perhaps it's a little too quick. Sometimes (Especially when someone gets a good roll or two.) a game can be over before players can adopt an emergent strategy. I never found that the original was overlong. Don't let this put you off playing Machi Koro 2, it's of a similar quality as they original. Even though I own the first game, I was happy to buy and play the second and would recommend it to players of the original as well as to people who have never played it. 8th February 2022 Tuesday night games with the Woking Gaming Club at The Sovereigns continued with Fantastic Factories. I don't know if factories are fantastic but I guess we're going to find out. What's in a game?
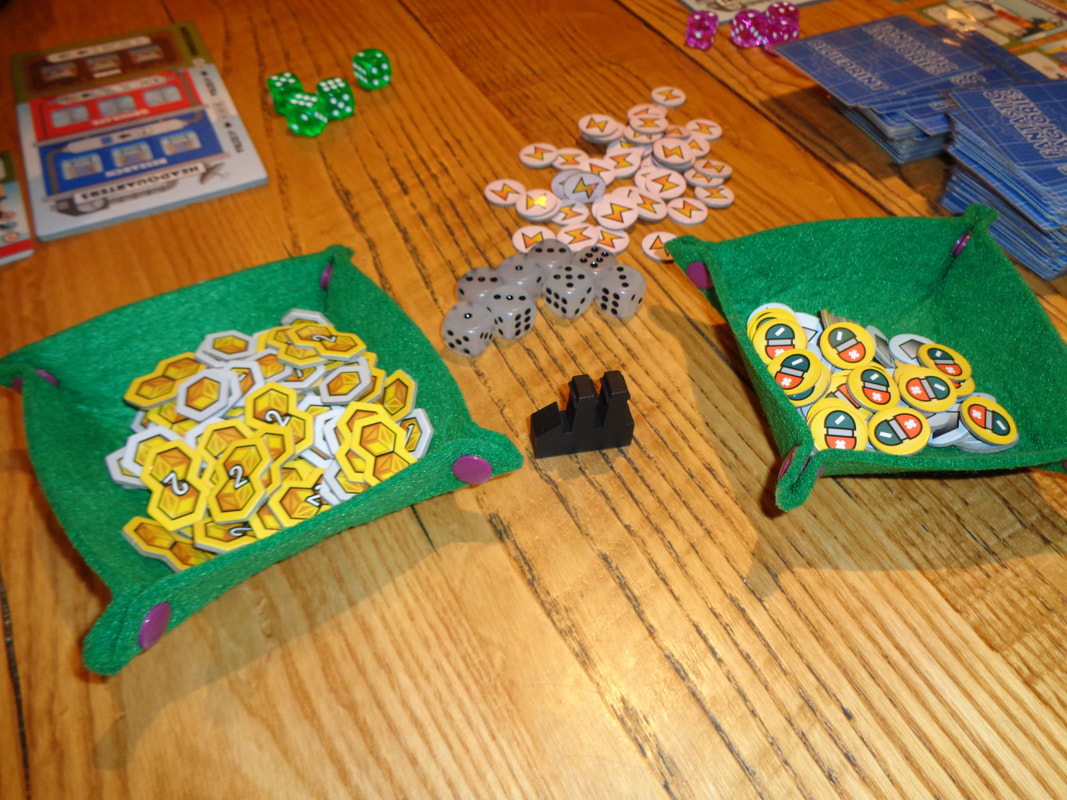
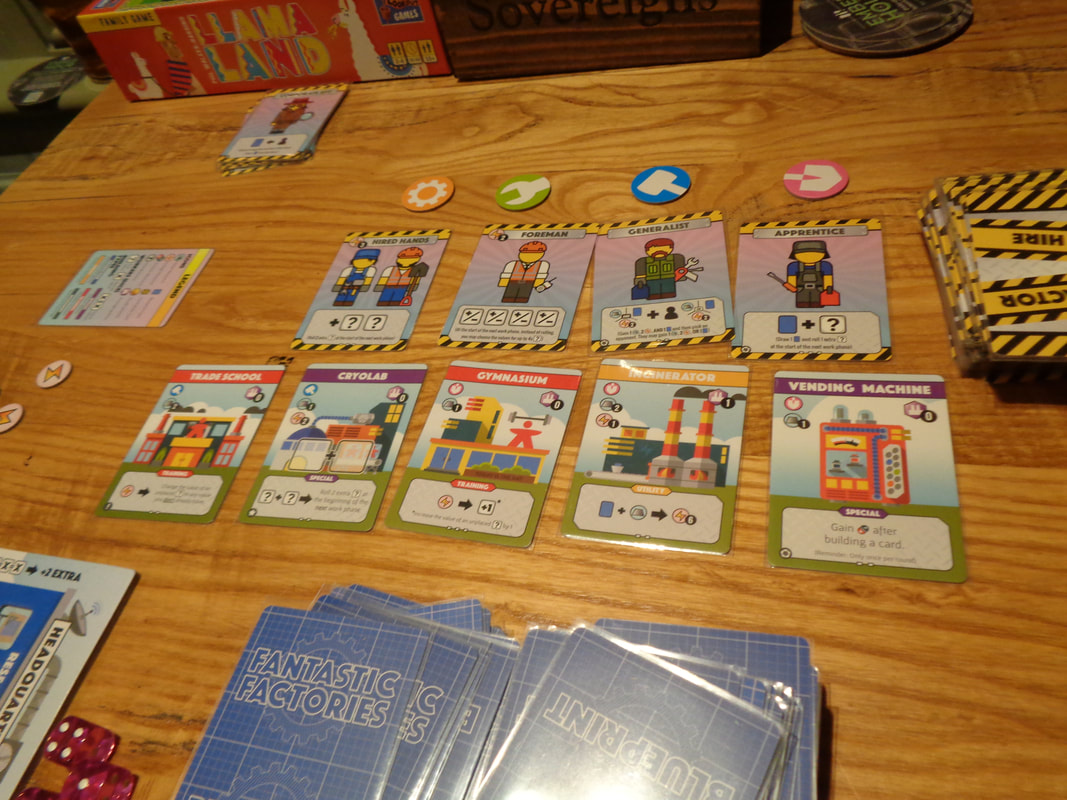
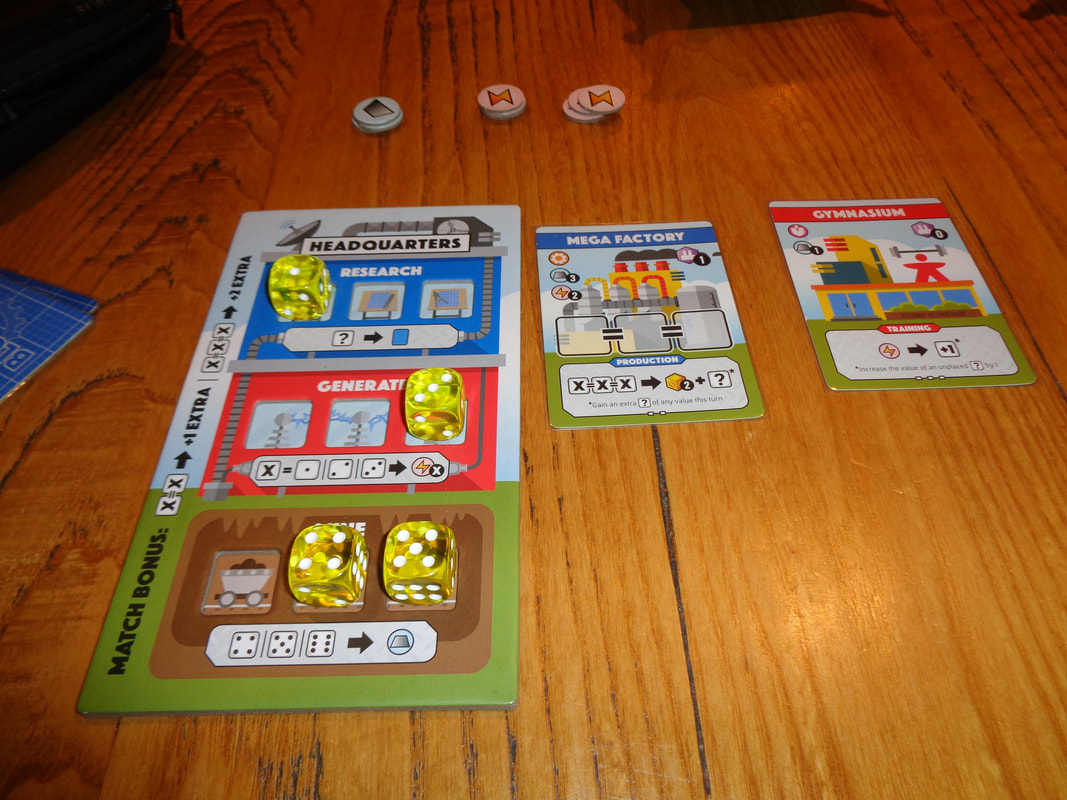
From an art perspective, the game makes good use of cheerfully bright colours. The art itself uses heavily stylised illustrations of both factories and contractors which is fine and suits the game's slightly light-hearted theme. When built, factories provide a varied amount of special actions, consequently the game makes use of quite a varied amount of iconography. For the most part it's straightforward, however, on occasion 2 cards may seem similar but they'll be a small difference between denominated by a single small icon or sometimes they'll just be something I wouldn't say it's any kind of a gamebreaker or that there's too much iconography but for a few turns players will probably end up referring to the rules. How's it play? Setup
On to play Broadly speaking, a round is broken into 2 phases; a market phase which occurs in turn order and a work phase, which can be performed simultaneously by all players.
Endgame Play continues until either a player has built their 10th card or acquired their 12th good. In either case, the current round ends and 1 more round is played. Players then total the VPs from their buildings and the goods they gained. Points are tallied, highest score wins. Overall
On a basic level, Fantastic Factories is mechanically pretty straightforward; acquire blueprints, acquire resources to build factories, use factories to acquire resources. It's a mid-weight engine building game that provides players with strong card synergy and offers a good selection of choices and avenues to follow for building that engine. I feel for the most part that players will want to focus on blueprints and building them, which is natural as this is what gets resources and VPs. Players shouldn't neglect the contractors who provide instant if transitory benefits for a relatively low cost. Applied at the right time, they can be game changers - provided they're available at the right time! Once again, it's a case of reacting to opportunities as they are revealed. There are a couple of there elements that make Fantastic Factories interesting. Firstly; dice rolling. Players will never be guaranteed getting the results and thus the resources they want. It means that players may not be able to build the card they originally wanted to and will need to adapt and react to the situation as it arises for optimal play. Of course it's always possible to play it safe and have all the required resources before getting a card, it's safer but it's also slower. Secondly; Fantastic Factories makes use of a hand-as currency mechanic. This forces players to think ahead, players may need to get blueprint cards just to discard for another building, or may be forced to discard a blueprint they still want in order to build another, it can be a tough decision. There's also some high level play, where it pays to watch what other players are working towards then wipe the marketplace to deny another a player a card they want. Fantastic Factories is a well balanced game, it's rules aren't particularly complicated and are easy to learn but also have depth that comes from recognising how to exploit the available cards that appear during the game to build their engine optimally and to maximum efficiency. The gameplay is solid and will appeal to fans of engine building games, which I am. so I guess factories can be fantastic! 24th January 2022 It's time for some impromptu Monday gaming in lieu of Sunday and we're logged into Board Game Arena. Can't Stop Express is the roll & write cousin to the excellent push-your-luck dice game; Cant' Stop. Caveat: We have only ever played this game digitally. What's in a game?
And that's it!, Can't Stop Express is a very minimal game and that applies to all of it. I can't comment on the quality of the components, there's no art to speak of in the game and no iconography either. How's it play? Give each player a scorecard and you're ready to go. Can't Stop Express has in one regard a similar mechanic to Can't Stop, which is that after every dice roll, players are putting together 2 sets of 2 dice, the 5th die has a different role (Sic). Where Can't Stop Express differs is that once the dice are rolled, the results are used by all players simultaneously.
Endgame When a player fills the 8th and final checkbox in any one of their 5th die rows, then they stop scoring and the game is over for them. Once all players can no longer score dice, the game is over and players calculate their scores for all scoring rows, rows that have no boxes checked off score 0. Points are tallied, highest score wins. 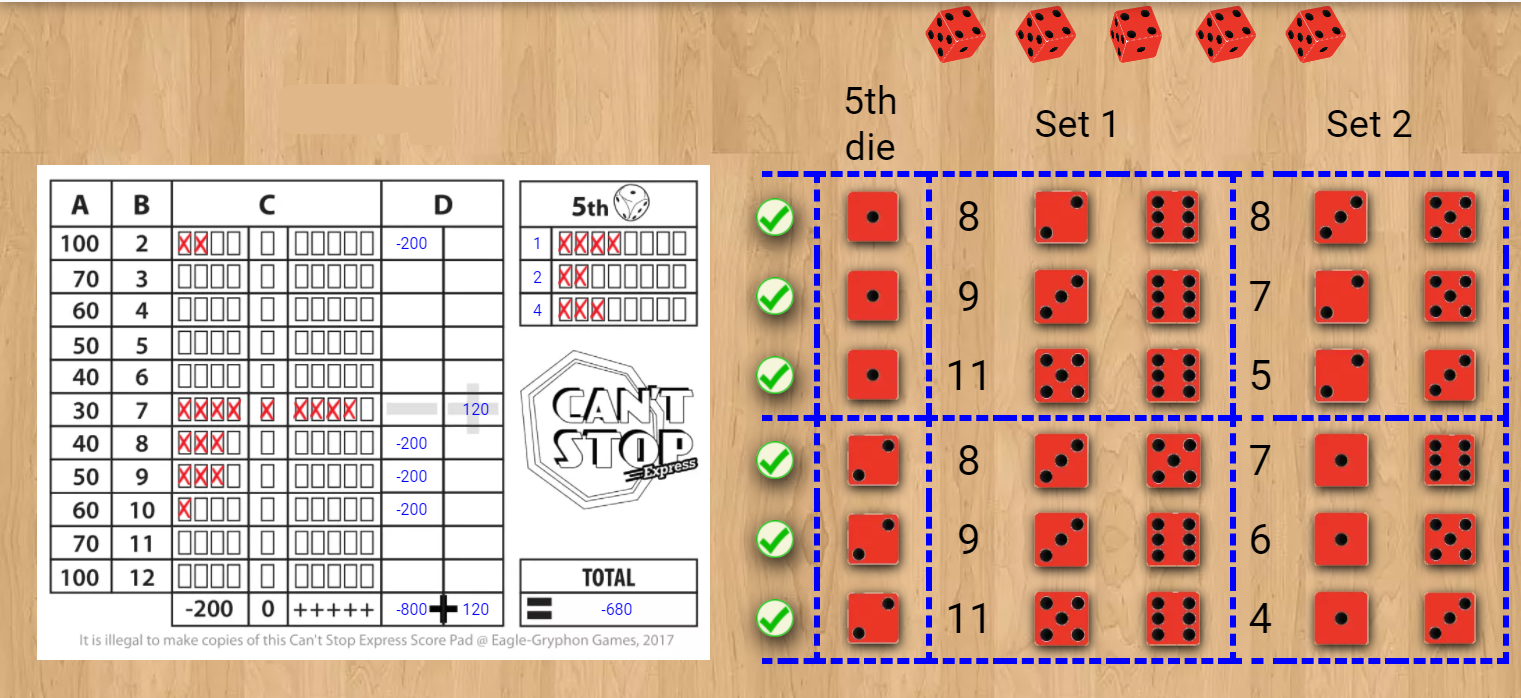 Mmm.... spreadsheets! Overall
One thing I found interesting about Can't Stop Express is how it twists the paradigm of Can't Stop. In Can't Stop, the objective is to reach the top of any 3 tracks using the results of the dice rolls, which tracks are used is unimportant; they all score a point each. Since it's much easier to get a 7 than a 2, this is balanced out by needing to get many more 7s to reach the top than you would for 2s. The points have equal value but getting them requires varying numbers of dice results depending on the number. In Can't Stop Express players are also trying to move along tracks but it is changed around. To reach a scoring position for both 2 and 7 requires getting the same number of pertinent results, either six 2s or 7s, but in Can't Stop Express, they score differently. Six 7s will score 30 but six 2s will score 100 and in fact seven 2's would more than all ten 7 results. The dice results required for each track to score are equal but they score varying amounts depending on the number. Anyway, talk about mechanics aside, I found Can't Stop Express to be a bit of a middling game. I like how it shares a concept with Can't Stop of setting aside 2 sets of 2 dice and it probably plays a little quicker. There's no going bust, so no 'wasted' rolls - at least in theory. Luck can mess with players in Can't Stop Express, just in a different way! The push-your-luck element works very differently here, there are no extra dice rolls to make here. Instead players will need to judge which rows to try and fill out and it's in the planning where players push their luck, when a player decides to start marking off the checkboxes in a specific row, they're essentially gambling on that number reappearing again and again. The 7 row is the safest bet but is not much of a scorer. The further away from 7 you move, the greater the rewards but also riskier it is to fill out 6 or more checkboxes. In terms of what I don't like Can't Stop Express is a game completely lacking in theme and feels a little dry (Although to be honest Can't Stop's mountain climbing theme is paper thin.). My biggest bugbear though is the scoring; those first 4 checkboxes that penalise players 200 VPs, occasionally being forced to mark off checkboxes in rows you don't want to and watching your score drop by hundred of points can be very frustrating. I know why it's there, it replaces drawback of going bust from Can't Stop, even so, it makes the game feel negative and I'm not fond of it. I don't think Can't Stop Express is a bad game, mechanically speaking it's pretty solid but it lacks the extra bit of thrill that comes with deciding to re-roll the dice from Can't Stop and doesn't really bring anything new or different to the table. I'd have no issue with playing Can't Stop Express more times but if given the choice between this and Can't Stop, I'd pick the latter every time. 15th January 2022 The Wogglecon day of gaming continued with Rolling Realms. They see me rollin' They hatin' Patrollin' and tryna catch me ridin' dirty OK, Rolling Realms isn't about rapping but it is about rolling and is a quirky little roll-and-write mini-game collection. What's in a game?
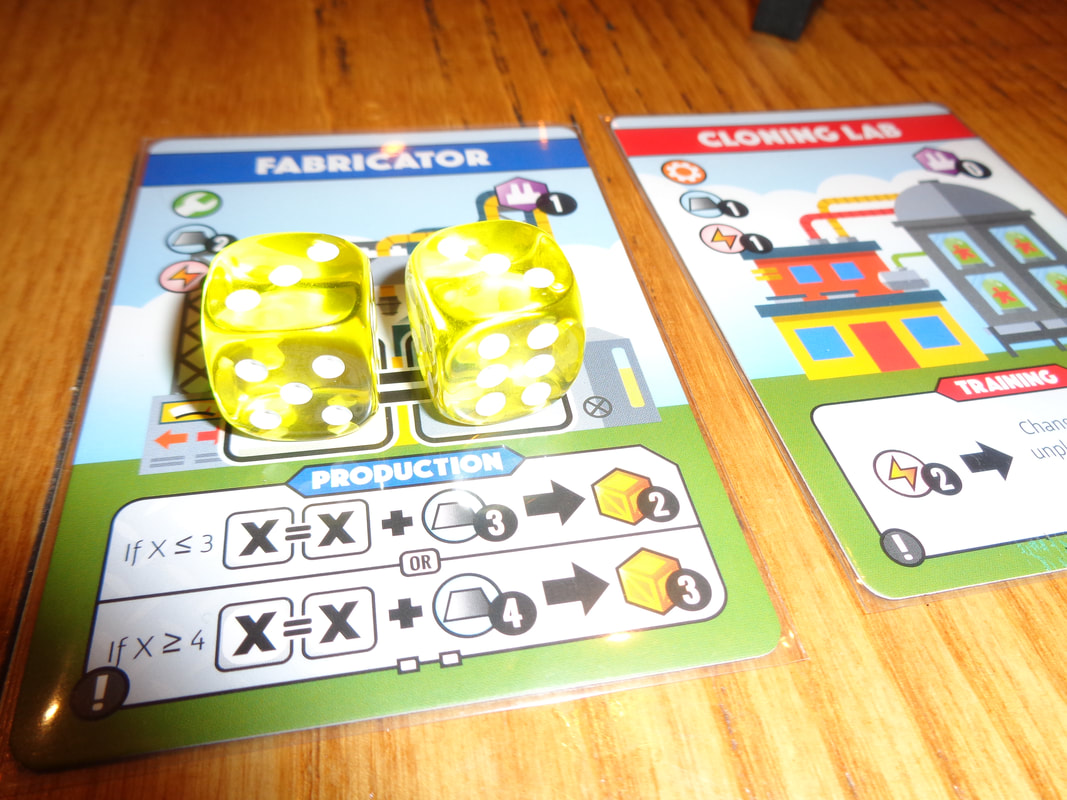
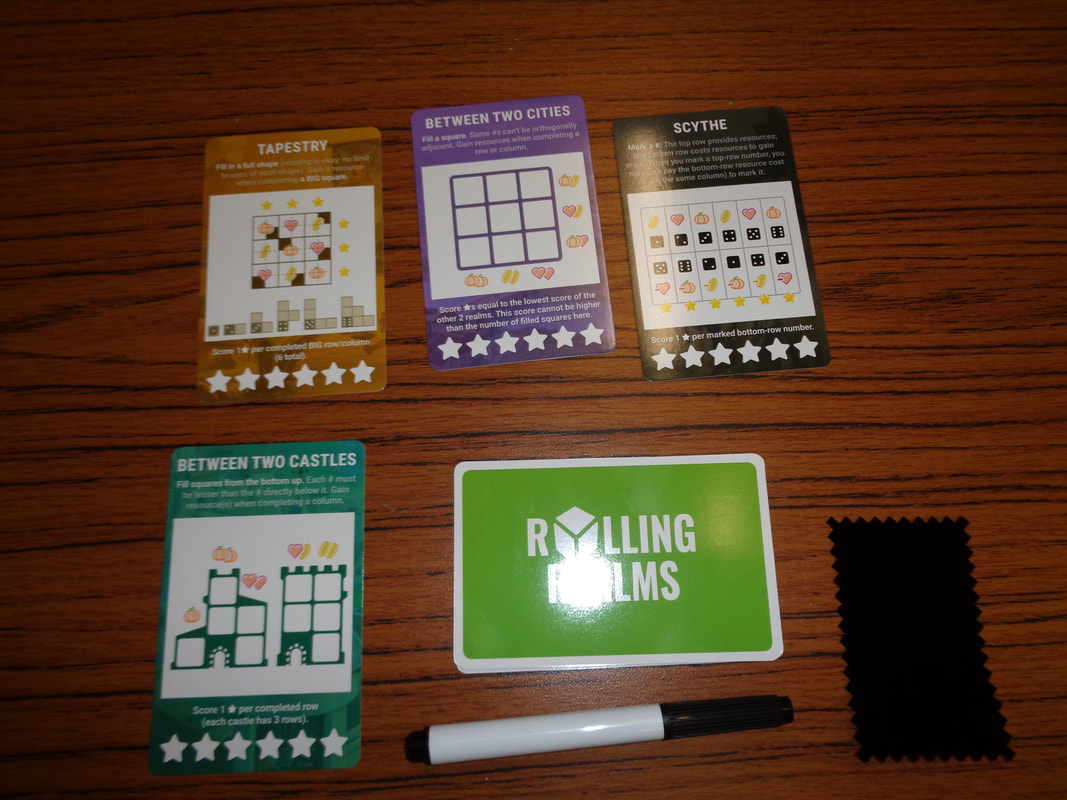
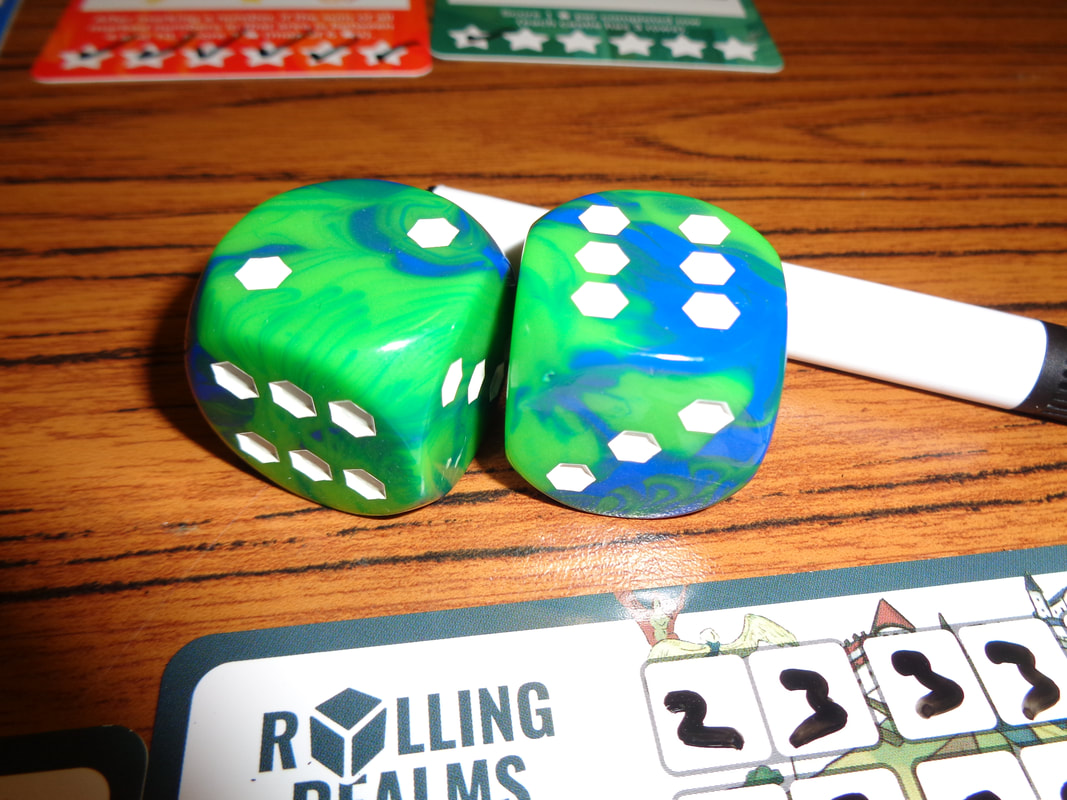
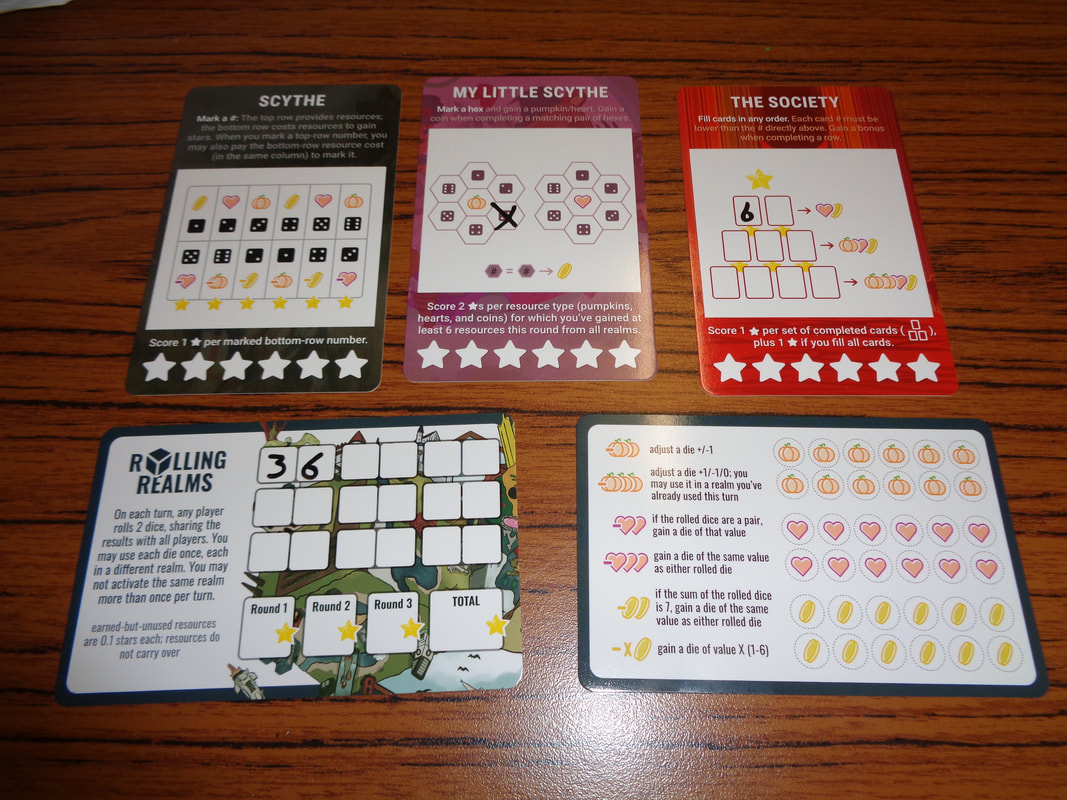
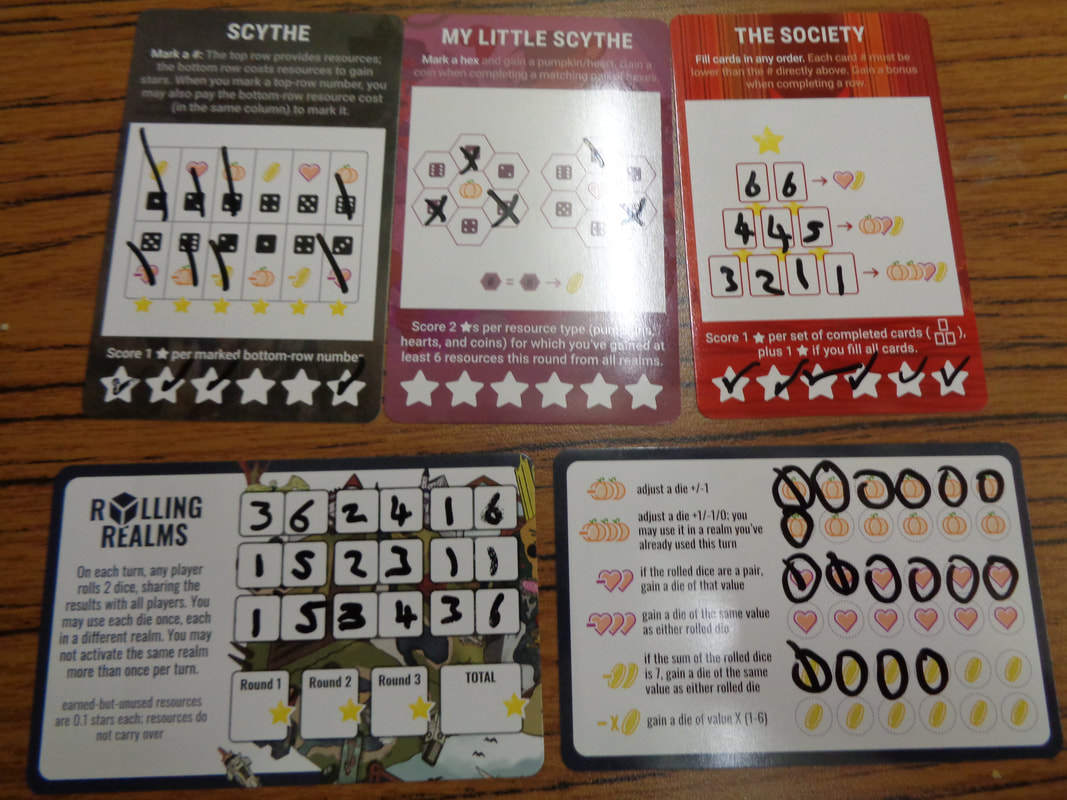
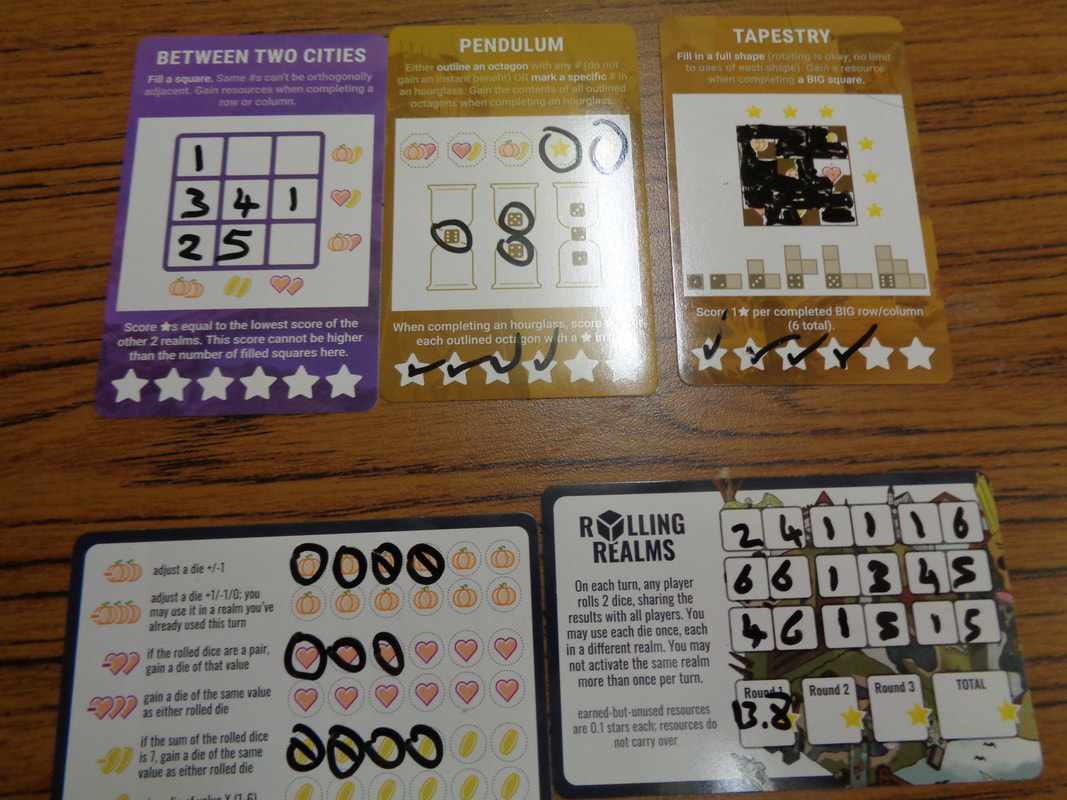
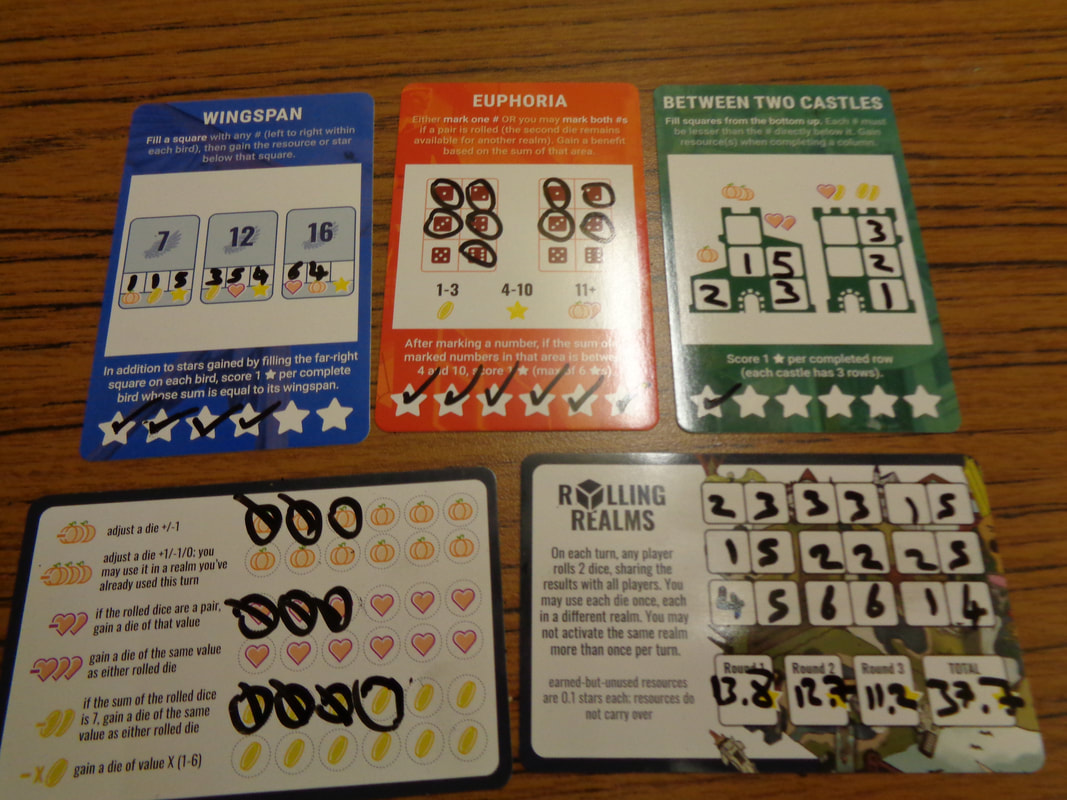
All the cards in the game feel reasonably sturdy especially since they're laminated. The dice are definitely a nice touch and have been manufactured with rounded corners, they're about as good as non-wooden dice can get. Rolling Realms features almost no art except some stylistically simplistic illustrations on a few cards, which is fine as otherwise it would probably interfere with whole roll & write thing. The game's core iconography which appears across all cards is easily comprehensible, however, each individual mini-game is likely to contain its own unique icons which must all be learned. How's it play? Setup
On to play Rolling Realms is played over 3 rounds and each round consists of 9 turns, which means 9 sets of dice are rolled each round, there is no turn order in the normal sense and players resolve their choices simultaneously.
Endgame Once 3 rounds have been completed, that is 9 realm cards have been used, then the game is over. Players should calculate their results from all 3 round. Points are tallied, highest score wins. Overall
Rolling Realms is undeniably unique and inventive, a game about mini-games based on games that the publisher has already released. It's impressive how the mini-games generally manage to distil a game's mechanic and/or them down to a simple, related iteration and one that makes use of numbers 1 to 6! The game comes with 11 realm cards and the publisher has released a bunch of expansions and promo cards go along with it. Rolling Realms balances its priorities quite well and mostly makes player decisions meaningful. Players will naturally want to focus on using dice to gain VPs but neglecting resources will give them lass flexibility later on Because the game uses a randomiser, it's hard to plan ahead, that 6 you really need to earn you those last couple of points on a card might never appear.... That means that players need a dollop of adaptability to manage unwanted numbers and that's when resources come in useful. Particularly useful are the abilities to generate a 3rd die result, it can essentially increase your gains by 50%. It's hard to summarise Rolling Realms because there is a lot of little things going on, but I did enjoy it, the variation provides an interesting challenge and every round brought a new set of challenges. A game that uses a lot of mini-games risks being a mixed bag and couple were a bit more obtuse than the others but there were no outright stinkers. Having said that, it felt like a bit of a chore having to go explain 3 sets of rules to unfamiliar players each round, especially since it seems there will always be this one player who just doesn't get something. I also felt the game sat in weird middle-ground of being a bit too long for a filler but a bit too short for a main game for the night. The box says 30 mins, but that's highly ambitious in my opens. These are minor quibbles though. The mini-games are reasonable light but provides enough depth and definitely variation to keep most players engaged. It's one I'd play again 19th December 2021 We continued our Sunday gaming on Board Game Arena with Can't Stop. Can't stop, addicted to the shindig. Chop Top, he says I'm gonna win big. No... wait..., this isn't a song. It's a sharp little push your luck game. Caveat: We've only ever played this game digitally. What's in a game?
That's it for components, there's not too much that can be said about such a minimalistic, almost abstract game. The only art featured is the mountainous picture on the board which is a nice enough illustration which keeps the board from looking plain. Although it's obviously been used as a theme to fit the mechanic. There's no iconography to the game unless you count the numbers on the dice!  Just why have you decided playa push-your-luck game Because it's there! How's it play? Setup
On to play The objective in Can't Stop is to get 3 of your 11 tokens to the top of the board (Or mountain.) first. Each player takes turns rolling the dice and using them to move their tokens up the lines, they can continue doing this until they choose to stop, reach the top or go bust.
Endgame When a player's 3rd personal token reaches the top of a line and they stop, then they immediately win. Overall
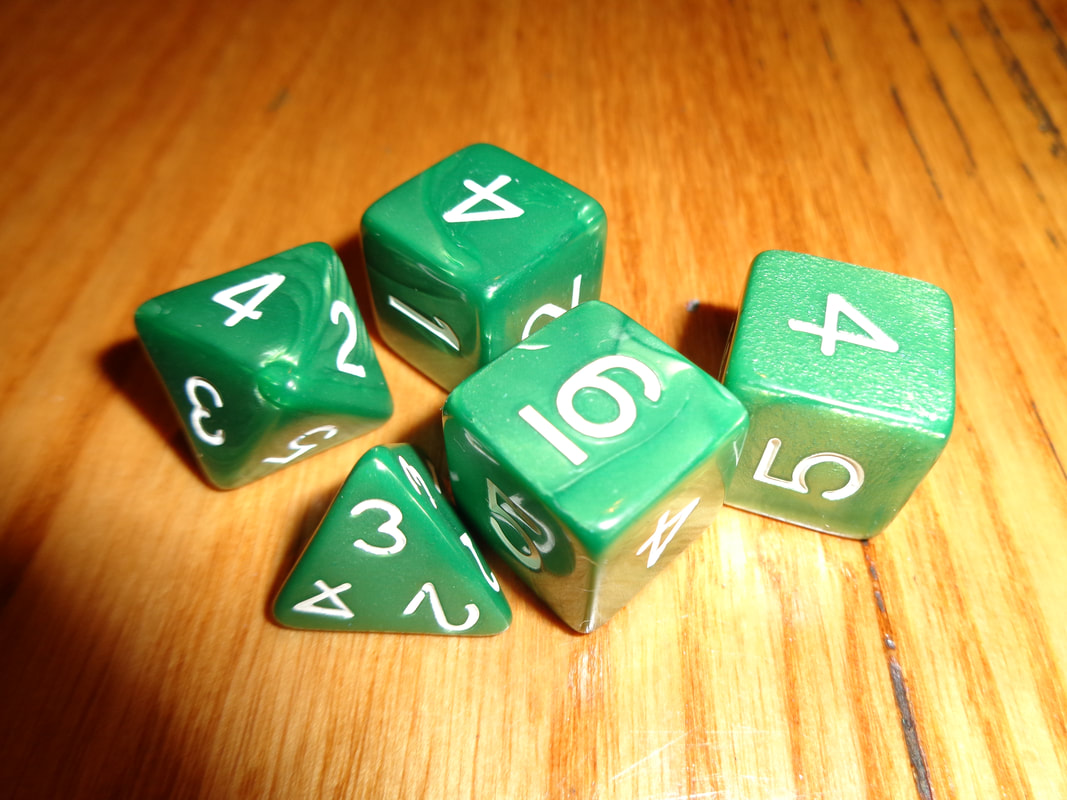
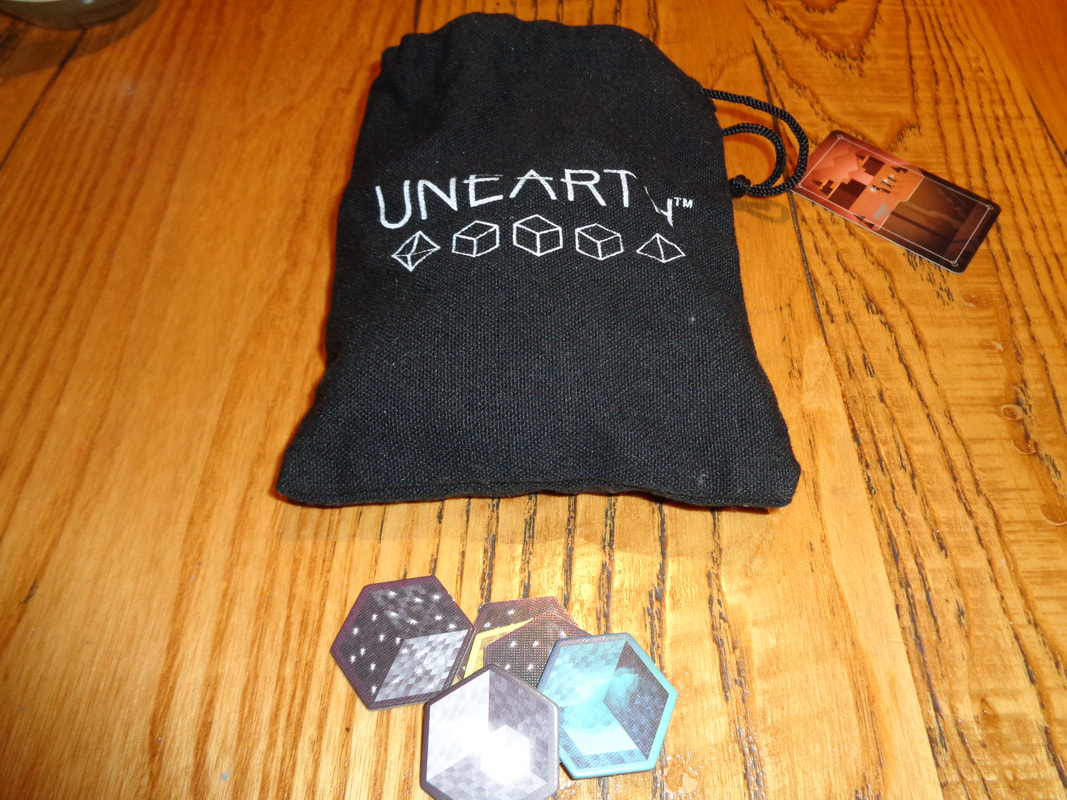
First off; if you don't like push-your-luck games or games that introduce significant amounts of randomness or chance, then you can probably stop read right here! Chances are that you'll hate Can't Stop. Only Joking, please keep reading! Maybe I can convince you that it's worth trying! I think that Can't Stop is a good 'crossover' game that will appeal to casual-gamers, the luck element is a good balancing mechanism that levels the playing field somewhat and will probably prevent dedicated players from always winning, allowing players of differing levels of experience to play together. Simple rules make the game accessible to anyone. For such simple rules, there's a few things I want to say about Can't Stop's elegant gameplay that has been stripped down to pure, distilled, unadulterated push-your-luck mechanics. There's no gimmicks here or clever twists, just you and the dice. Speaking of dice; using 4 of them was a piece of inspiration. If the game was played with only 2 dice, it'd be too easy to predict outcomes. Any dice-slinger worth their salt would know that getting 2 or 12 is a 1-in-36 chance, or getting a 7 is 1-in-6. Adding an extra 2 dice into the mix that need to be paired off changes everything but also sort of keeps it the same! While it would take a little effort to try and figure out the probabilities with 4 dice, it doesn't change the fact that 7s will still be more common than 2s or 12s. The probability curve is now just skewed to some degree, how much, I don't know, l haven't bothered to make that effort to figure it out. This is reflected in the game's design. You only need 3 2s or 12s to to reach the top, while you require 13 7s to do the same. While luck undoubtedly plays a big part in Can't Stop, there's also some strategy involved. Like many chance based games, it's important to employ good judgement on when to push-your-luck and when not to. It also pays to think about how dice are paired off. Generally, when you get movement markers in the 6-8 range, it's the best time to push it, there're no guarantees though... And the longer a player can go without putting all 3 movement markers on the board, by managing the dice pairing, the better. If I have a criticism, it's that the game can slow down towards the end as columns become locked off. We've played this 3-player frequently and at times, when players have captured 2 lines each it means 6 out of 11 lines are no longer in play so everybody ends up going bust a lot more often. As a filler, I think Can't Stop is pretty good fun, it provides some entertainment which allows me to turn my brain off and chill out for a little while (Provided bad rolls don't infuriate me!). I don't take it too seriously and neither should you. 19th October 2021 Tuesday evening has come around again and we're at The Sovereigns with the Woking Gaming Club. The first game of the night was Unearth; a dice-rolling, worker placement game set after a distant apocalypse where players command a band of 'delvers' searching for lost wonders of the long past age. Basically archaeologists sans the bullwhips and giant rock chases! What's in a game?
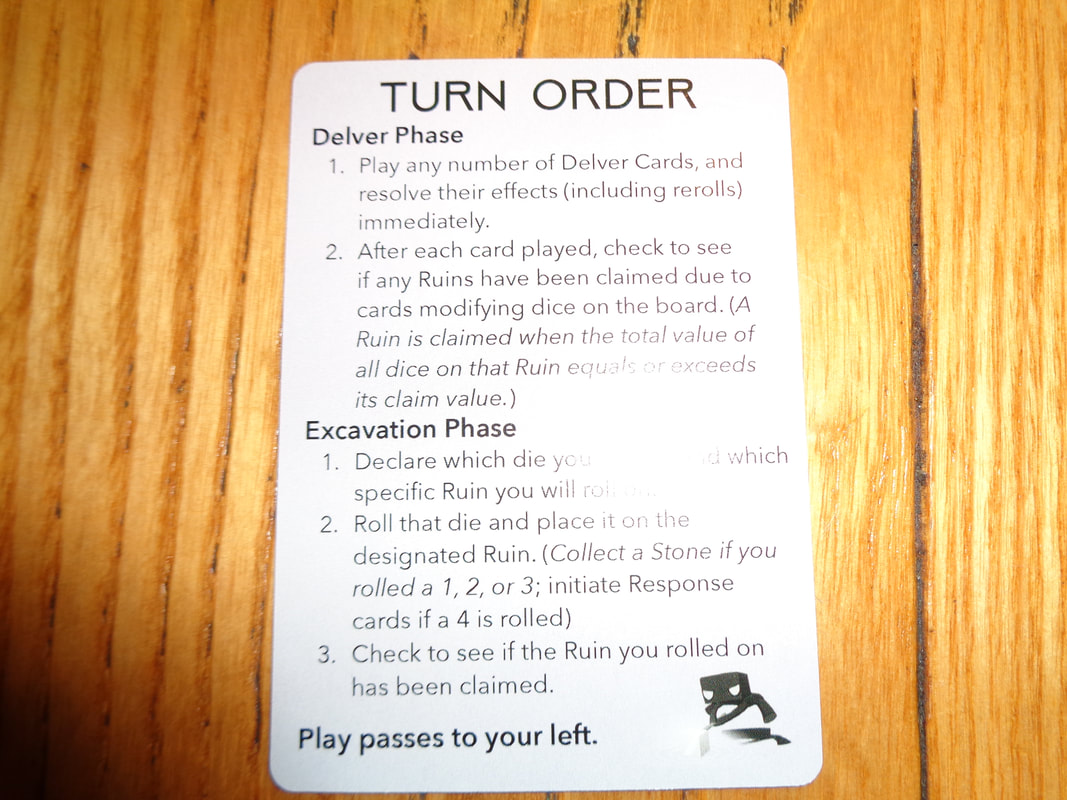
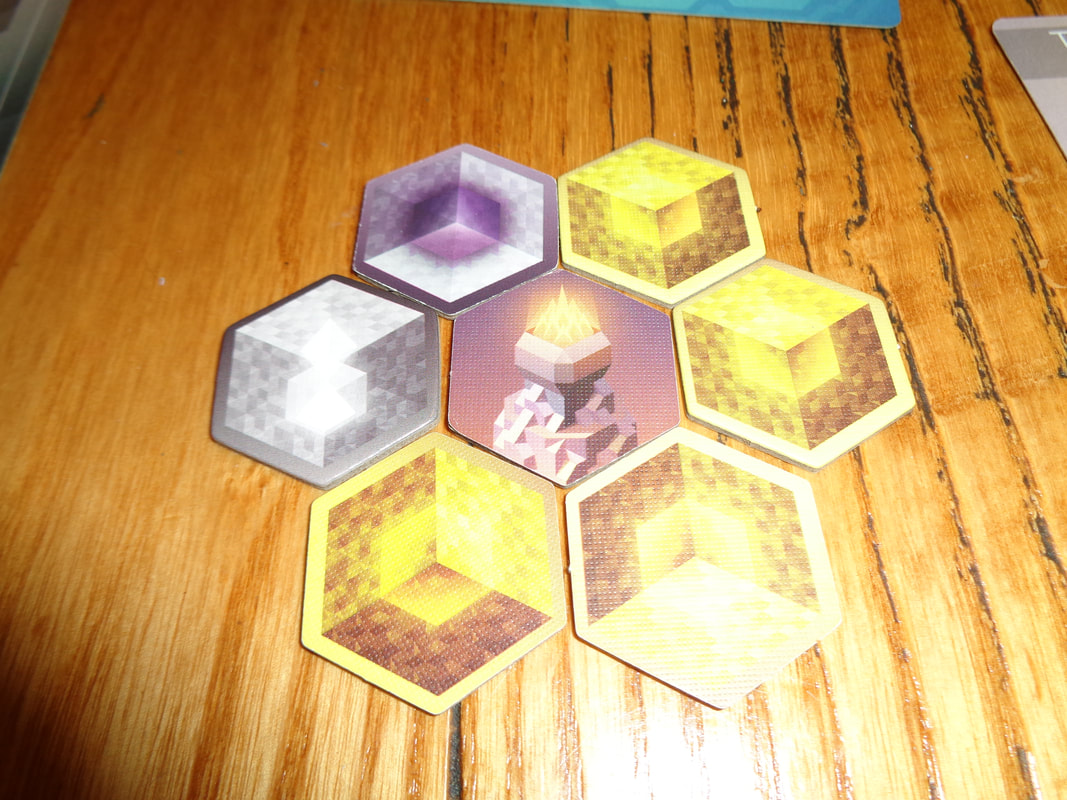
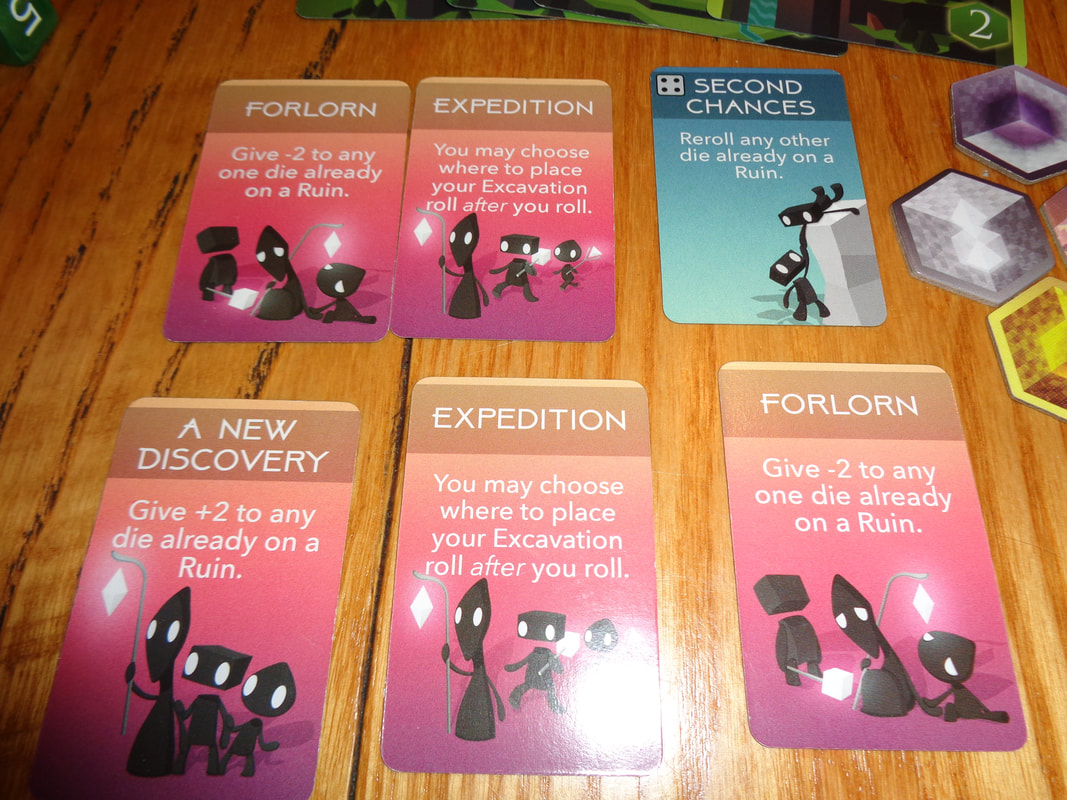
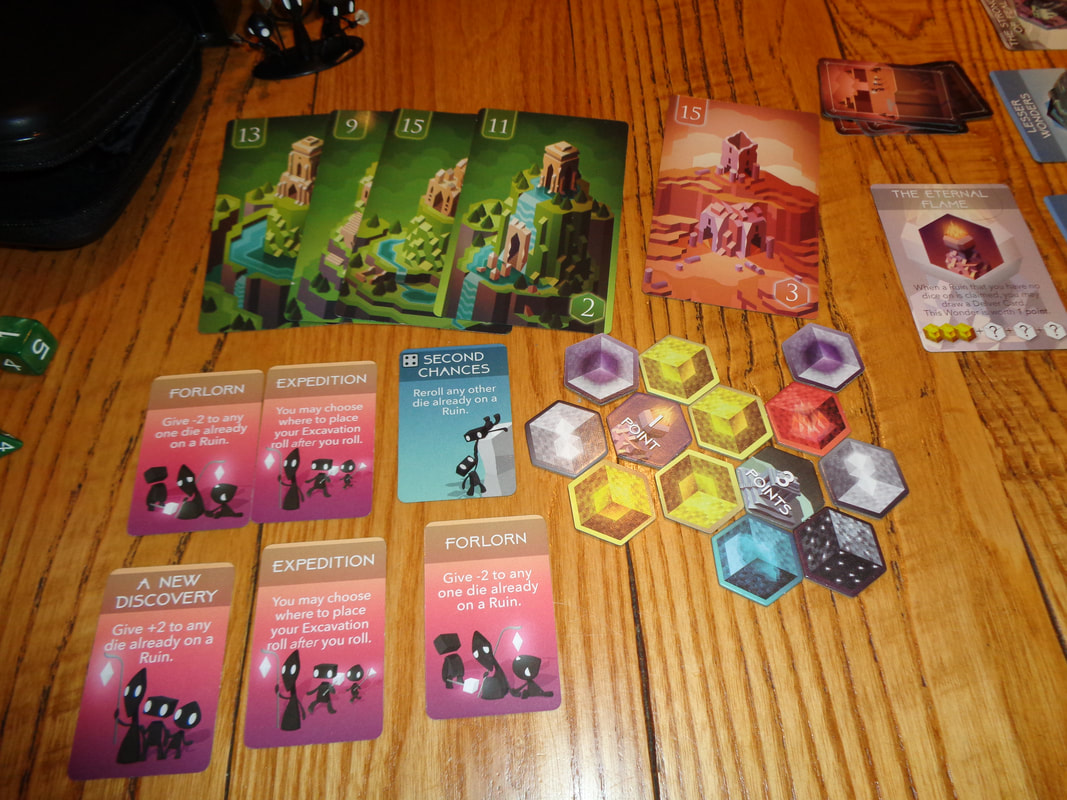
For the ruins cards, Unearth uses some distinct eye-catching colour palettes and isometric cuboid artwork to depict the long destroyed structures. For the delver cards, an almost cartoony style is used to illustrate the workers/dice. Overall, I like the art style. The game doesn't make much use of iconography, what there is of it is pretty simple to comprehend. How's it play? Setup
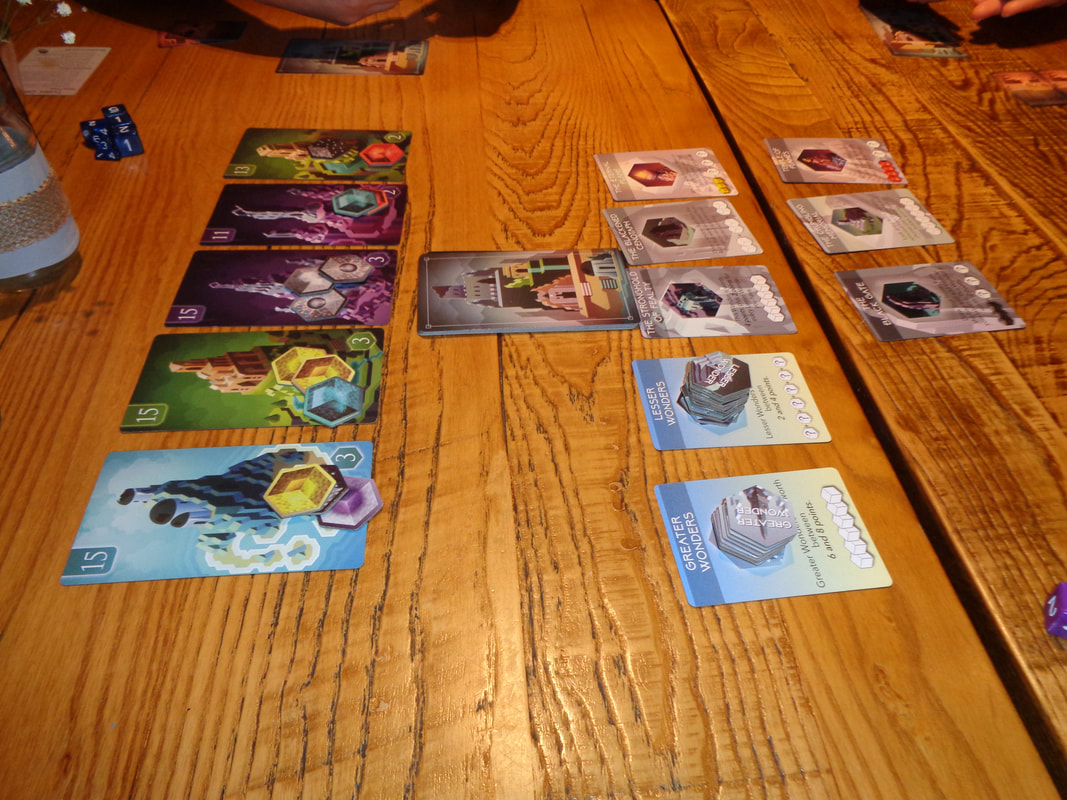
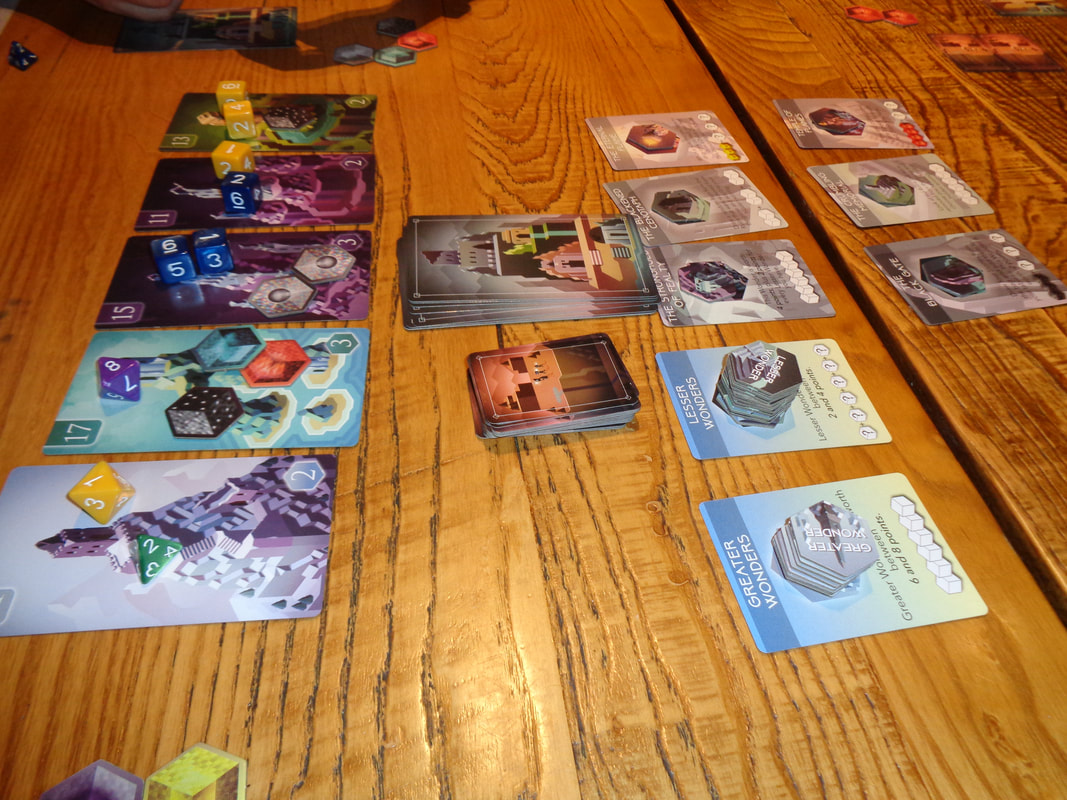
On to play In Unearth, players take turns and are attempting to use delvers to acquire sets of ruin cards, that is place rolled dice on ruins card and also build wonders by accumulating and placing stone. Broadly speaking there can be 2 phases that the active player acts in, the delving phase and the building phase.
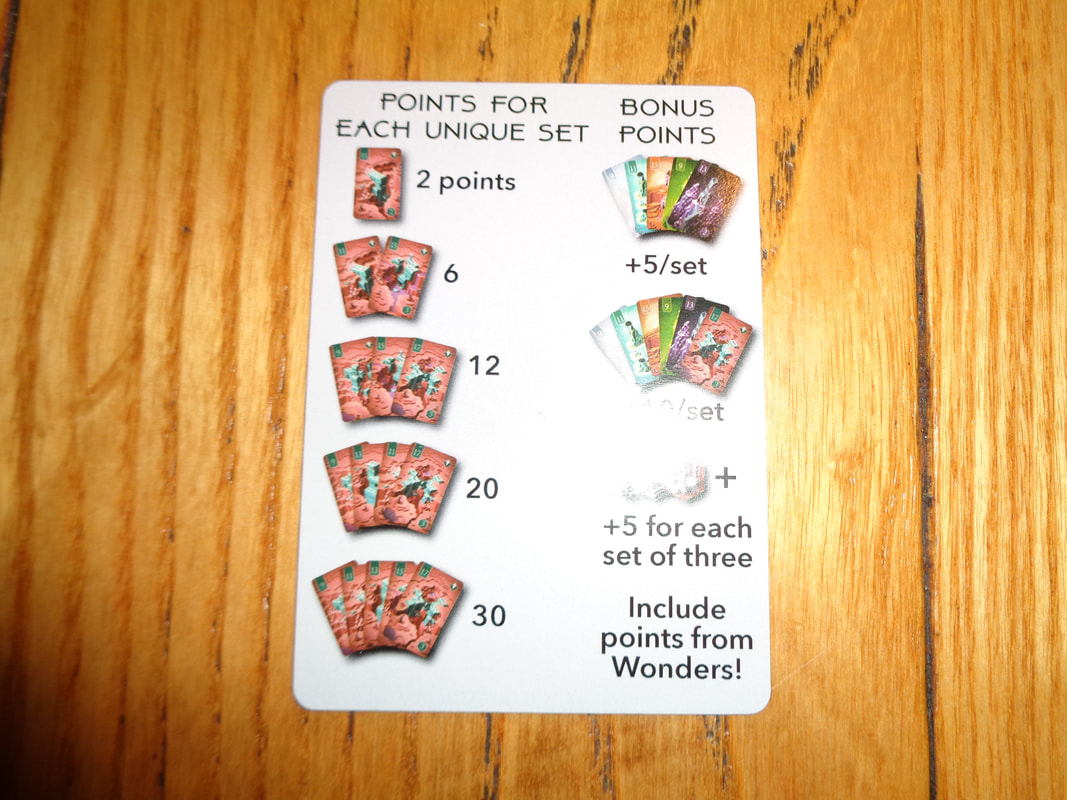
Endgame Play continues until the end of age card is revealed, any instructions on that card are immediately resolved, then play continues until all ruins cards have been claimed. Players then score for each set of the same colour they've collected. Sets range from 1-5 cards and score 2-30 points per set. there are also points for sets of each colour collected. Players can then score points from the individual wonders they've built, they also score for building 3 or more wonders. Points are tallied, highest score wins. Overall
The sum of Unearth's parts make it a fairly unusual game. It provides 2 distinct paths to scoring points and neither can be entirely ignored. Set collecting is one way to earn victory points and the card collecting mechanics are quite solid, giving players who fail to acquire a card some sort of other benefit and the range of dice available to players that give them a couple of options is key to this. Players can play for the card or try and play for the stones - the eight-sided die has a slightly better chance of roll higher than a six-sider and four sided die has a 75% chance of rolling 3 or lower, they each give advantage but don't guaranteed success. The other path to victory points - building wonders requires players to both plan ahead and also adapt to opportunities and changes as they appear, collecting stones of a particular colour can always prove tricky, especially if another player is also on the hunt for stone tokens. There are also some restrictions on how stone tiles are placed and depending on what a stones a player is trying to get, placing them may require a small amount of planning and forethought. I found Unearth a little unengaging and I can't quite put my finger on why, maybe it's the game's slightly abstract nature or maybe that it feels like little is ever happening. Very little seems to occur in a player's turn, quite often a player rolls a dice and there's no immediate effect, sometimes they get a stone, sometimes they don't, occasionally they get a ruins card. Often it felt like that despite my decisions, little was in my control. All of this makes the game sort of light on decision making. Players choose which ruins card to gamble a doe on and when to use a delver card, or where to place a stone token when they gain one and that's about it. There's just not that much to it. I can't find much to fault Unearth but then I can't find much to praise it either. It's all a little unexciting. 12th September 2021 Up from the depths. Thirty stories high. Breathing fire! HIS HEAD IN THE SKY! GODZILLA! GODZILLA! GODZILLA! ….and Godzoo- OK, that's going too far. Take on the role of a kaiju as they rampage against each other for the right to flatten Tokyo! What's in a game?
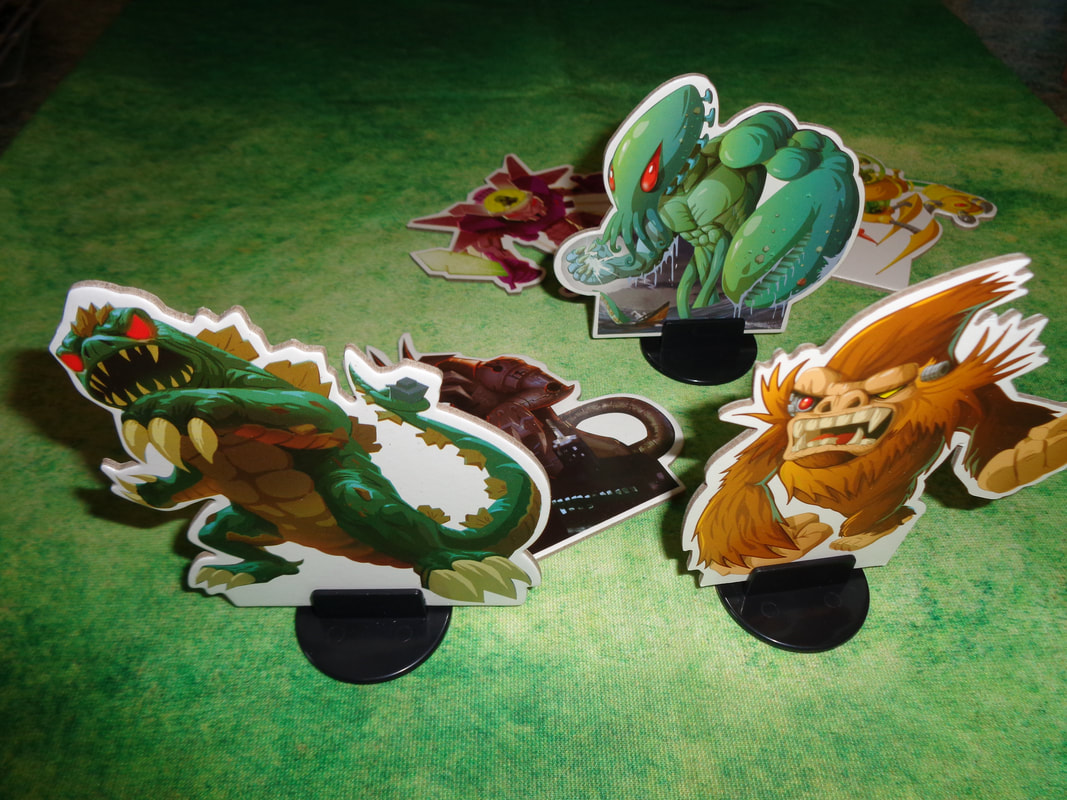
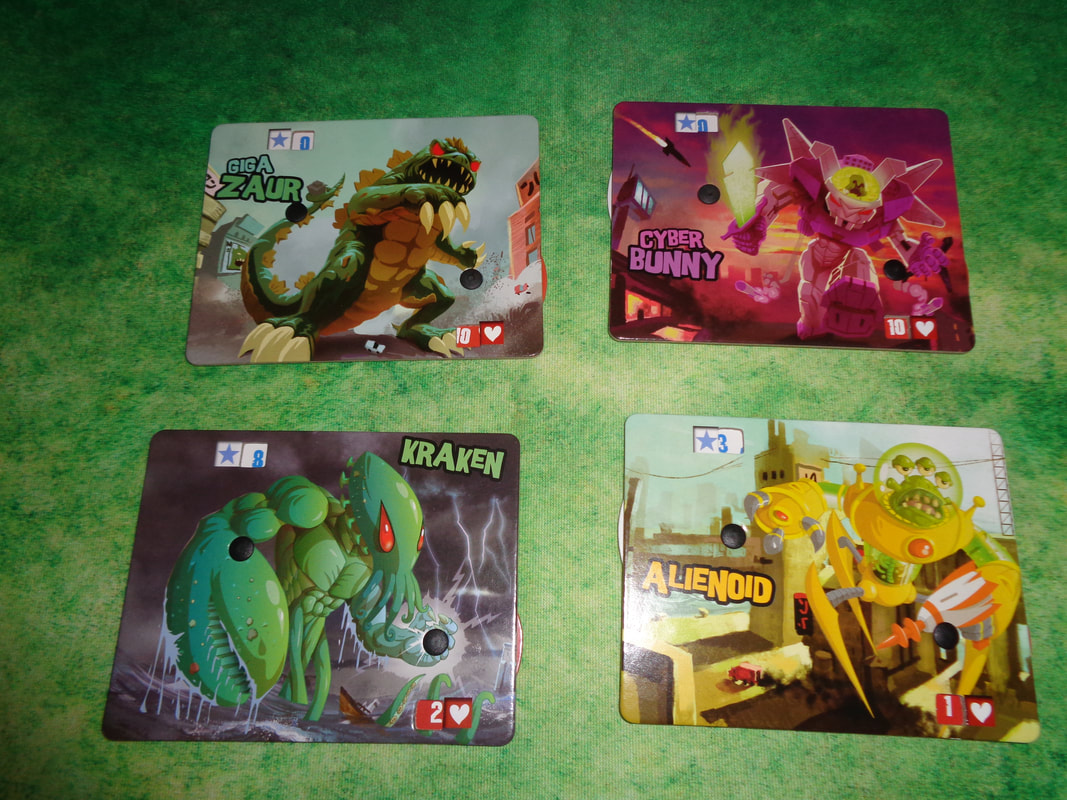
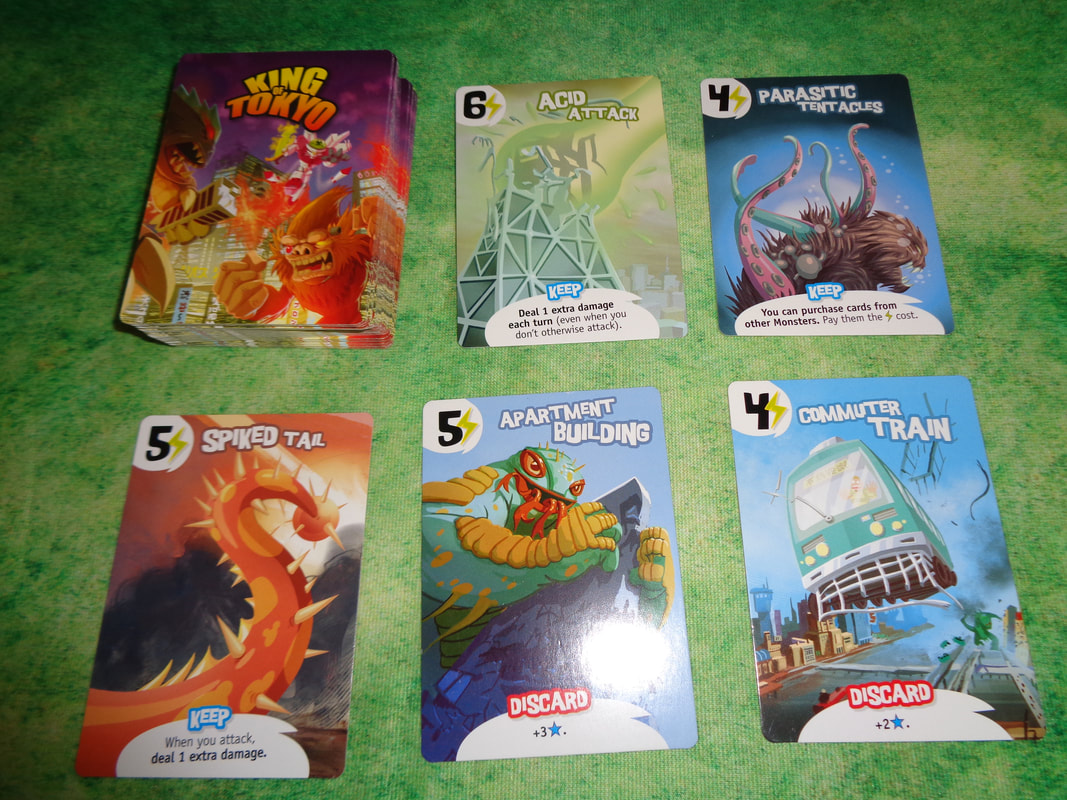
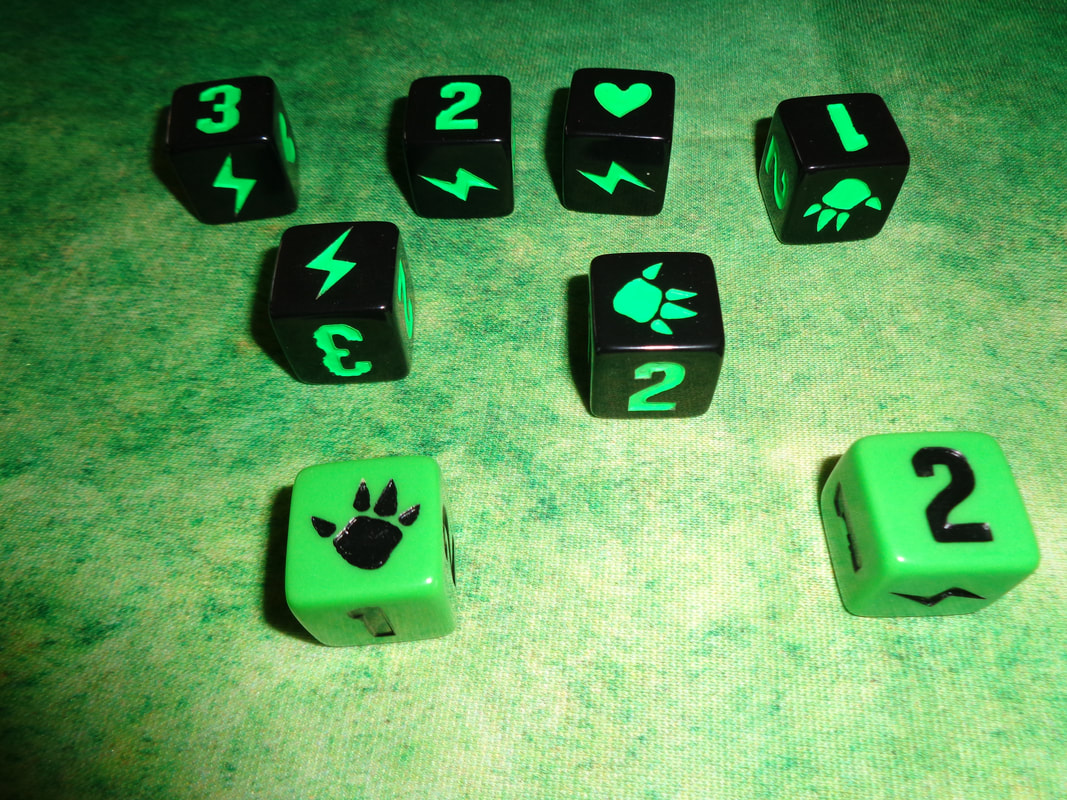
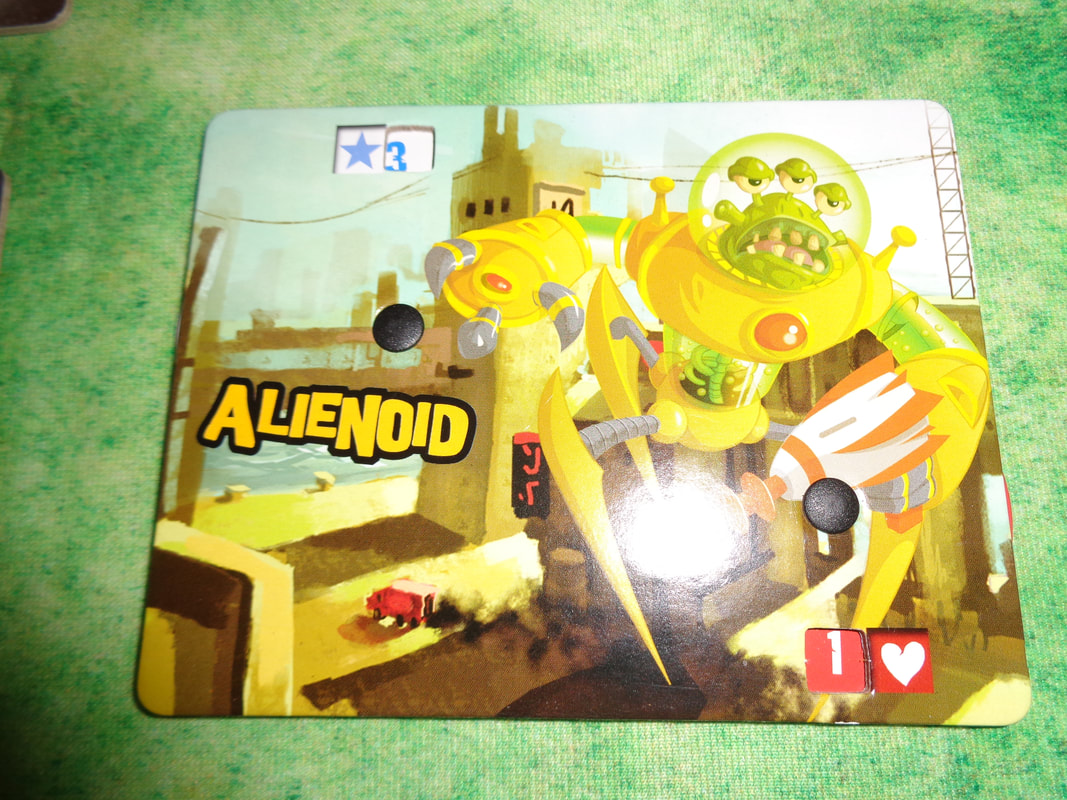
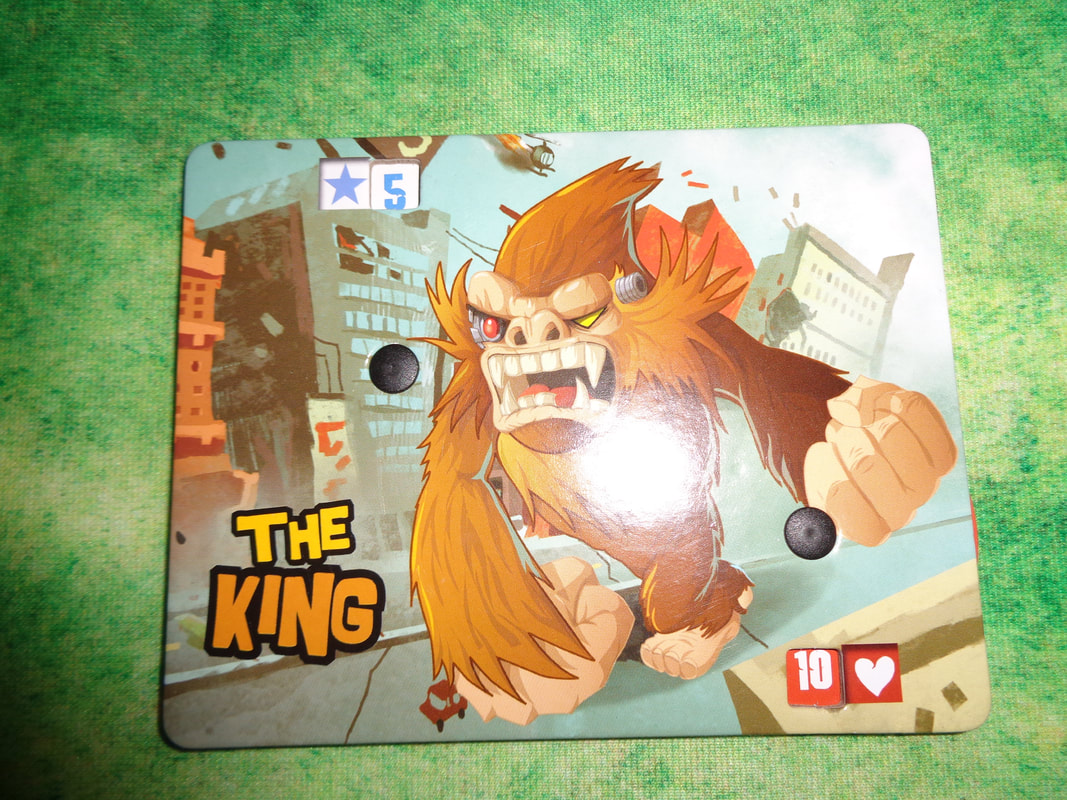
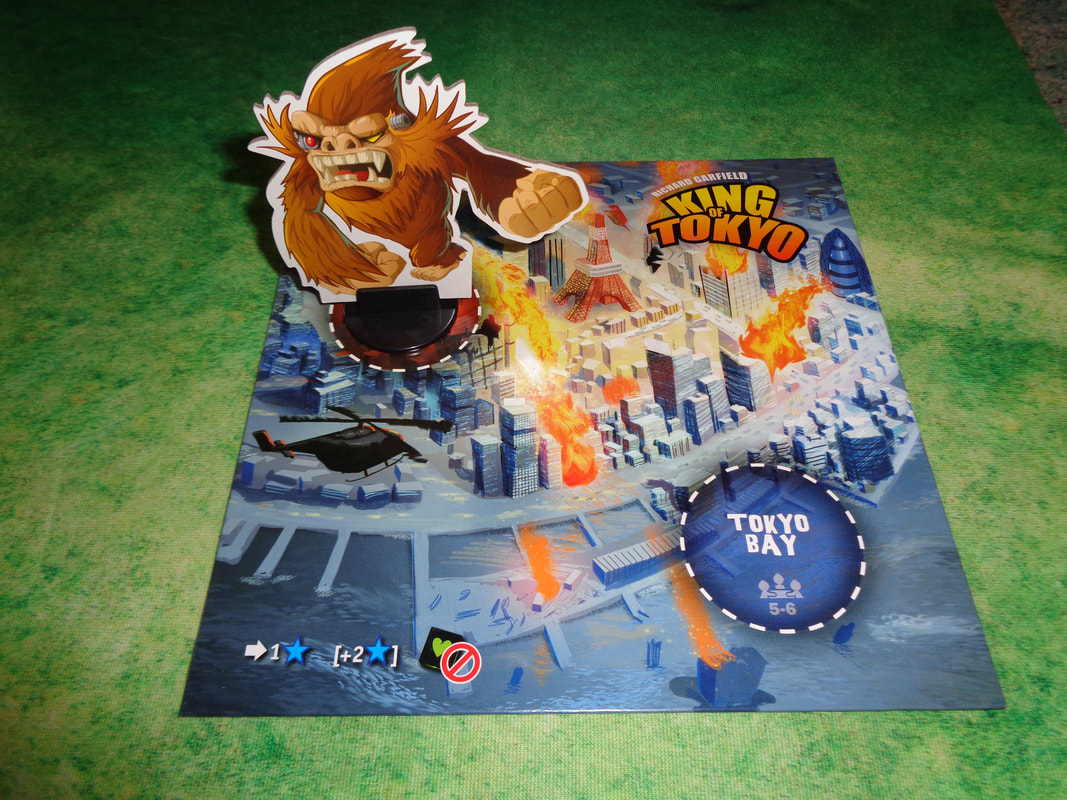
The dice are very well constructed and feel satisfying weighty to heft, which is good because they be getting a of of use. The boards, cards and standees are lavished with brash, colourful and cartoonish art, it's comical style perfectly fits both the game's style and over the top theme. The game has little iconography which is easy to understand. How's it play? Setup
On to play In King of Tokyo, players take turns rolling and re-rolling dice, then using those results to try and gain some benefit to work towards their objectives. During play there will always be a monster inside Tokyo, while the others are outside, in a 5+ player game, there can be 2 monsters inside Tokyo. A turn goes like this.
Endgame Play continues until one of two conditions are met. A player has reached 20 victory points - in which they immediately win or all monster bar one have had their health reduced to 0, in which case the last monster standing wins. Overall
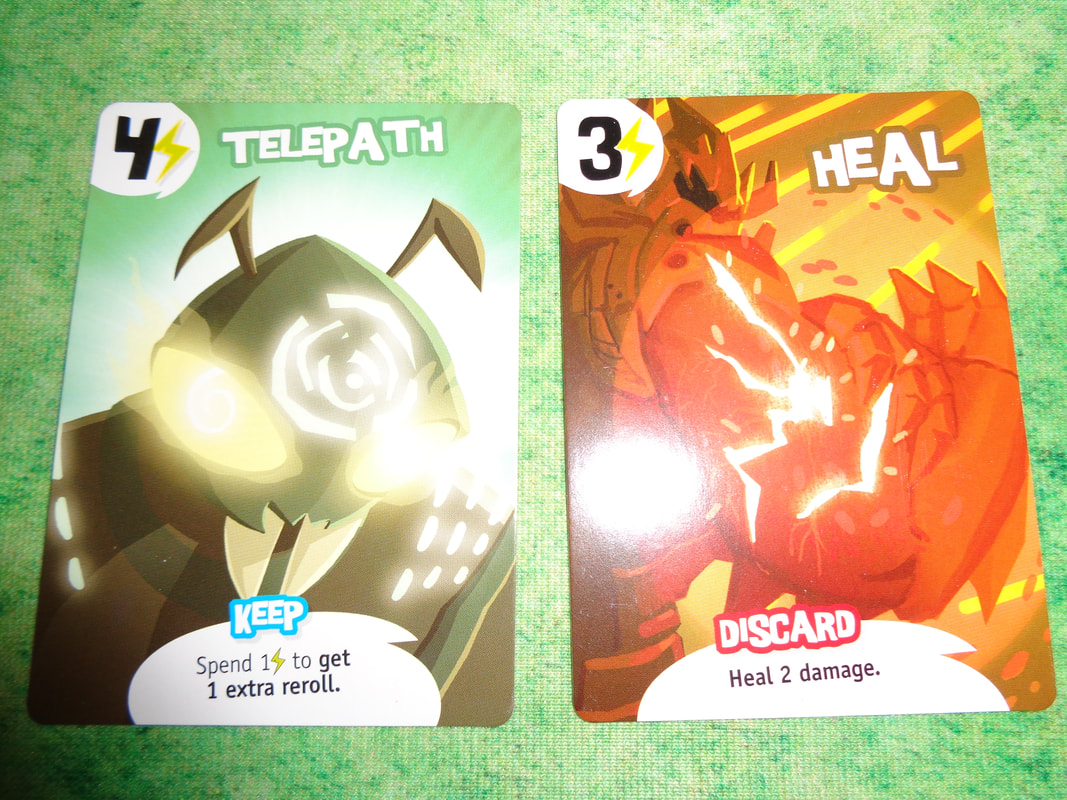
King of Tokyo is a push-your-luck game with a difference, most other games of this type task players with essentially beating the odds and doing so more efficiently than other players, getting to whatever the victory criteria is first. But King of Tokyo has an extra wrinkle, in King of Tokyo, players can target and eliminate other players, I'm not a fan of player elimination but it gives the game an extra approach and dimension to gameplay. Not only that, players will look to prioritise different results at different times, if they're low on health; they'll want hearts. If there's a power card they like the look of; they'll want energy. The rules for getting into Tokyo compliment this well. Getting into Tokyo works for scoring points or attacking enemies. There's an inherent risk to do so, because it makes that player the central target. Managing to stick it out in Tokyo however, earns the player 2 victory points per turn, which on the surface might not seem like much but is actually 10% of the required victory score. Additionally, being in Tokyo is the best way to dish out damage to all other players, hit them hard enough and they'll probably want to heal instead of attack, giving the player in Tokyo more time, because sometimes, attacking the player in Tokyo is a risk. A canny player might yield Tokyo to another player who is low on health because it then puts them on the spot! Throw the usage of power cards into the mix and King of Tokyo becomes an enjoyable blend of strategy, risk and reward and push-your-luck mechanics. Furthermore, players will need to adapt to the unpredictability the game sends their way. King of Tokyo is a easy to learn, light and fun game not to be taken too seriously, it's perhaps a little too long for a filler game but is definitely worth trying, especially if you're a fan of push-your-luck games. |
AuthorI play, I paint. Archives
March 2024
Categories
All
|


 RSS Feed
