|
4th August 2022 It's a Thursday and we're round Simon's for a evening of gaming entertainment. Cascadia: 'A land of falling waters,' generally referring to a large wilderness area in the Pacific north-west of the USA. In Cascadia players vie to create a diverse landscape of habitats and wildlife in this tile placement game. What's in a game?
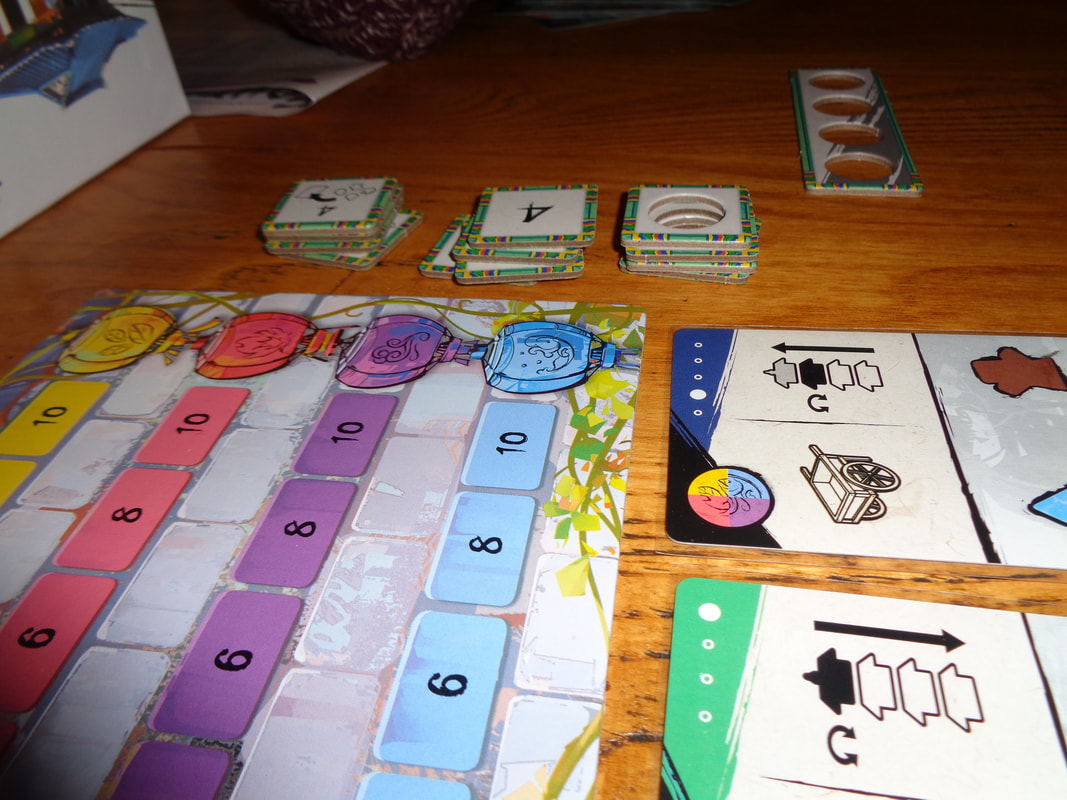
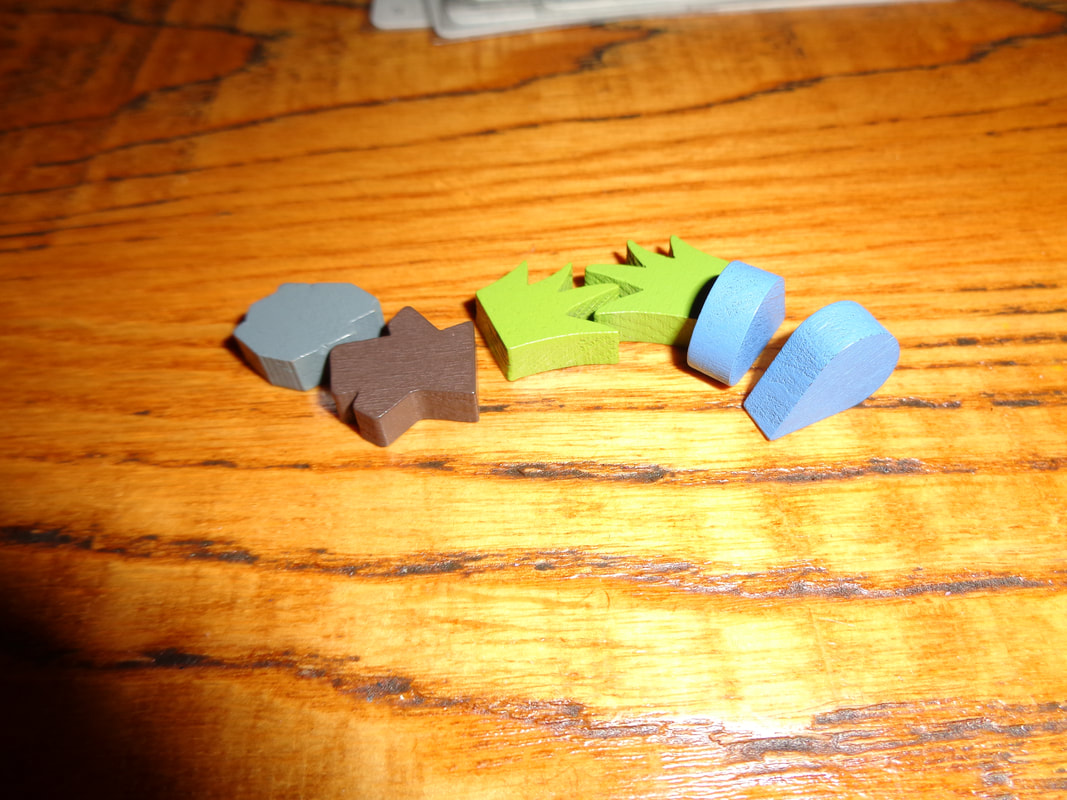
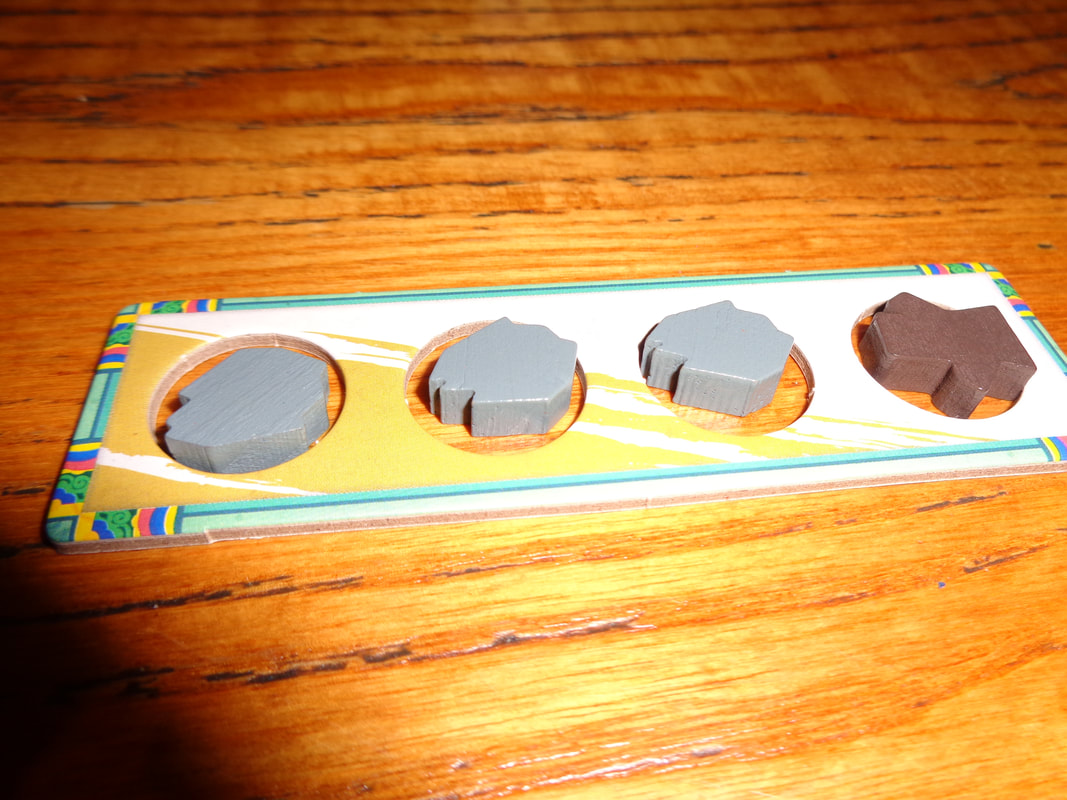
For the most part the components are all high quality. The tiles and tokens are sturdy and the wildlife tokens in particular are chunky and tactile. The pinecone tokens are average quality by modern standard - which means perfectly acceptable. The same is true of the cards, they feel a little flimsy but since they're only used to display information and won't really be handled much, they too are perfectly acceptable. The art used on cards is fantastic, having said that, each set of 4 only uses 2 images which are flipped and used a 2nd time, it's a minor quibble but it feels touch cheap. Art on the tiles is good too but is hard to appreciate since they are relatively small. Importantly, it's also uncluttered, differences between habitats is for the most part very easy to distinguish. Similarly, the wildlife icons are easy seen. As a minor aside: Prairies are depicted as yellow, which I guess represent dry grasslands. The yellow definitely does not represent desert! And yes; some of the yellow tiles have salmon icons on them, because, believe it or not, prairies can have water features. If you ever play the game and someone says, 'why are their fish in the desert', then let them know!! Anyway, back to talking about components. The iconography is easily understood in Cascadia. It's obvious what the wildlife icons represent and the icon for pinecones is equally as obvious. How's it play? Setup
On to play In Cascadia, players will draft tiles and wildlife tokens, using them to create a personal landscape by placing tiles adjacent to each other and putting tokens on top of them in order to create habitats and patterns of animals to score points. Cascadia follows a usual turn order with the active player resolving their action before play progresses to their left.
Endgame Play continues until all the face-down stacks of tiles have been depleted and only 3 tiles remain in the drafting area, which should also be a even number of player turns. VPs are scored from several sources.
Points are tallied, highest score wins. Overall
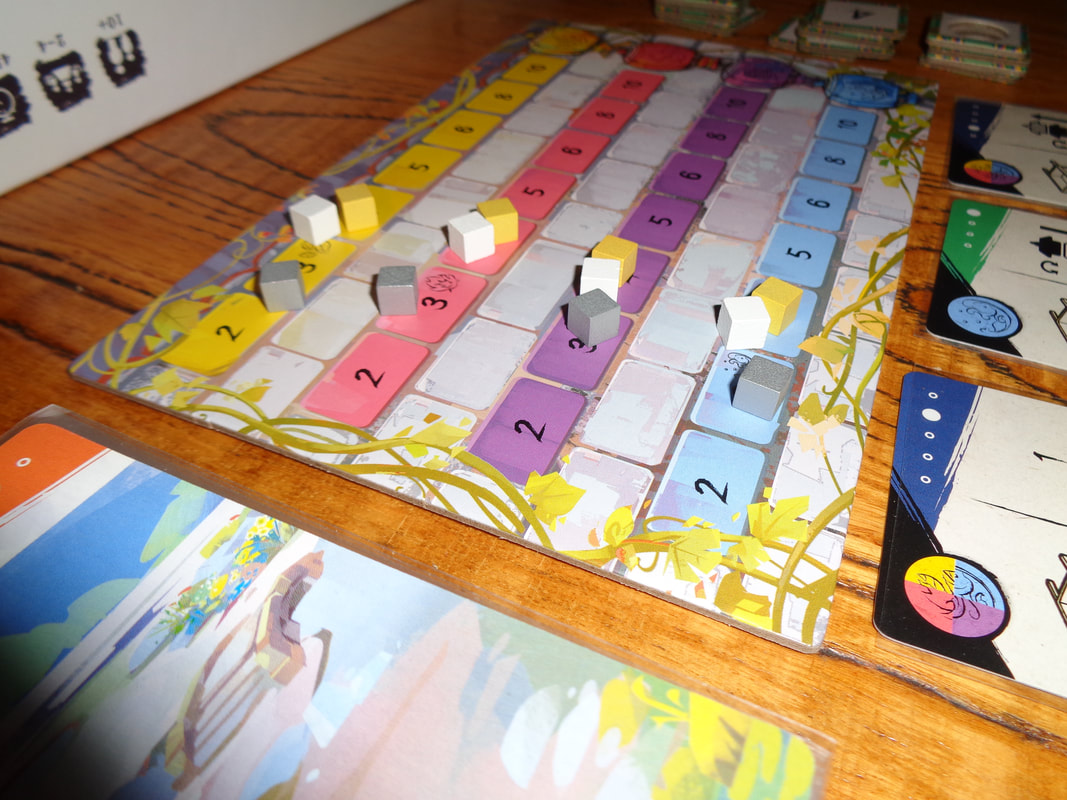
The rulebook for Cascadia talks about the real life habitats and biomes that inspired the game and it's obvious that this is one of those games where a bit of extra attention has been put into the details. On to the game itself: Cascadia has a nice mixture of quick to learn rules and depth of gameplay. This depth comes from forcing players to make tricky and meaningful decisions. This occurs because Cascadia has 3 axis' of play which will influence players' choices. The first comes from wanting tiles with specific habitats on them; players may want to expand their forests or rivers for example and will be looking for tiles that facilitate that. The second axis comes from also wanting tiles with specific wildlife icons. If a player needs a fox token in a certain spot, then they'll need a tile with a fox icon. The third and final axis comes from getting the actual wildlife tokens that are needed to score the wildlife cards. All of this means that it's unlikely that players will get all 3 that they want when picking a single pair which would be a no-brainer, they'll probably end getting 2 of they want and sometimes only 1. Players will need to adapt and re-strategize contextually, look to optimise their picks and finding other scoring opportunities. Players will probably have to gamble a little bit on getting what they need later in the game. Pinecone tokens can of course change things. Used at the right time they can really open up a player's choices, getting any pair can make a difference, as can clearing all wildlife tokens in the drafting area if a player is really looking for a certain token. Cascadia also has a fairly quick playtime, although it sort of occupies a game length that's way too long to be a filler but a little too short to fill an entire evening. I don't consider that a bad thing, you could just play twice! The randomness in setup and scoring gives it a lot of replayability. If I had a criticism of Cascadia, it would be that sometimes the card scoring can be a little unclear and finicky. The rulebook does offer elaborations on this, but it's a definite little niggle. Otherwise though, I think Cascadia is ab excellent tile-laying and set collectiing game. For me it ticks a lot of boxes that good games should; straightforward rules, some depth for decision making and a brisk playtime. It's one of those games I frequently like to carry in my board game bag when going to game events, so if I meet someone who's never met played Cascadia, they can try it. As should you!
0 Comments
5th July 2022 It's a Tuesday and we're at The Sovereigns with the Woking Board Gaming Club for an evening of gaming. The world of Victorian anthropomorphic railroad magnates is a cutthroat one in this game of acquiring train lines and towns. Buy low and sell high to become the... Raccoon Tycoon! What's in a game?
Raccoon Tycoon has excellent production values. Wooden tokens are used for commodities and first player token which is a good move, they always have a quality to them and also look cool. The cards (And paper money) have a sturdy feel to them while the tiles are satisfyingly thick. The game's art direction is also equally high. Anthropomorphic art is used throughout the game and I've found that it's a divisive style which most people do or don't like. Regardless of your view on this, it's undeniable that the quality of the art is high. The standouts are the railroad cards which use a oil painting style to display whimsical characterful animals in Victorian clothes. Curiously, the building tiles use a completely different style, instead displaying line illustrated buildings and subjects with mostly flat and barely shaded colours. It's a striking contrast that should theoretically be jarring but actually fits quite well. Icons used to represent commodities on cards are easily understood. Most other game information is relayed via text which is usually very clear. How's it play? Setup
On to play Players are trying to earn VPs in Raccoon Tycoon, this can be done by collecting sets of railroad cards, acquiring town cards to pair with railroad cards and gaining building tiles which are not only worth VPs but can provide avenues to scoring more VPs. All of this requires money and commodities, players will need to manipulate the commodities market to maximise the profit gained from selling their own commodities while trying limit the profit of other players. Racoon Tycoon follows a traditional turn order with the active player resolving their action before play moves on to the player on their left.
Endgame Play continues until one of the following 2 criteria is met.
VPs come from a variety of sources. Sets of railroad cards. Town cards paired with railroad cards. Building tiles earn 1 VP each. Bonuses from building cards may also provide additional VPS. Points are tallied, highest score wins. Overall
Even without the anthropomorphic artwork, Raccoon Tycoon would be something or a quirky game. It packs quite a lot of mechanical systems into a single game albeit to a fairly simple level. A little bit of stock market manipulation, a touch of set collecting, a dash of auctioning and a sprinkling of engine building. It could be a recipe for disaster but in the case of Raccoon Tycoon; the whole is greater than the sum of the parts. A large part of this I feel is due to the building tiles. Their unique bonuses both provide some asymmetrical gameplay elements and can also give players a bit of strategic direction. Raccoon Tycoon is a bit of a balancing act between acquiring cash for railroad cards/building tiles and commodities for town cards. It's hard to work towards both at the same time. Adaptation is important here, as is planning ahead. Players could look to finding ways to raise commodity values to increase profit when selling them later This brings me to commodity manipulation. There isn't too much interaction between players other than auctioning and commodity manipulation, Watching what opponents are doing can prove useful and is something of a higher level of play. I.e., if 2 players are accumulating the same commodity, there's a possibility that one of them will sell it, causing that market to crash. Beating a opponent to the punch so to speak, can cost them lots of cash! Raccoon Tycoon is fairly rules light and I think seasoned gamers won't have any problems grasping all the systems at work here. For less experienced gamers, the curve will be steeper, I don't feel it's a gamebreaker but I imagine it could be off putting. While there's enough gameplay to give players thoughtful and meaningful decisions to make and a fun experience, I also found the game to be a little unengaging and uncompelling, I never felt like I was building railroads or towns and despite the unique art style, it didn't feel like it stood out from the crowd. here's nothing wrong with Raccoon Tycoon but it wouldn't be my first pick for a game, although I'd have no problem playing it if someone else wanted to. 29th May 2022 Sunday gaming on Board Game Arena continued with mancala styled game Fruit Picking. I'm not the fruit picker, I'm the fruit picker's son, I'm only picking fruits 'til the fruit picker comes. Hmm, it doesn't work... Caveat: We've only ever played Fruit Picking digitally. What's in a game?
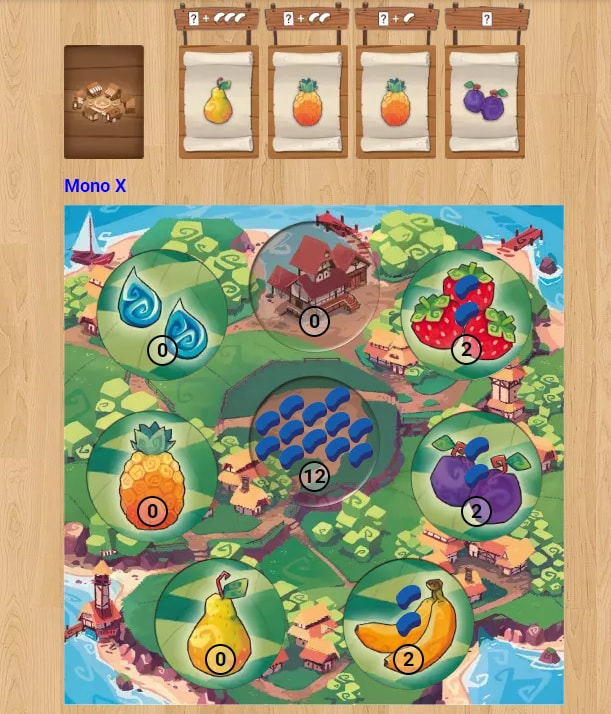
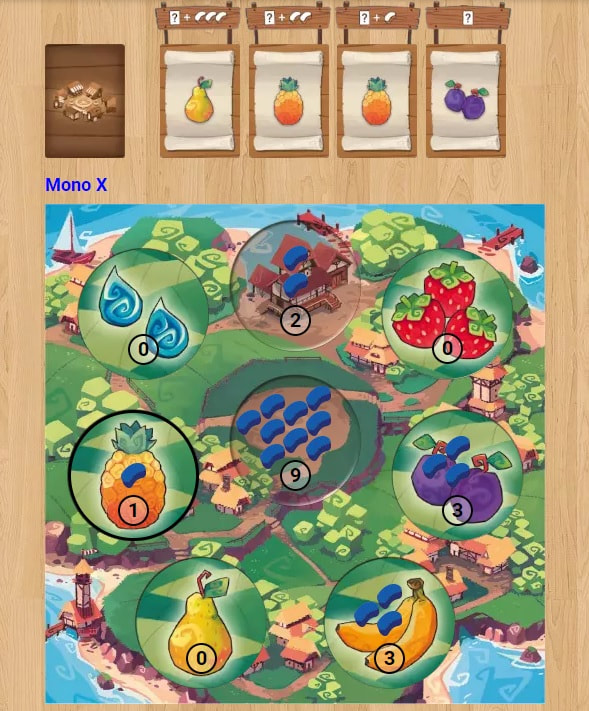
The boards in Fruit Picking feature a couple rural landscapes depicted with a appealingly stylised illustrations showing idyllic countryside. The fruits are also well illustrated and Fruit Picking has solid art style. Other than the fruit and waterdrop symbols, there's no iconography in the game and it should not prove any problem to players. How's it play? Setup
On to play In Fruit Picking, players take turns moving their resources clockwise around the spaces on their board which allows them to active one space to gain more seeds or buy a card. Play begins with the first player and once their turn is over, proceeds to the left.
Endgame Play continues with players acquiring fruit cards until one player has the cards to meet one of the criteria which triggers the game end. Fruit Picking provides players with 4 ways to do this. A pair and 3 of a kind, 4 of a kind, 3 pairs and 1 of each fruit. When this occurs, the current round is completed and if the player who triggered the game is the only one to have met any of the criteria, then they win. In the likelihood that more than one player has met any of the criteria by the end of the last round, then ties are broken by quantities of fruit and seeds on cards. Overall
Fruit Picking is a lightweight games that has a good mix of logic and luck. Logically, it's not hard to think several moves ahead if you want. Once farm cards have been distributed on to the player boards, moving seeds and activating farm cards is entirely predictable and only driven by player decisions. Manipulating the Harvest House action to game more actions is a key tactic, especially as it can be used to quickly fill the Harvest House and used to purchase cards. Fruit Picking is essentially a race to acquire cards before other players. When cards are drafted, everything can change, which neatly brings me to the next facet of the game The game's unpredictability comes into play on the market track. As play progresses, cards will come into play randomly, not only that, their costs will also vary, especially as they move along the track. It means that some times, the cards appearing will play into certain players' strategies and other times, potentially scupper those strategies. Players will have to be prepared to change direction for long term plans when this occurs and adapt their approach according to what is available. It's something I've encountered in other games and found to be irritating, Fruit Picking is no different. I know that this can be an important element of a game because without some randomizer, it can sometimes very quickly become obvious who's going to win. Even so, it irritates me. Fruit Picking also sits in a strange place of feeling a bit overlong for a filler game but definitely a bit too light for a main game. Having said that, it's accessible game that's easy to learn. For people who want something which engages some tactical thinking but is not along time brain burner, Fruit Picking may hit that sweet spot. 29th May 2022 It's a Sunday Evening and we're on Board Game Arena for some gaming entertainment. Copenhagen; largest city in and capital of Denmark. Few know though, of the cities secret history of builders having ties with errr.... tetromino shapes? At least that's what the game Copenhagen would have you believe... sort of! Caveat: we've only ever played Copenhagen digitally. What's in a game?
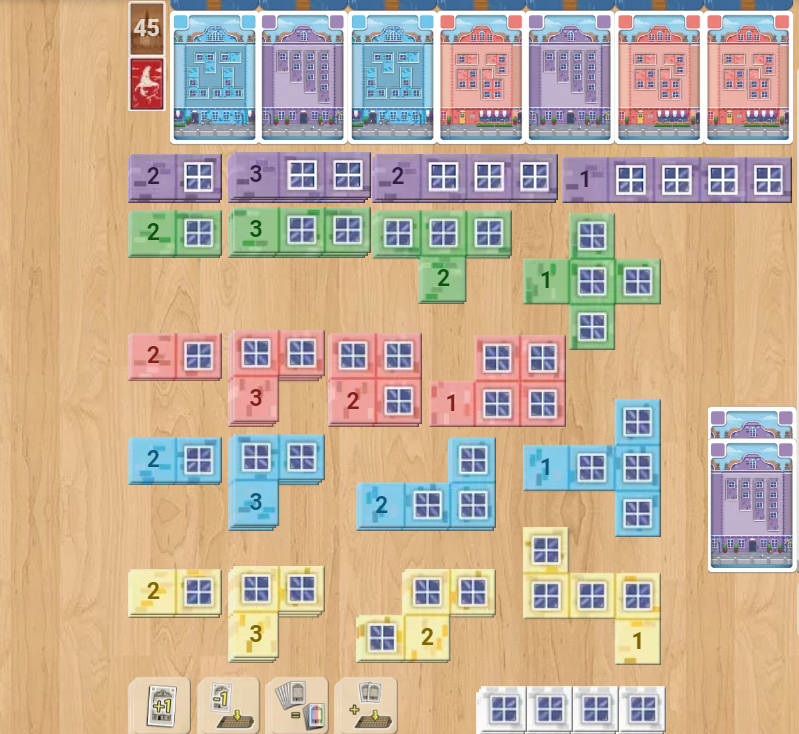
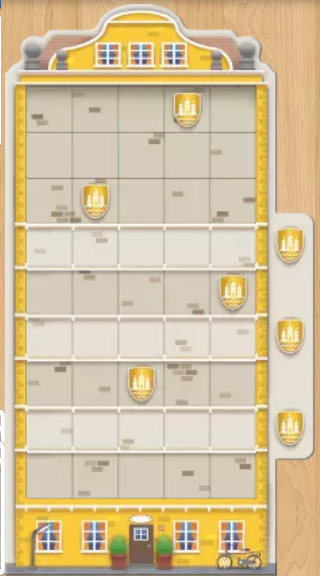
The components for Copenhagen are pretty colourful and bright, although there's barely any art to speak of. There's also barely any iconography to speak of. The symbols on the ability tiles aren't immediately obvious and will probably require looking up in the rules a couple of times. Other than that though, everything else is easily understood.
How's it play? Setup
On to play In Copenhagen, players take turns either gathering cards or playing them to gain tiles which they put on to their player board to score points. During their turn, the active player may perform exactly 1 of 2 possible actions.
Endgame Either one of two ways can trigger the game end. If the End Game card is drawn (Can only occur after shuffling the discard pile back into a draw deck.) then the game immediately ends. If a player scores a 12th point then the game immediately ends. In either case, points are tallied, highest score wins. Overall
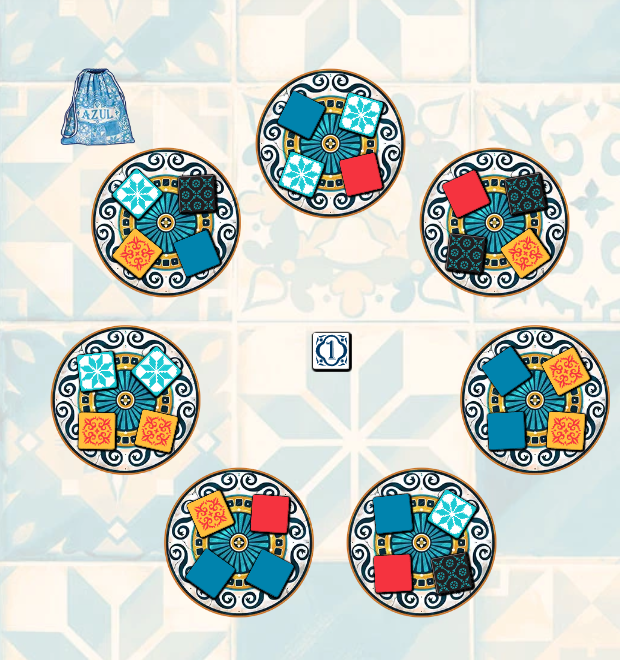
Mechanically, Copenhagen is a fairly light, accessible game; players are either drafting cards or drafting tiles. It's the relationship between those 2 actions that's interesting. Firstly, there's not many tiles that go into the game, e.g., only 1 5-space tile is available in each colour and only 3 each of the other sizes in each colour, which is all quite deliberate. It takes more cards and thus more actions (And longer.) to get the bigger tiles which are the better tiles but there's the risk a player won't get the one they want. The bigger tiles are better because of the windows (Or lack of.) on them. Getting a lot of 2-space tiles will mean 50% of filled spaces on a player's board will be windowless, while getting a lot of 5-space tiles means only 20% of spaces are windowless. Completing a row or column with all windows essentially doubles the points that line is worth and the more windows a player can get on their board, the more likely they are to do this. This brings me to the next point, other than the 1-space tiles, every tile has a windowless space. This means it's very hard to create lines that all score windows. Players will want to position windowless spaces to minimise their effect and provides players with meaningful decisions to make. These two factors means that players are faced with a dilemma. Go for the quicker easier to get tiles and probably get a smaller score, or take the risk of losing our by going for bigger, better scoring tiles. There's definitely a higher level of play that involves watching what cards other players are drafting and trying to anticipate what colours they're going for. This kind of knowledge allows players to adapt to what they think their opponent is doing. I think Copenhagen is a fairly easy to learn game that has a streak of depth to it. Most people will pick it up fairly quickly. Having said that I personally found the game a little dull. There's nothing here that I haven't seen elsewhere, it's just packaged differently here. Copenhagen also played just a little too quickly for my liking (Normally something I'd never criticise a game for!); playing with just 3 people meant that frequently 6 cards were being drawn from the 70 card deck every round, this means the game would reach the end of the deck twice after 20-something cards drafts for each player. It felt like the game is mostly likely to deplete it's deck before a player gets to 12 points. To put that into perspective; if a player has 20-something card drafting actions, that in turn gives them the ability to draft around 50 spaces worth of tiles. The quickest way to reach 12 points is to have 6 filled rows, all with windows. That would require filling in 30 spaces at a minimum, this is provided they got the cards and tiles they wanted. I'm sure there are players out there that would find the challenge of getting to 12 points compelling but for me. It meant that I found the game unsatisfying and combined with it's blandness made it average and unremarkable. I can't really fault the game, it's just a little dull. 1st May 2022 It's a Sunday and we're logged into Board Game Arena for an evening of gaming. Azul; not a game about a villainous god-entity from Ghostbusters but actually a game about creating mosaic, decorative wall patterns with multi coloured tiles. My friend's a plasterer, wonder if he'd be good at this! Caveat: We've only ever played Azul digitally. What's in a game?
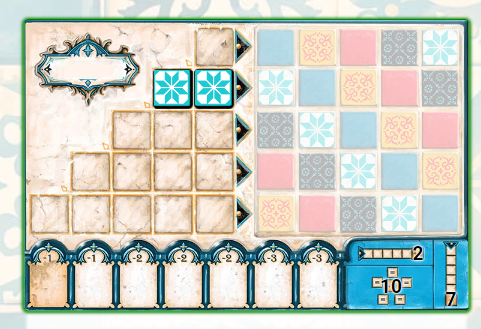
Azul doesn't make use of icons and the relationship between tokens and a player board is clear. How's it play? Setup
On to play In Azul, the player's objective is to place tokens on to their respective spots on the wall grid of their player board, which scores them VPs. This is done by filling in the horizontal lines in the pattern lines grid; players must collect tokens of the type they need and place them in the spaces on the respective horizontal line. Depending on the line, it will require 1-5 tokens to fill a line. When a line is filled, one of those tokens can be placed in the matching space on that line at the end of the round. All tokens will score 1 or more VPs when placed, tokens can also score again at the game end. Azul makes use of a traditional turn order, with the active player performing their action (Which will involve taking 1 or more tokens of the same type.) before play progresses to the player on the left.
Endgame When any horizontal line in the wall grid on any player's board has been filled, the endgame is triggered. The current end of round actions and scoring are completed and the game goes to final, bonus scoring. Bonus VPs can be scored scored by the following:
Points are tallied, highest score wins. Overall
On a rudimentary level, Azul's mechanics involve drafting handfuls of tokens and then placing them on to a board where their relative positioning scores varying amounts of VPs. It's a mechanic (Or a variation of that mechanic.) that have been employed in several other games and I'd say that Azul is a mid-weight iteration of it. As written the rules feel a little opaque and counter-intuitive but in application, they're pretty straightforward. Where Azul get its weightiness comes from two areas of the rules; how the drafting - particularly drafting from mats works and then where and when tiles should go on the grids. As a basic concept, collecting as many tokens as possible to fill out the pattern lines and consequently get tokens on the wall grid is the way to go. However, there's more to it than. For example, simply collecting too many tokens can sent the excess to the floor line and cost VPs, this is more important than it sounds, because as tokens are taken from the mats, it's inevitable that other tokens will build up in the centre and trying to predict this can be very important. Depending on circumstances, a lot of tokens of a particular type may well build up in the centre. A player may want 4 red tokens for example, should they try and take them in drips and drabs from several mats over several turns or wait for them to accumulate in the centre? Provided of that they do accumulate in the centre, what if too many go to the centre? There's definitely a higher level of play where watching what other players are doing is important. Quite often it's clear what they're prioritising, what they want or don't want in the next few turns. If they have a single token in the 5-space line on the left, it's likely they'll be looking to fill that out. Conversely, if they've already got 1 or more scoring tokens on the right side, they'll be unlikely or unable to use more of those tokens. Being able to predict other player's objectives will help when making decisions. It can also allow a player to try and deny tokens to other players and curiously, on some occasions force other players to take tokens they don't want. Players will also want to think about how and when to place their scoring tokens. Putting them down willy-nilly is a sure way to minimise points. Obviously in order to optimise points, tokens should ideally be put on to the wall adjacent to other tokens. Placing them vertically is a good way to go, since completed vertical lines earn an additional 7 VPs each, unless a player is looking to end the game, in which case they can go for the horizontal line! This brings me to an interesting facet in the mechanics, scoring the diagonal, i.e., putting all the tokens of 1 type on to the wall grid scores the biggest bonus; 10 VPs but as they are diagonal, they can't score off of each other! Additionally, once a diagonal of a type has been completed, the player can no longer score tokens of that type at all, collecting those tokens will now just incur penalty points in the floor line. Should a player hold off getting the diagonal until later which lowers the risk of sending tokens to the floor line or wait? Waiting will mean risking not completing it at all. I have to say I'm not fond of mechanics which lose players points especially if it can occur out of their control, it irritates like a unreachable itch and can be a little stress inducing. I find that's the case with Azul as well. However, having said that, the truth is; this is what makes Azul a good game and gives it depth. It means that collecting tokens either earns VPs (Or contributes towards acquiring VPs.) or loses VPs. It's always a meaningful decision. Other iterations of these mechanics are a little less stressful, brain-boiling and perhaps more accessible. But if depth is what you're looking along with a dollop indirect interaction between players, then Azul is worth a try. 15th April 2022 It's a Friday and we're logged into Board Game Arena for some afternoon gaming. Take a road trip across America, visit the landmarks, go wildlife spotting, play some sports, end where you started? Send a postcard (Or write a letter from America.), walk 500 miles, maybe walk 500 more... OK, enough of the tenuous references. Boomerang: USA combines set collecting and roll and write mechanics into a point salad of a scoring game. Caveat: We've only ever played Boomerang: USA digitally. What's in a game?
The only artwork in the game appears on the 28 cards and is obviously referencing the locations the cards represent. It's pretty artwork too, with blue skies and bright colours. Using letters/symbols for cities is a smart move and easily understood. Boomerang: USA makes use of 4 types of sets to collect and each set will feature its own range of icons, it means that the game has a fairly large array of icons. Luckily, it's clear which icons belong to which set and players don't need to reference a rulebook to know what they mean since the game is about matching icons in their respective sets. How's it play? Boomerang: USA is played over 4 rounds and uses a drafting mechanic where players pick a card from their hand and then passes the remaining cards to their left, then all chosen cards are revealed (Or not for the first card.) simultaneously. This continues until all cards have been selected and players have acquired 7 cards.
Endgame Once the 4th round is completed and scored, players then total their final score from across all 4 rounds. Points are tallied, highest score wins. Overall
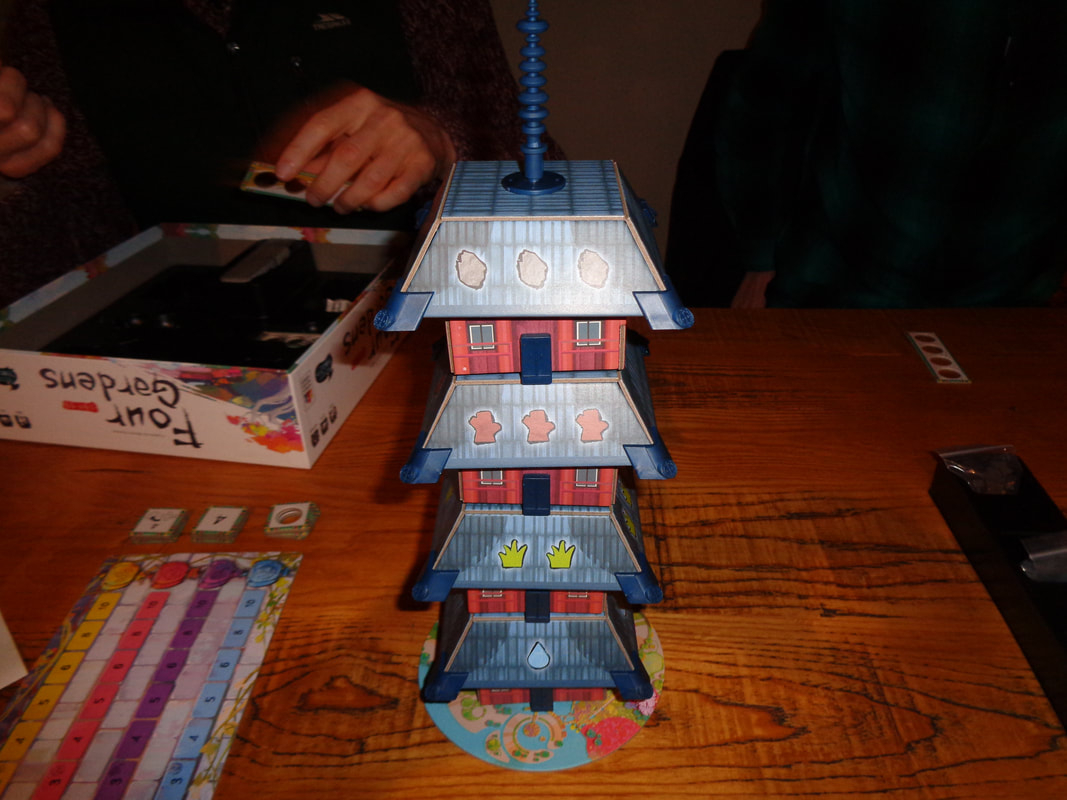
On a basic level, Boomerang: USA is a straightforward drafting game. It's point salad of scoring mechanics makes the game complex, most of the blog above talks about the 7 ways to score VPs. Some of the scoring methods have pretty standard elements, collecting matching pairs or 1 kind of set are common, however, restrictions on how these are scored, particularly for Americana activities add an unusual twist. The throw and catch mechanic is the standout here, presenting players with a clear risk and reward choice right at the start of a round especially when this is when they'll have all 7 cards to choose from. Play a 1 as the throw card and it's guaranteed to score but is only worth 1 VP. Playing a 7 as the throw card earns 7 VPS but requires a 7 as the catch card; since player have no control over what their last card will be it's a risky proposition. Typical for a game of this type, it's more or less impossible to score well in all categories at the same and the dilemma of what a player should prioritise is what drives the gameplay. Should a player concentrate on getting locations and regions (Which are another type of set really.) over other sets? Is it a good idea to have a steadily increasing Americana score over round, or go high then score 0 to score high again? When is a good time to try and get a good score in a particular activity? A lot of this will be contextual or unpredictable, it's the nature of this kind of drafting game. Players will probably start a round with no clear direction and will need to adapt to a strategy and recognise what to prioritise as it emerges from whatever cards they pick. There's also a higher level of play where players can watch their opponents to try and gauge what they're concentrating on and deny it to them: If it looks like an opponent is trying to complete coast-to-coast, a player might chose and play a card with the location needed themselves in order to deny that other player. Although I'm not sure that denial tactics are that effective though, it's entirely possible blocking a opponent will involve blocking yourself as well. I felt like the travelling, roll and write element was a bit out of place here, adding extra layers of what seem like unnecessary complexity the game. So while the game has depth thanks to all these scoring opportunities, it actually felt like it was perhaps a little detrimental to the experience, increasing thinking time and inducing some analysis-paralysis as a consequence. Otherwise I can't really find fault with Boomerang: USA, it's not a bad game by any stretch, it just somehow didn't appeal and seemed a little unengaging. Maybe the theme of being a tourist did quite gel with me? I feel that there are other mechanically similar games that are a little more accessible and quicker to play. Obviously, YMMV, a fan of card drafting games who plays them often might find the roll and write part of Boomerang: USA a fresh take in the category. 15th March 2022 We're with the Woking Gaming Club at The Sovereigns for some Tuesday evening entertainment. Four Gardens is a game about you guessed it... four gardens, it's also about spinning a pagoda! I'm not sure if Spinning Pagodas would be a better name or not? Why are players spinning a pagoda? Apparently, the pagoda contains some gods! Who... I guess... like... being spun? What's in a game?
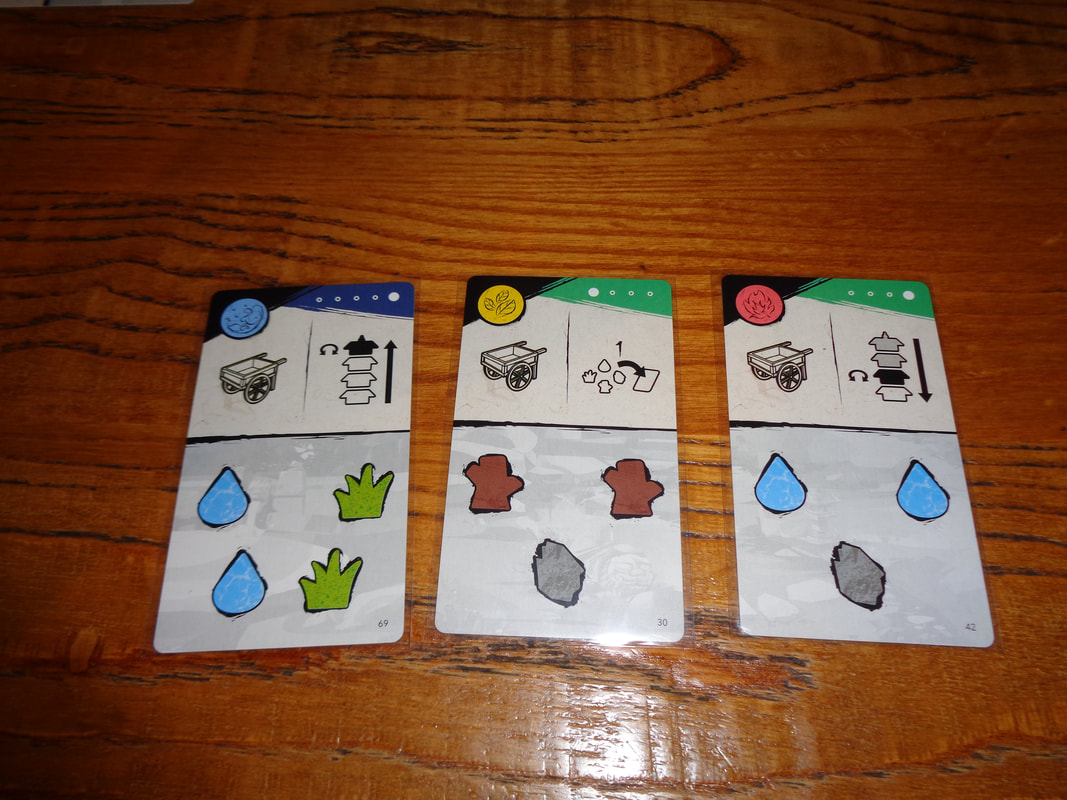
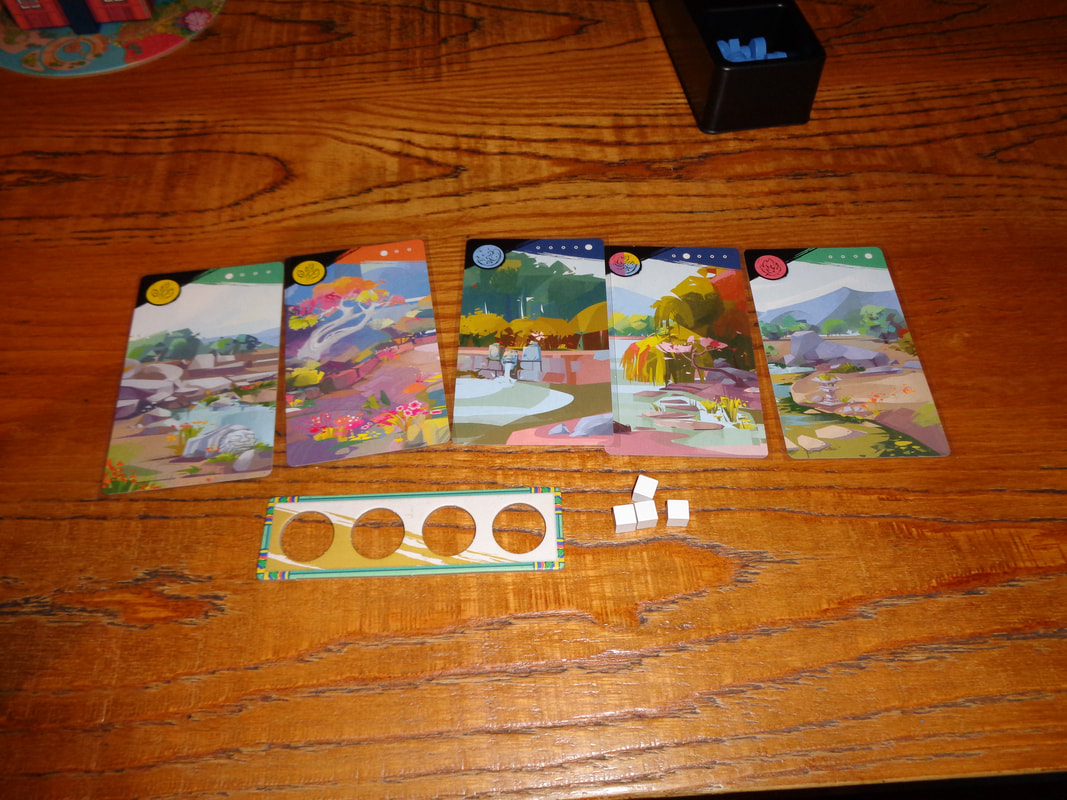
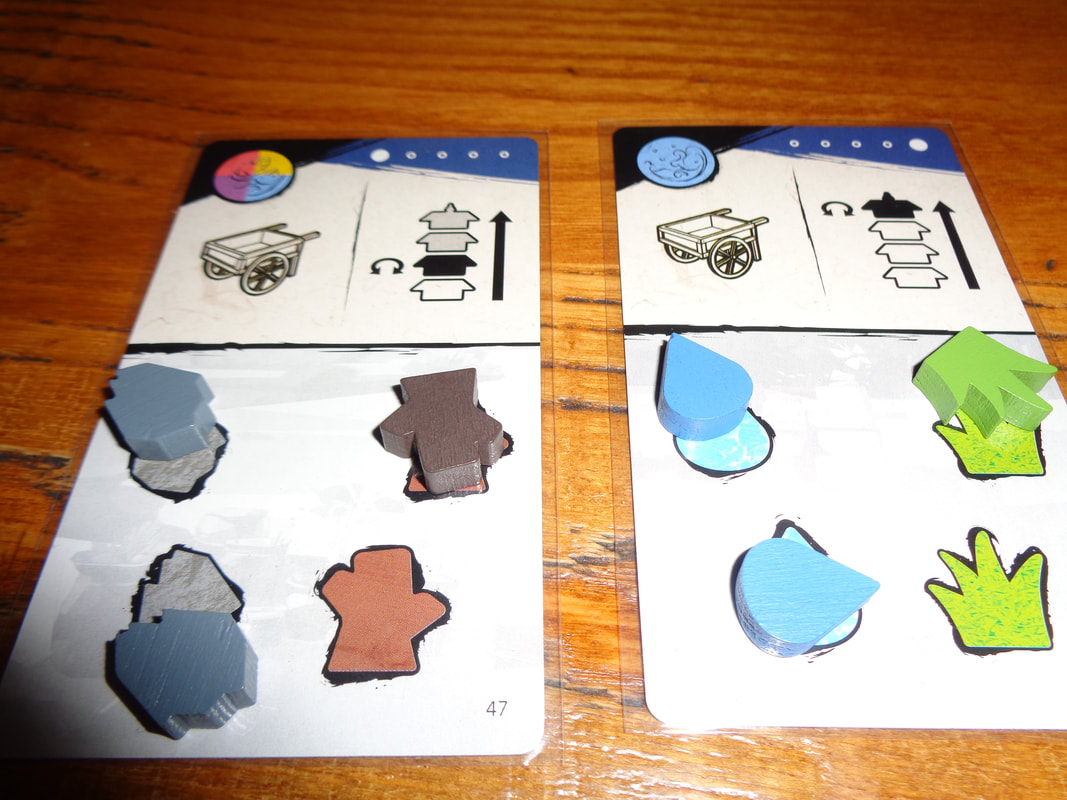
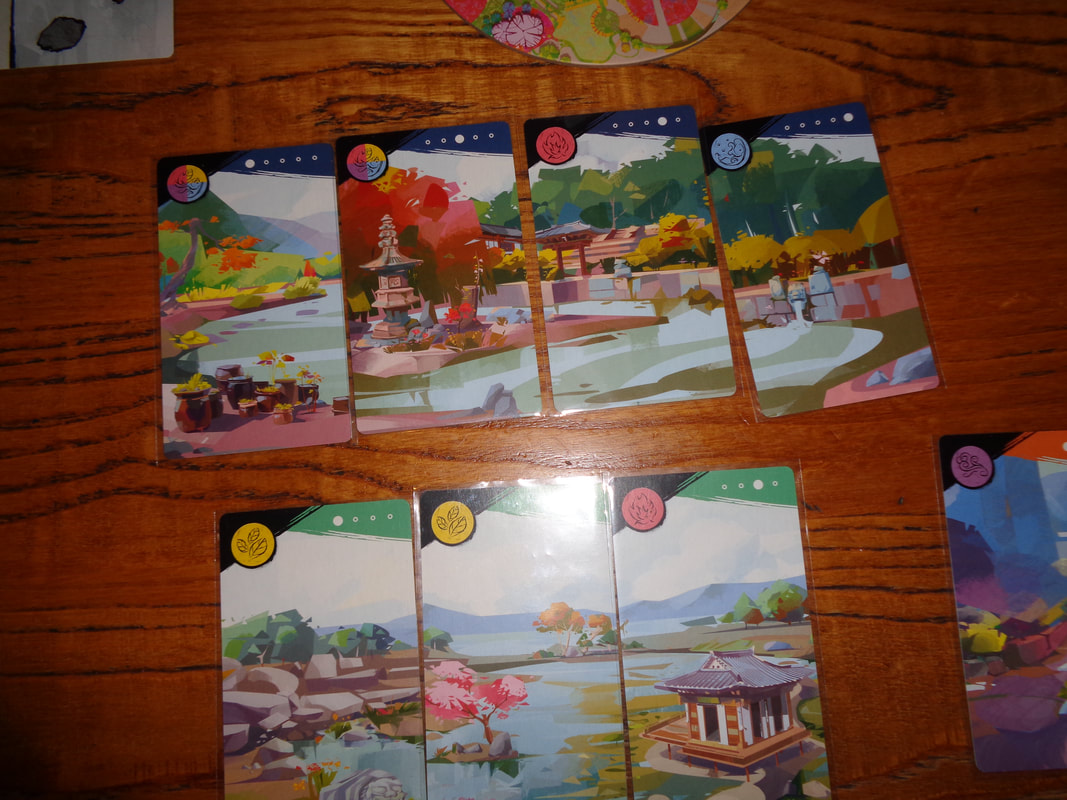
The resource tokens felt like they were wooden and the wooden cubes were pretty standard wooden cube components, which is something I like. The tiles were standard quality card tile and fine, I thought having tiles with little hole to hold resource tokens was a pretty smart move. The card were also pretty standard quality from what I could tell. From the large, eye-catching and rotating pagoda to the tactile resource tokens shaped and coloured identically to their icons in the game; Four Gardens has excellent presentation. The backs of the cards which, when placed together form the panoramic views of the titular feature excellent, colourful and interesting art. Four Gardens features a fair amount of iconography, from the 4 scoring tracks and types of gardens to symbols for resources and different actions available on cards. For the most part, it's instantly understandable and there should be few problems with the iconography. How's it play? Setup
On to play As the name suggests, the objective is to create 4 garden panoramas using the backs of the cards. Four Gardens uses the traditional turn, with the active player acting with play then progressing to the player on the left. During their turn, the active must perform exactly 3 actions. Each action also requires the player to play or discard one of the cards in their hand. There are 4 actions that can be performed, these can be performed in any order the player sees fit. The actions are:
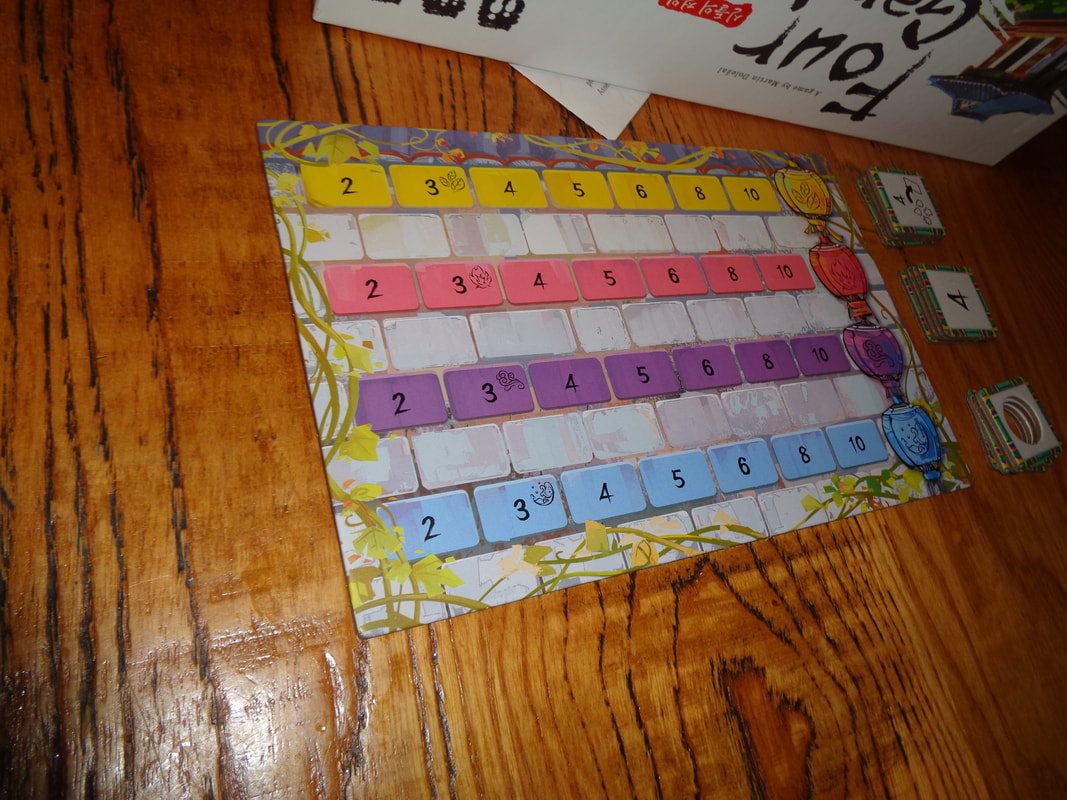
Endgame Depending on the player count, once 8-10 panorama cards have been constructed by any player, play goes into the endgame and the current round is completed. Players calculated VPs earned from the 4 scoring tracks and points they may have gotten from a bonus VP track. Points are tallied, highest score wins. Overall
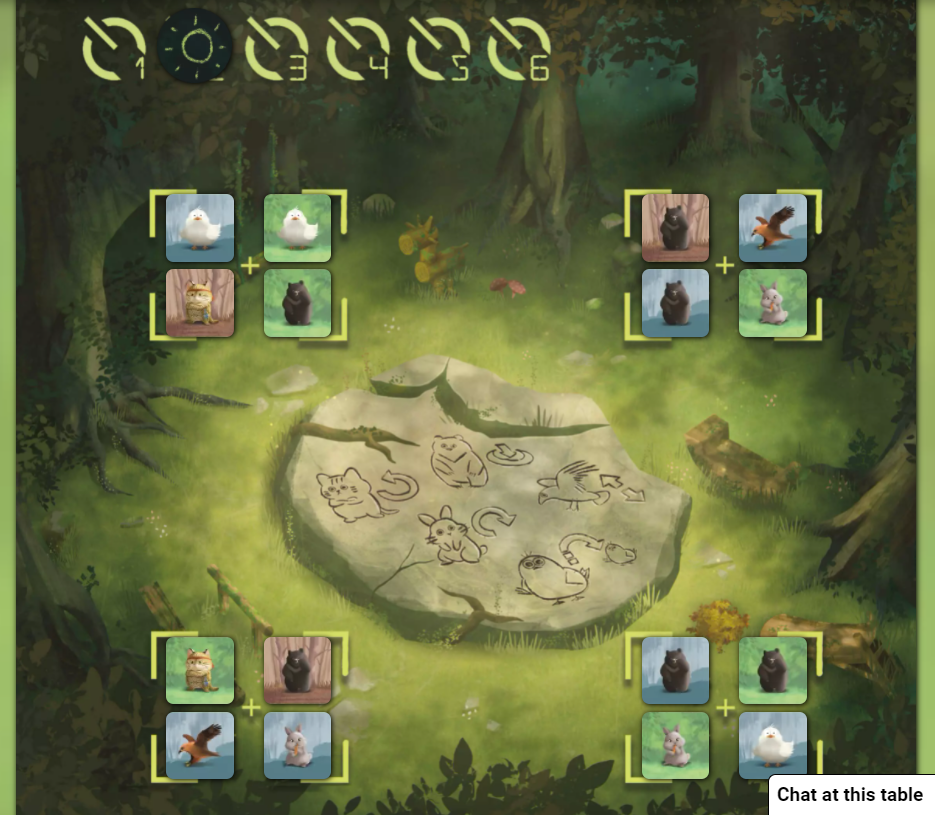
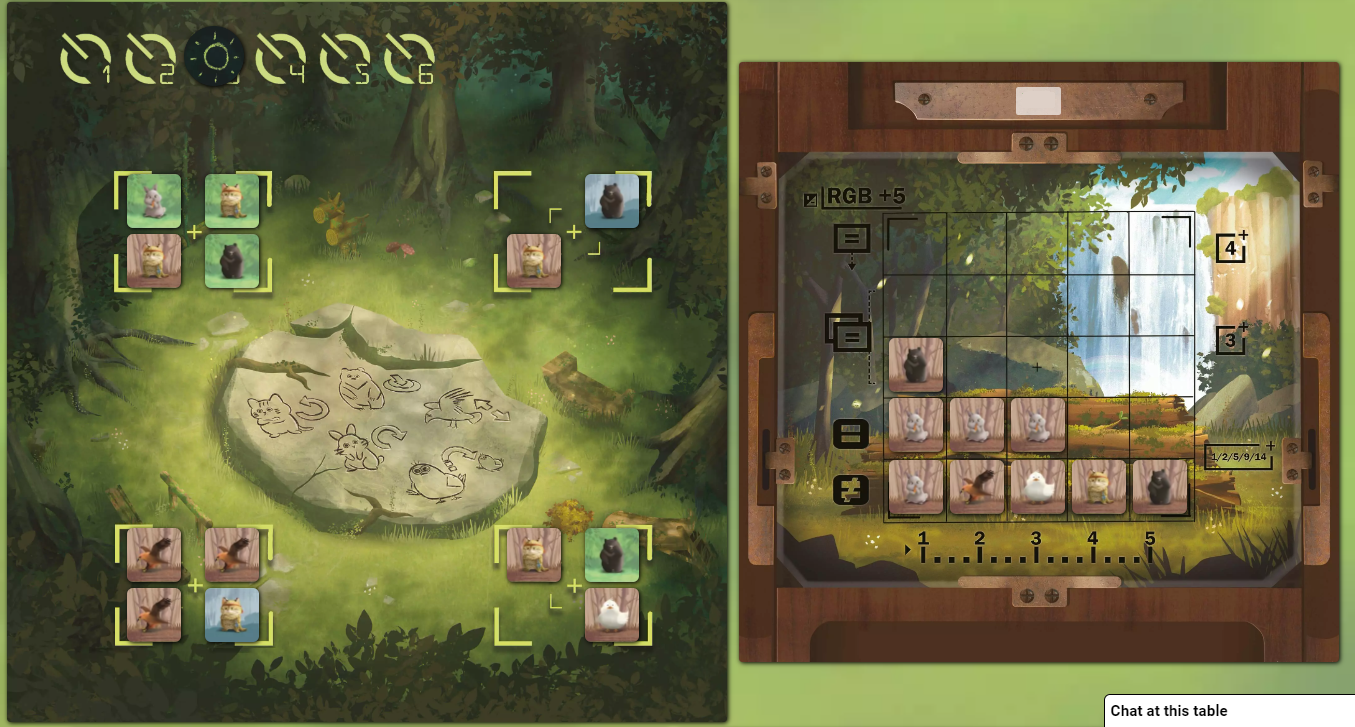
I'll start by discussing the pagoda - the game's most obvious feature. Is it a gimmick mechanic? Maybe. Does it work well? Definitely. It's also quite a unique mechanic and not something I've seen anywhere else. When used in conjunction with the rule limiting how many resources can be collected on the planning tile, it forces players to really think about how they have to manipulate the pagoda to get the resources they need: It takes an action to empty a planning tile that's been filled unnecessarily and that's an action that could be used elsewhere. I think it's a set of mechanics that works very well. Talking about the pagoda does lead me to one gripe: Which is the rule where all players should sit around the pagoda at 90' angles. Players don't always have the right gaming space to accommodate this and while strictly speaking, it's not necessary as players can remember what side of the pagoda is meant to be facing them, it's inconvenient and finicky. The card-synergy, or more accurately score-synergy is a pretty clever rule, providing players a reason to work towards completing panoramas. The 4 scoring tracks seem a little unnecessary but in practice they work fine. This brings me to the knock-back mechanic. It feels a little harsh that, if a player gets their scoring marker knocked off the board, it can't come back into scoring. On the other hand if a player has reached maximum on a track and other players are lingering at the bottom, it's probably not a priority for those other players, so not that much of a loss. So yes, it feels a bit harsh but it's not game breaking. All of this means players will look to optimise the order in which they play cards to optimise how they increase their scores. Concentrating on increasing scores in 1 or 2 tracks can potentially knock-back other players. Conversely, working towards completing panoramas can earn bonuses which may prove useful elsewhere; sometimes you'll be able to do both but sometimes not and looking for opportunities to exploit these times is vital. The also makes use of a variation of the hand-as-currency mechanic, except here it's used to trigger actions and not to actually pay for something. Despite this difference, it places that same conundrum on players; which is how to choose which card to discard? Obviously, they'll be times when it has to be a card with the action they need but otherwise, it's another meaningful decision to make. In conclusion; Four Gardens is a fairly easy to learn set-collecting game that provides players with enough decisions to be engaging, fun and provides unusual resource gathering and scoring mechanics which makes it feel unique. I enjoyed it and think it's worth a try. 20th February 2022 It's a Sunday and we're logged into Board Game Arena for some gaming fun. I don't know what Loco Momo means but I kind of hope it means crazy fun with cute animals. Hmm, that didn't sound right, how about wholesome crazy fun with animals. Loco Momo is actually about (I kid you not!) organising the disarrayed wildlife population of the forest for a group photo! Caveat: We've only ever played Loco Momo digitally. What's in a game?
It's good quality artwork though, a bright palette and bold cartoony style suit the game's light-hearted theme well. The game's only iconography appears on the player boards. It's not immediately apparent what they mean but quick read of the rules makes them clear. How's it play? Setup
On to play The objective of Loco Momo is for players to fill their boards with tiles to score VPs and the game provides various approaches to achieve this. Although this mostly involves collecting various kinds of sets. Loco Momo uses the traditional structure with the active player taking their 2 actions - a drafting action and placing action with play then moving to the player on the left.
Endgame Play continues until the 6th round is completed, then scoring occurs.
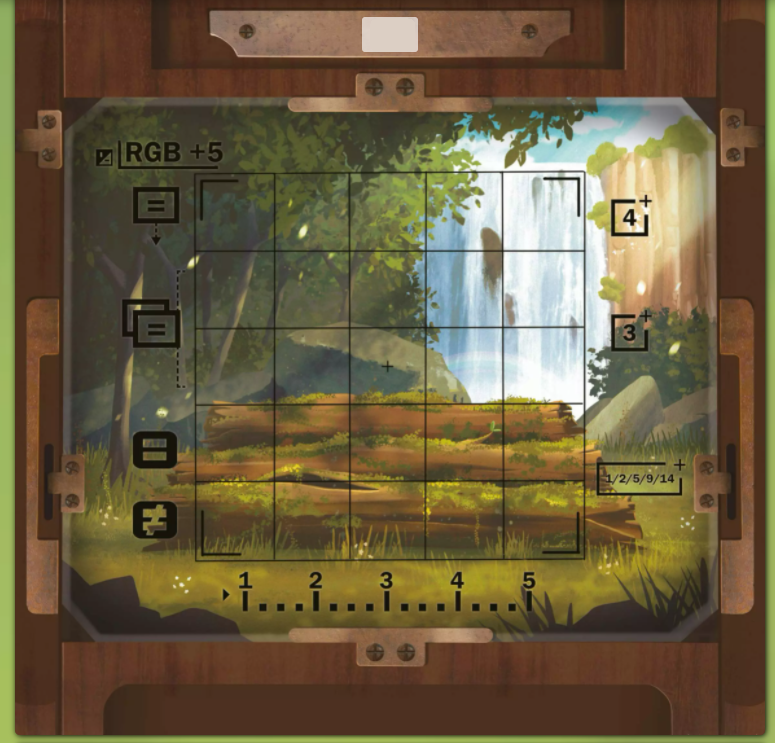
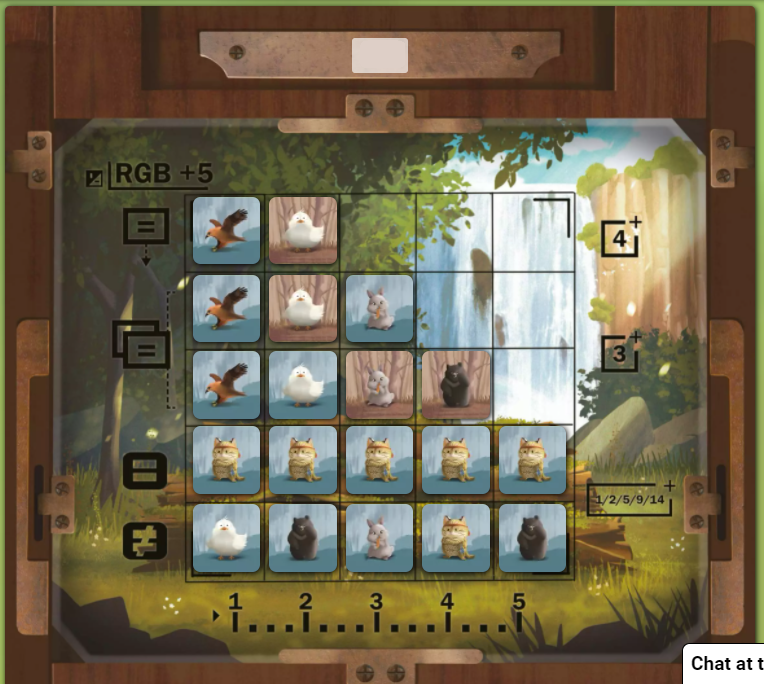 The bottom row has 5 different animals, scoring 14. Row 2 above has 5 identical animals, also scoring 14. The matching eagles in the 1st column for rows 3 & 4 score 3, plus the eagle in the top row above scores an additional 4. The ducks in column 2 also score 7. The 2 rabbits in column 3, rows 3 & 4 score 3. The bear scores nothing. Finally, 2 rows have the same colour as does 1 column, scoring 15 more. Total score: 60. Overall
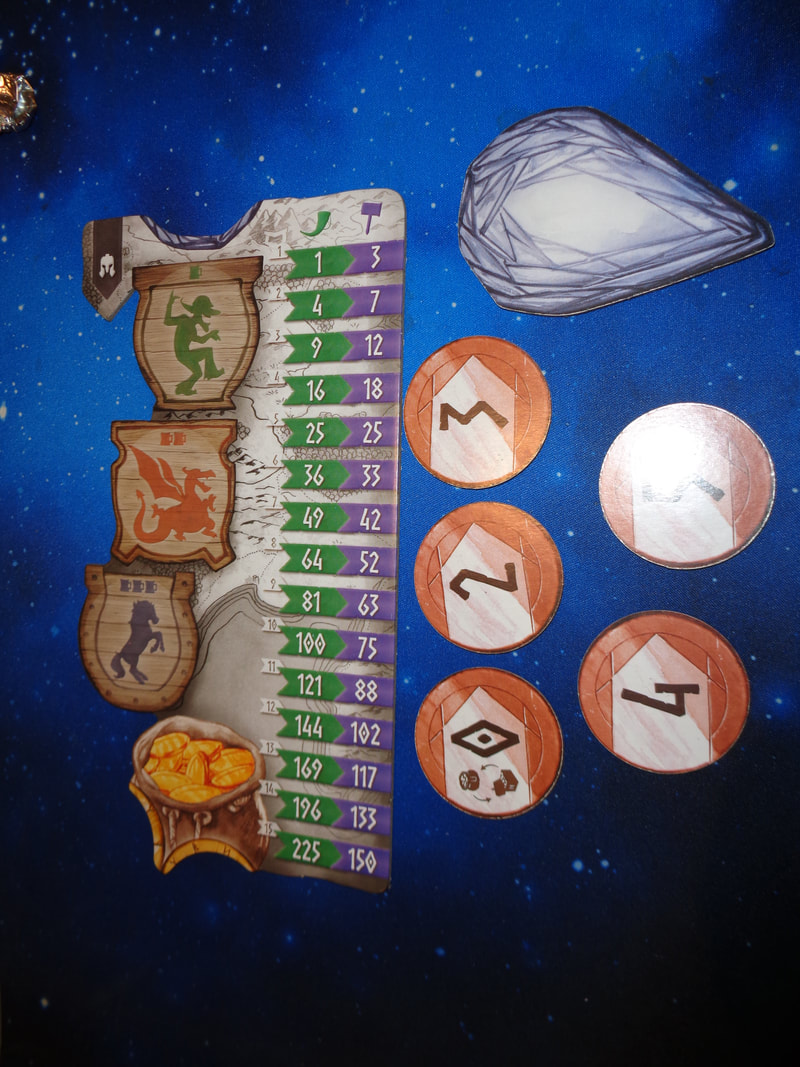
Loco Momo is a fairly straightforward game, the gameplay strategies are more or less obvious and there's not much to say about it. During drafting players will look for the optimal method to acquire the most tiles possible or, as will occur on occasion if there's little they want, try to avoid taking tiles. Then, when placing tiles, players may need to make some meaningful choices. Sure, it's easy putting down tiles when a player has got the ones they wanted but frequently, this won't be the case and dealing with those wayward tiles is very important. Players will want to keep scoring opportunities for other tiles/sets open and minimise the damage caused by having to place unwanted tiles. There's also a higher level of play that involves looking at what's available on the central board and what other players are working towards, then trying to anticipate what tiles they'll be looking to gain from themselves. It might be prudent to try and deny other players certain tiles. Or if they're not interested in tile of a particular colour, it might be safe take that tile in a later turn. This brings me to the one niggle I have about Loco Momo, which are the colour scoring rules. We've only played Loco Momo 3 player and because there are 3 colours of tile, we tend to gravitate towards one colour each with little 'stealing' of other players' colours. Which is understandable as completing columns/rows with the same colours confers nice bonuses and during the late-game completing sets scoring the colour instead of the animal gets more VPs. Consequently it also makes decisions 'easier'. I imagine with 4 players, this status quo would be shaken up and the game would become more interesting. Despite the criticism, the game ultimately generally does provide players with meaningful decisions to make. Games about about drafting sets of tiles and placing them on to a player board are pretty commonplace today. So does Loco Momo do anything to stand out from the crowd? I think the answer is... sort of. Loco Momo is a bit unremarkable but at the same time it's an enjoyably light, easily learnt and accessible example of this kind of game with a reasonable playing time. A good introduction or crossover game If this ticks your boxes, Loco Momo might be worth a look. 3rd February 2022 Thursday night gaming at Simon's came to a conclusion with the 2nd and final game of the evening; Nidavellir. Google tells me that Nidavellir might mean the wane of the moon and is derived from Norse cosmology. Protect the dwarf kingdom from the ravages of a dragon by taking on the role of a Elvaland councillor and collecting sets of cards... err... gathering the bravest army of dwarves possible by trawling pubs (I kid you not.). Where's Sneezy when you need him eh? More like boozy! What's in a game?
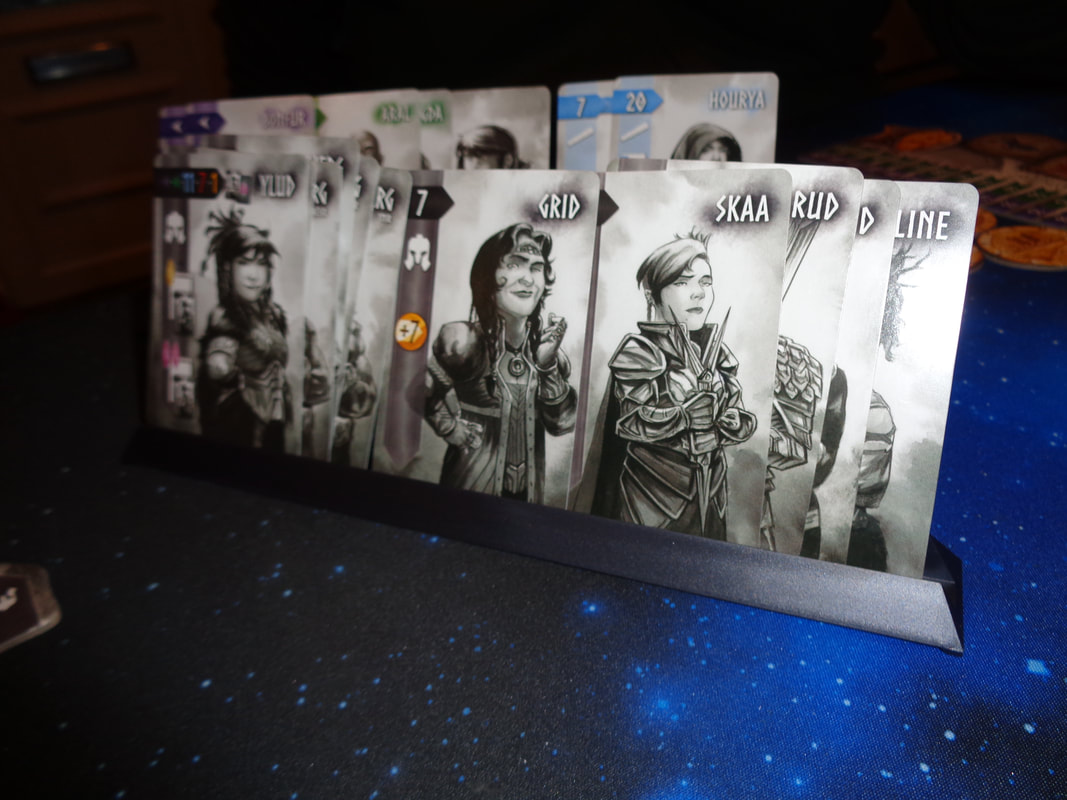
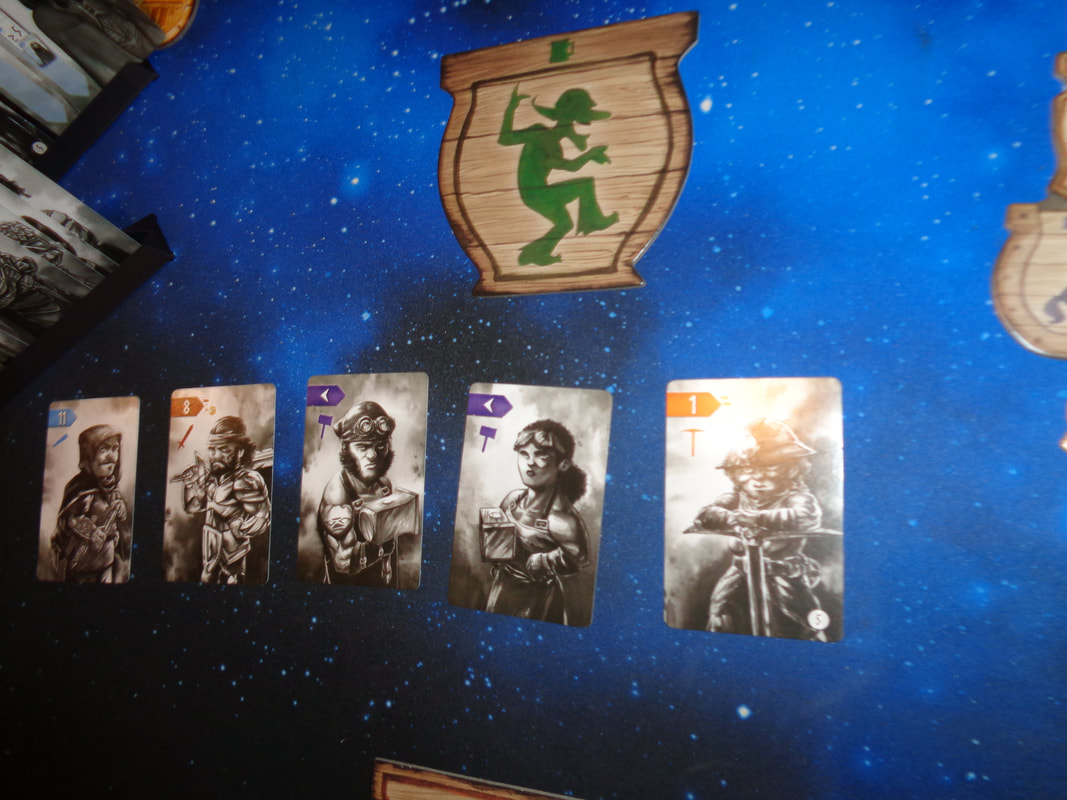
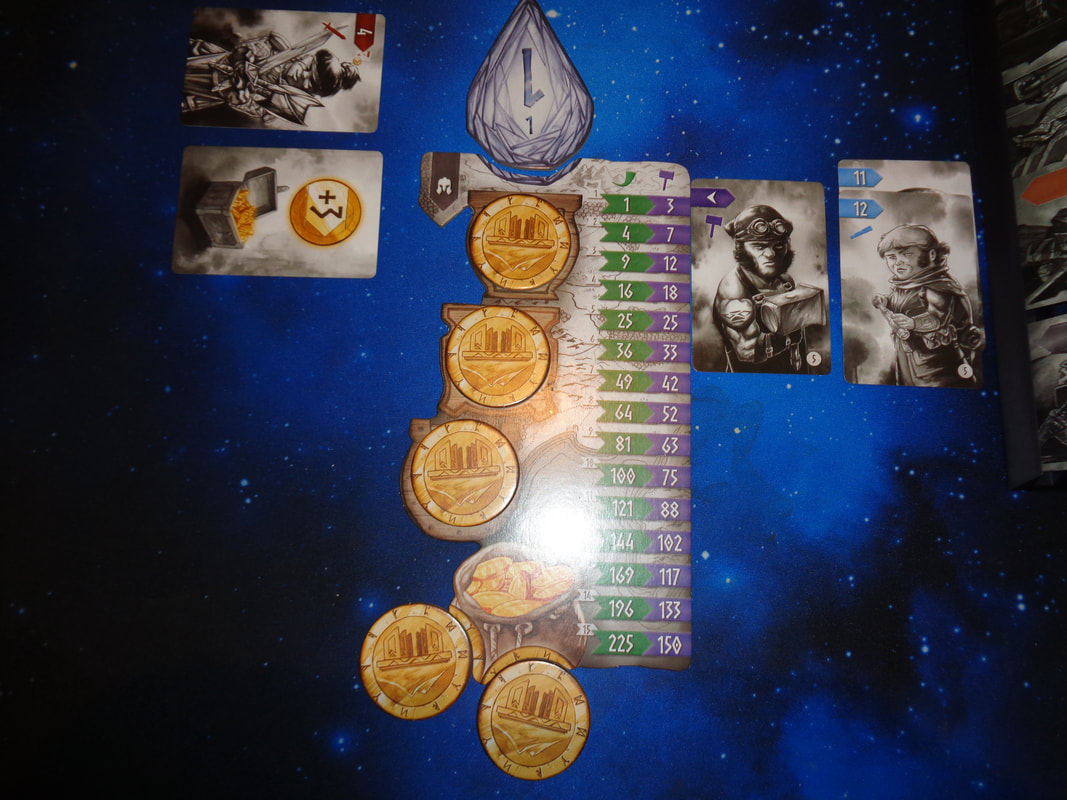
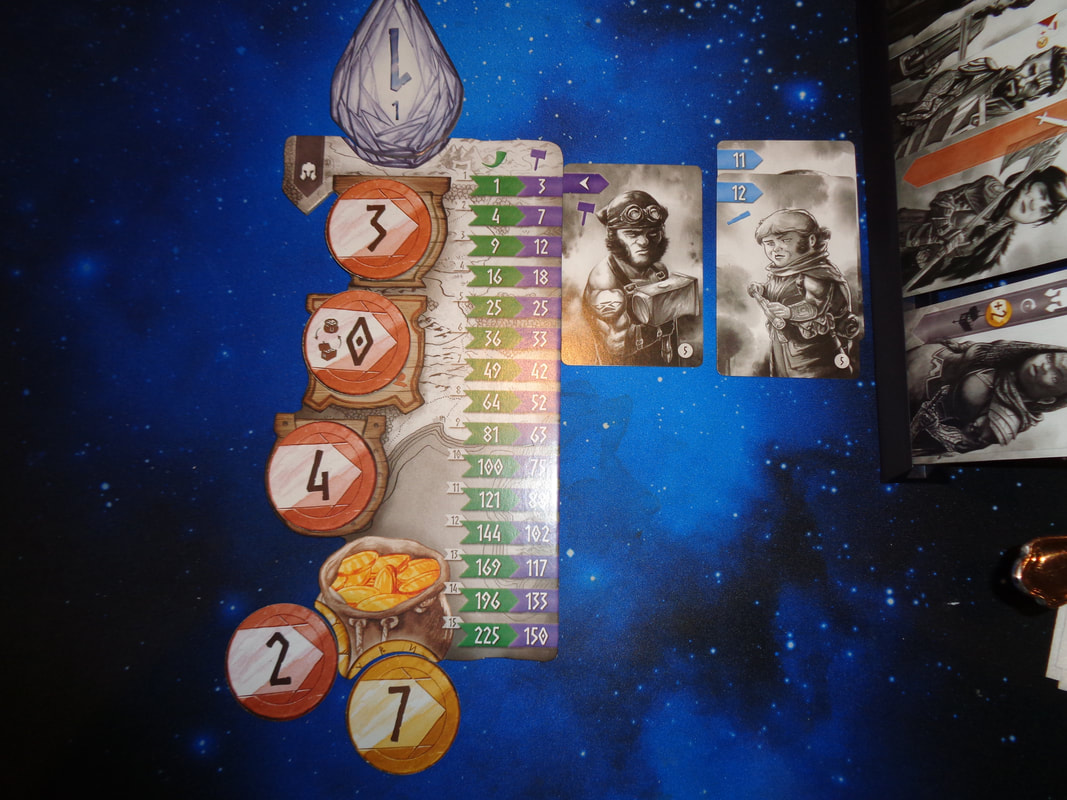
The cards holders and especially the royal treasure are a nice touch too. However, since they can only be easily viewed from one side, it sort of forces the game to have a strange setup where the card holders and treasure rack are along one edge of the playing area instead of in the centre with all the players along the other edges. Nidavellir also makes good use of artwork, most of which appears on the cards, they contain well detailed, good quality illustrations of different dwarfish characters painted in a sort of monochromatic watercolour style along with a dash of a single colour. Usually I'd find this kind of art a bit dull, but here it works and gives the game a distinctive look. Much of the iconography is clear but some of the hero cards have symbols which are quite small and may also need looking up occasionally. How's it play? Setup
On to play Nidavellir is an auctioning game that has players simultaneously perform series of 3 blind bids during each round. Once bids are revealed, actions are resolved in an order determined by the bids.
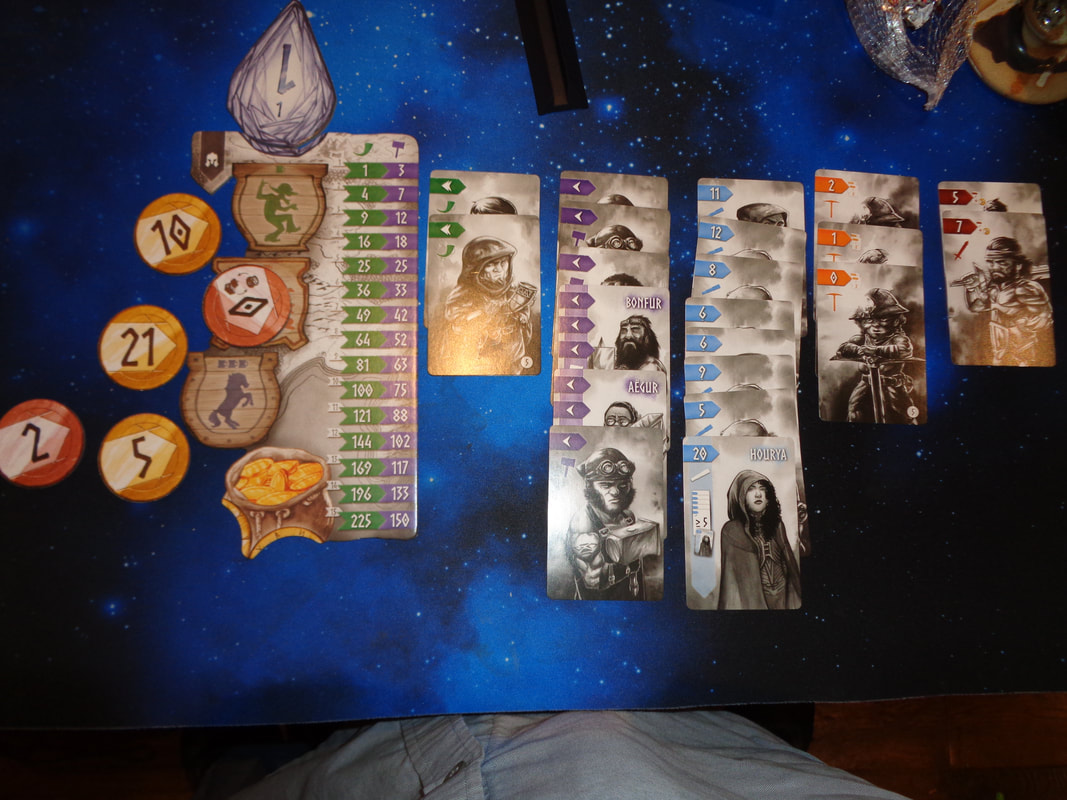
Endgame Play continues until the Age 2 cards are also depleted, then the game goes to scoring. Each of the 5 classes has it's own way to score VPs, suffice to say; the more cards a player has in a class, the more that set scores. Bonus VPs which can come from various sources should then also be added in. Points are tallied, highest score wins. Overall
Nidavellir does a good job of mixing set collecting with auctioning. The set collecting element is about a mixture of getting the cards you want and sometimes collecting a card just to deny it to another player. Sometimes you'll be completing to build sets and sometimes you'll want to take a card no one else does on the cheap. Pretty standard stuff for set collecting and what you'd expect. The auction mechanics offer something a little different. I have to say I'm not the biggest fan of auctioning games, I don't dislike them and I've enjoyed some of them but they're not really my jam. I've often found bidding decisions could be a little stress inducing, which is probably why some people love them so much! Nidavellir cleverly bypasses some of this with it's auction system because players never lose their bids. Instead of trying to out bid someone or bluff a bid up, players will be trying to gauge how others will bid. This requires not only watching what cards others have been collecting and trying to anticipate what they will prioritise in each bid but also paying attention to how they've been upgrading their coins. If another player has a coin that's got a higher value, it will never be possible to simply outbid them and it might not be even worth going against them and could be a good time to play that 0 coin and get an upgrade instead. There may also be other times when players want to bid low such as when all the cards in a tavern are not valuable or if they're not valuable to other players. This means that Nidavellir has 3 avenues of strategy that the player must take into account. Not only do players have to keep an eye on which dwarf cards to try and acquire, they'll want to think about creating rows as well as columns to earn hero cards which cna prove very useful. Players will also need use that 0 coin to upgrade coins - which is essentially a form of arms race that can't be ignored - unless a player thinks they can win by being last in every auction! Nidavellir is a solid game and I can't find anything to fault about it. It isn't particularly complicated but there's definitely enough depth here to keep players engaged and generally give them meaningful decisions to make. If you like auctioning or set collecting games, it's probably worth a look. If you like auctioning and set collecting games, Nidavellir is definitely worth a look. 8th December 2021 The next game of Wednesday afternoon gaming on Board Game Arena was 7 Wonders: Architects, which is essentially a 'spin-off' of and at least a little thematically similar to the titular 7 Wonders drafting game. Like it's ancestor, 7 Wonders: Architects is all about building one of the world's great wonders and no doubt dabbling in science, politics, religion and warfare while doing it. Caveat: We've only played this game digitally. What's in a game? In the physical game, when players are given/choose wonders to build, they are given that wonder's 'tray'' containing the relevant components for that wonder. However, none of this appears in the digital version
The artwork used throughout 7 Wonders: Architects is very similar to the original game which is both understandable and also pretty good, there's a nice variety of colourful illustration used throughout the cards. The same is true of the game's iconography, it looks identical to 7 Wonders and just like 7 Wonders, there's a lot of it. Most of it is pretty straightforward but players will invariably turn to the rules for an explanation from time-to-time. 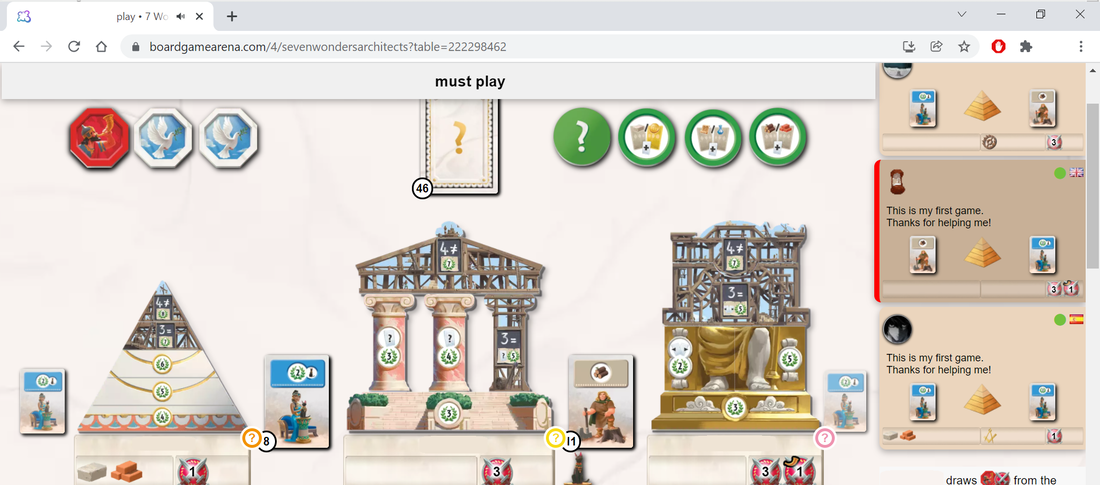 3 wonders are under construction. How's it play? Setup
On to play Play in 7 Wonders: Architects is pretty straightforward with the active player taking their turn before play proceeds to the player on their left.
Endgame The endgame is triggered at the end of any player's turn when the 5th tile for their wonder is flipped, thus completing it. Points come from a variety of sources. Wonder: Flipped tiles on wonders can provide points. Blue cards: All blue cards score victory points. Military victory tokens: These tokens contribute victory points. Progress tokens: These tokens may provide bonus victory points. Cat pawn: Whoever possess the cat pawn at the game end will earn a small amount of victory tokens. Points are tallied, highest score wins. Overall
It's quite impressive how the 7 Wonders: architects manages to distil so much of its parent game into this simpler product and I also like how the mechanic for flipping the wonder tiles works but I'm going to go ahead and say it; I'm pretty certain that I'm not the target audience for 7 Wonder: Architects. It feels a little like a 'entry-level' game that I found a little too shallow. When it comes to a players turn, they are fundamentally only given 3 choices. Take a face-up card from the left, take a face-up card from the right or take a face-down (Unless you have the cat pawn of course.) card from the central area and that's it. I suppose that it can force players to adapt, recognise and try to exploit the available cards to their fullest advantage but I feel that the game lacks the flexibility to see this through, there's no synergy between different card types and all of this makes it hard to create any sense of strategy during the game. In fact, it feels that strategy is reduced to pick a path to victory and hope that the cards which support that strategy appear. That meant it felt my choices had little significance beyond their immediate benefits. So, if I'm not the target audience for 7 Wonders: Architects, who is? Casual or light gamers? It strikes me that the rules have enough complexity to not be immediately accessible and the game's usage of iconography only compounds this - experienced gamers will be used to this, but casuals gamers, not so much. I Feel the game sort of straddles a strange middle ground between rules complexity and light gameplay which is the opposite of what you want and makes it less accessible to casual gamers and less compelling to more dedicated gamers. |
AuthorI play, I paint. Archives
March 2024
Categories
All
|


 RSS Feed
