|
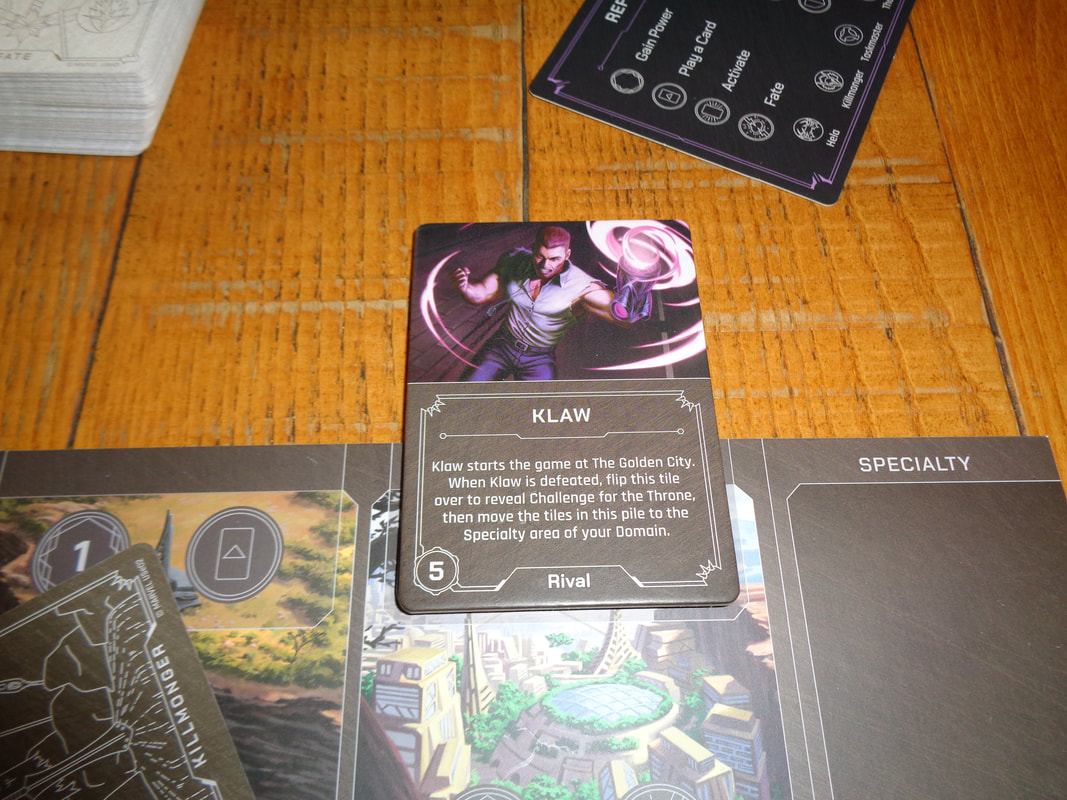
30th January 2022 Sunday and we're at The Sovereigns for a rare afternoon of gaming and the beginning of a day of gaming. Twirl your moustache and laugh your evil cackle! It's time for Marvel Villainous: Infinite Power, a game about the poor misunderstood bad guys of the Marvel Cinematic Universe. What's in a game?
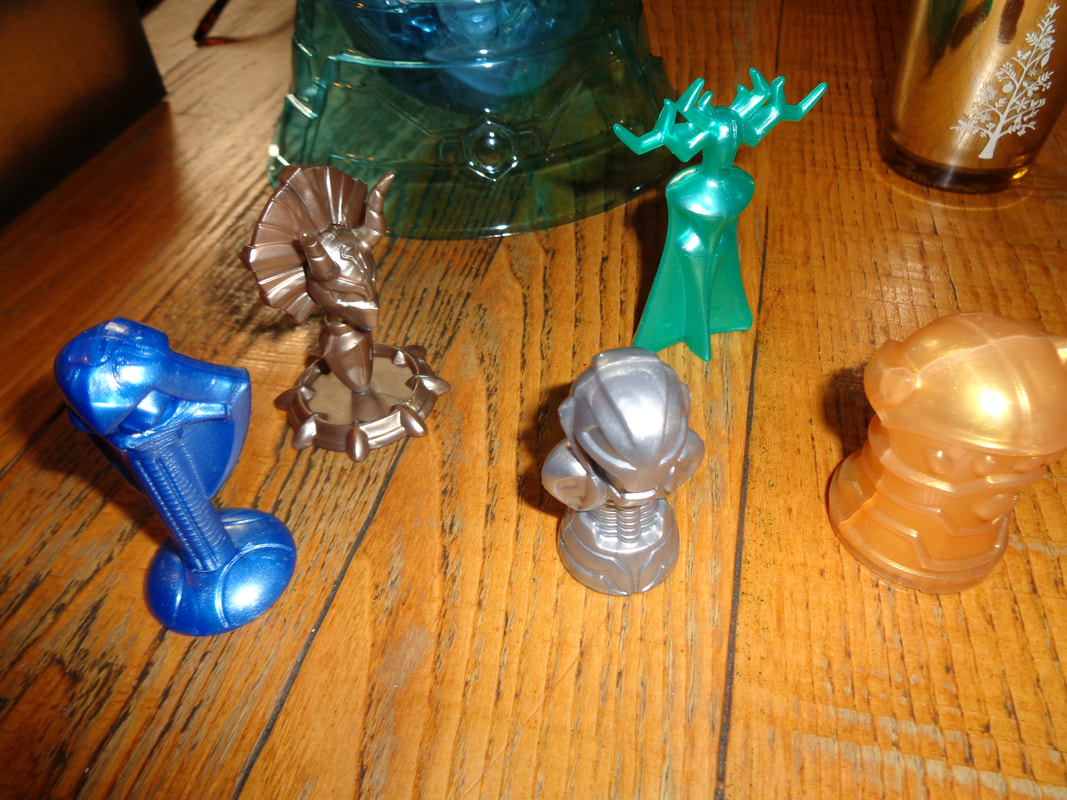
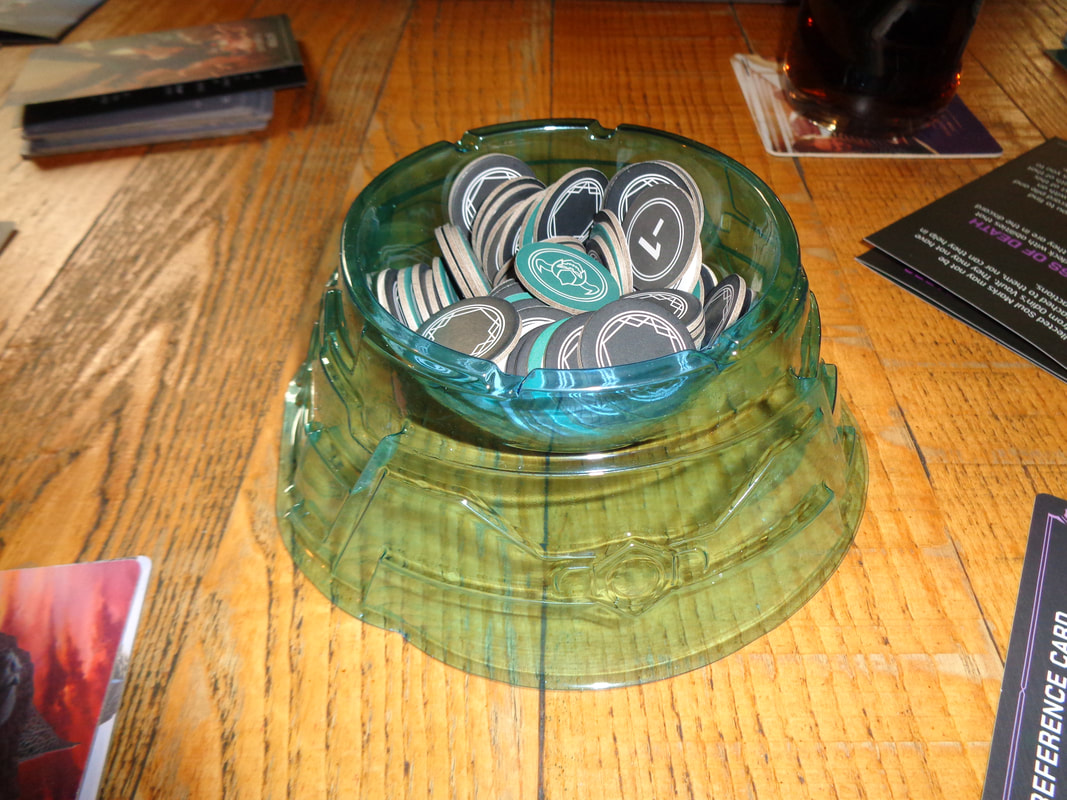
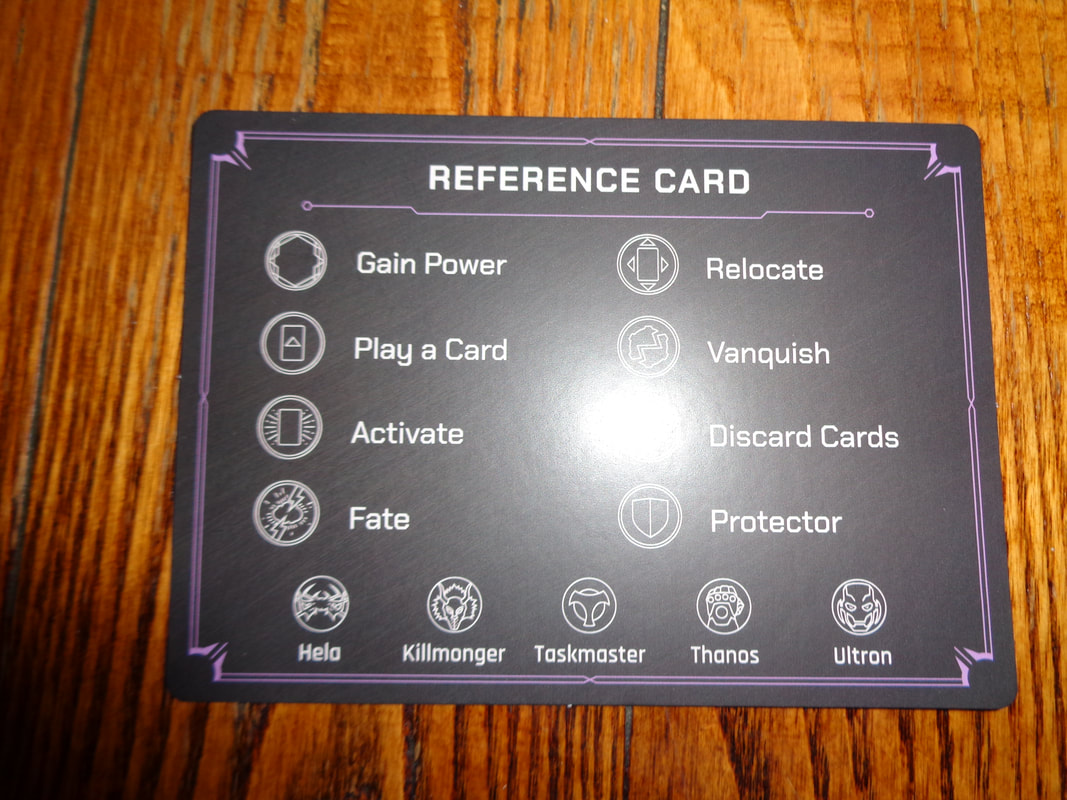
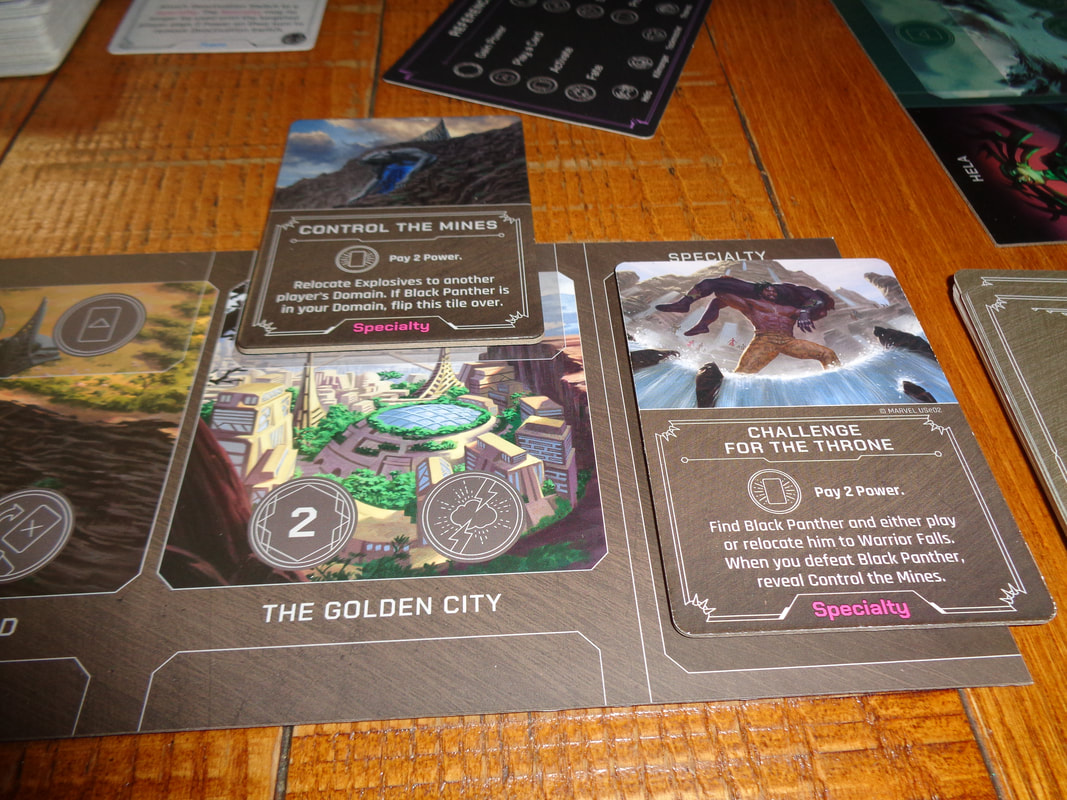
It's clear that the game's art direction draws influence from the Marvel films but wisely steers clear of actually using stills from them. Instead the art looks familiar but also comicbook-like, which means it's mostly brash and colourful. There's a lot of illustrations throughout the cards and none of it seemed bad. Marvel Villainous uses a fair amount of icons and to be honest they weren't very clear initially but the reference sheet provided meant that it wasn't an issue and after a coupe of turns it was pretty clear. How's it play? Setup
On to play In Marvel Villainous, the active player moves their pawn to a location performs an action from that new location, play then progresses clockwise to the next active player.
Endgame The first player to complete their objectives immediately wins. Overall
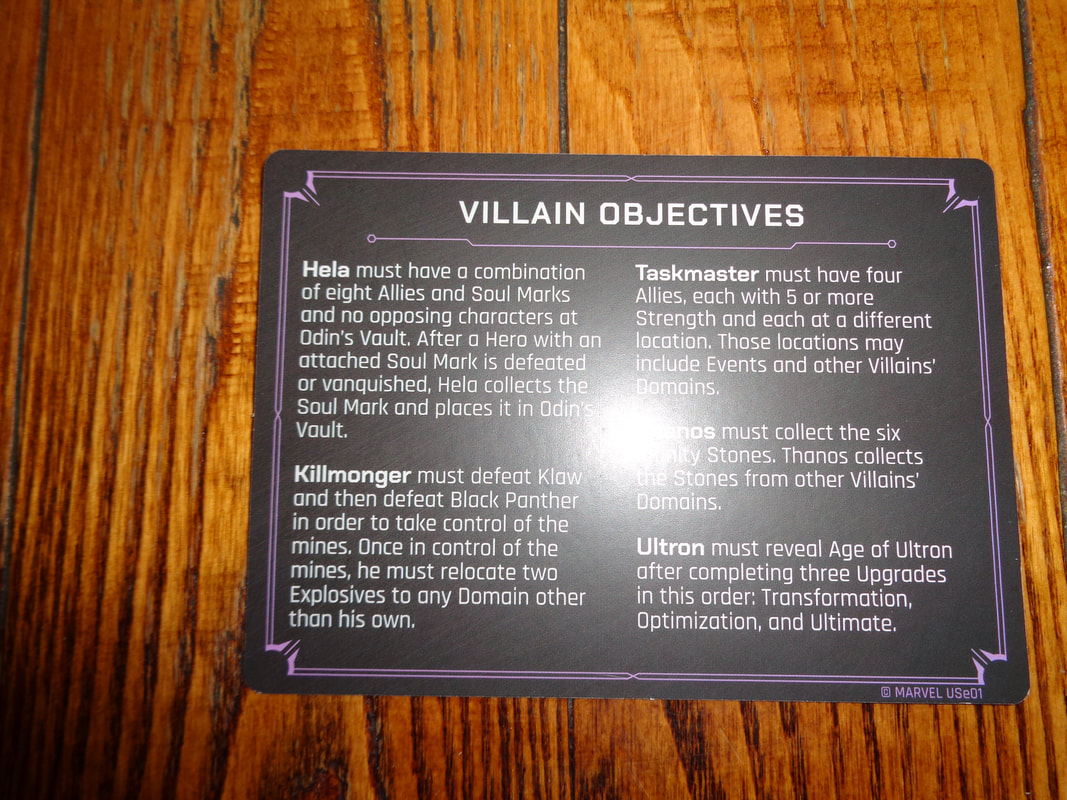
In Marvel Villainous, players for the most part will be concerned with advancing their own particular objective (Unless they're playing Thanos!) and will look to optimise their plays. Since a pawn cannot stay on the same location for 2 consecutive turns, players will also want to think at least a turn ahead. Occasionally the opportunity to mess with other players will arise. Players can also employ the fate deck to interfere with opponents as well but this has the chance to backfire. Having said that, players will need to keep an eye on their opponents who might be close to completing their objectives, in which case priorities will no doubt change, forcing players to decide which is most important. Thematically I think the game is strong and I like the asymmetrical play and objectives, how they follow the storylines from the related films is well done and shows some flexibility and scope in the game's mechanics. The core mechanics are pretty solid but I did have few issues with the game. The asymmetrical objectives are good, it also didn't feel very well balanced. Certain supervillains had easier objectives to complete, or so it seemed. I'm not 100% on this though I found the event cards slowed the actions down without adding any noticeable value to the game, they're just added obstacles and resolving them is identical to vanquishing enemies, only with a harder, higher strength to overcome. Consequently, it probably extended game, making it a little too long. I also found the game perhaps a little unengaging. I think this is down to how each supervillain has their own deck and that deck never changes. It means the only strategies available are the ones granted to me by the deck and it feels like the game is holding my hand. There's definitely some card synergy going on in each deck but a hand size of 4 feels like it limits that synergy and is something I feel was a deliberate decision. As result, I'm unsure of the game's longevity. I feel that the rules are a little fiddly as a result of the asymmetrical elements but ultimately, Marvel Villainous is for the most a pretty straightforward game and looks more complicated on paper than in play. This is no surprise as I'm sure it's a game meant to have crossover appeal. So, having said all of that however, I'm probably not the target audience here. Core gamers probably won't find much to get their teeth into here but for more casual players, particularly those who are fans of the Marvel films, this light-ish game might be some fun.
0 Comments
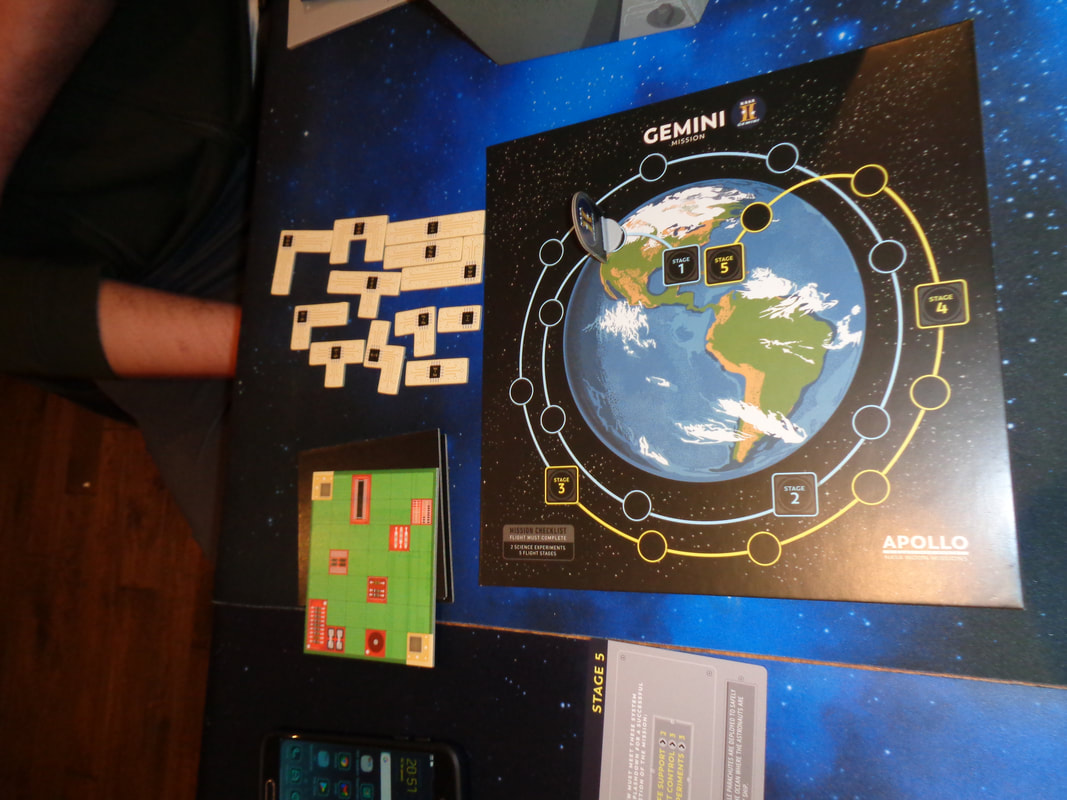
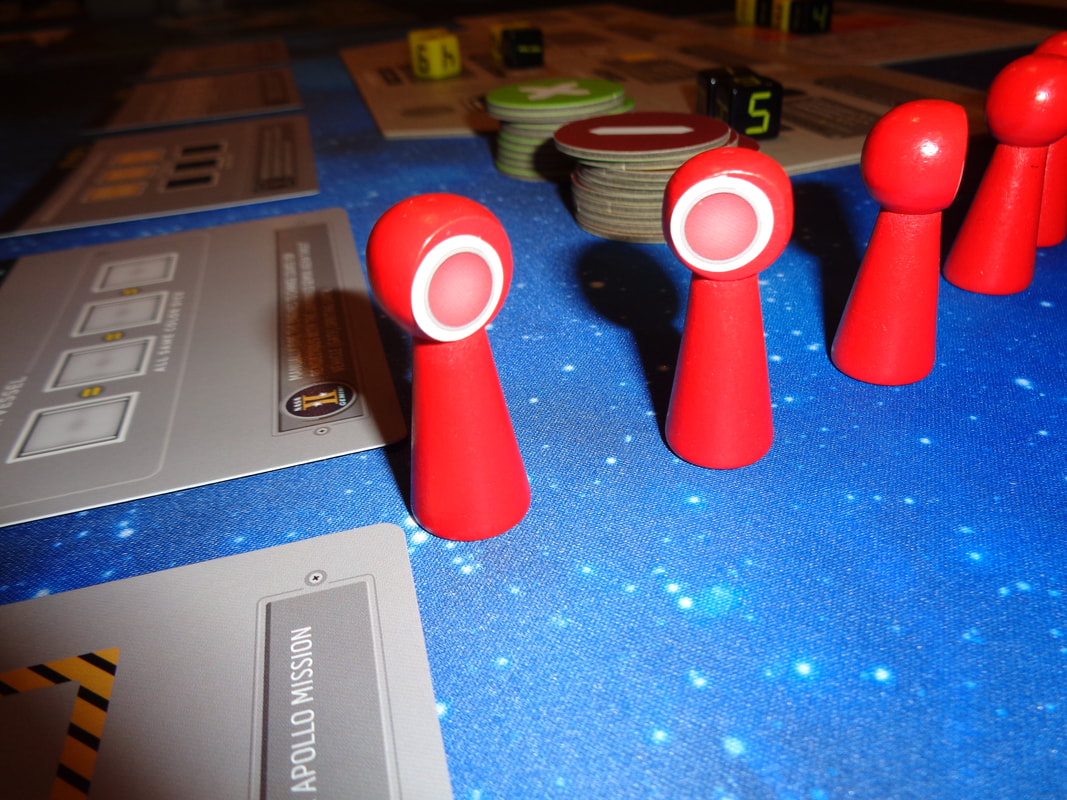
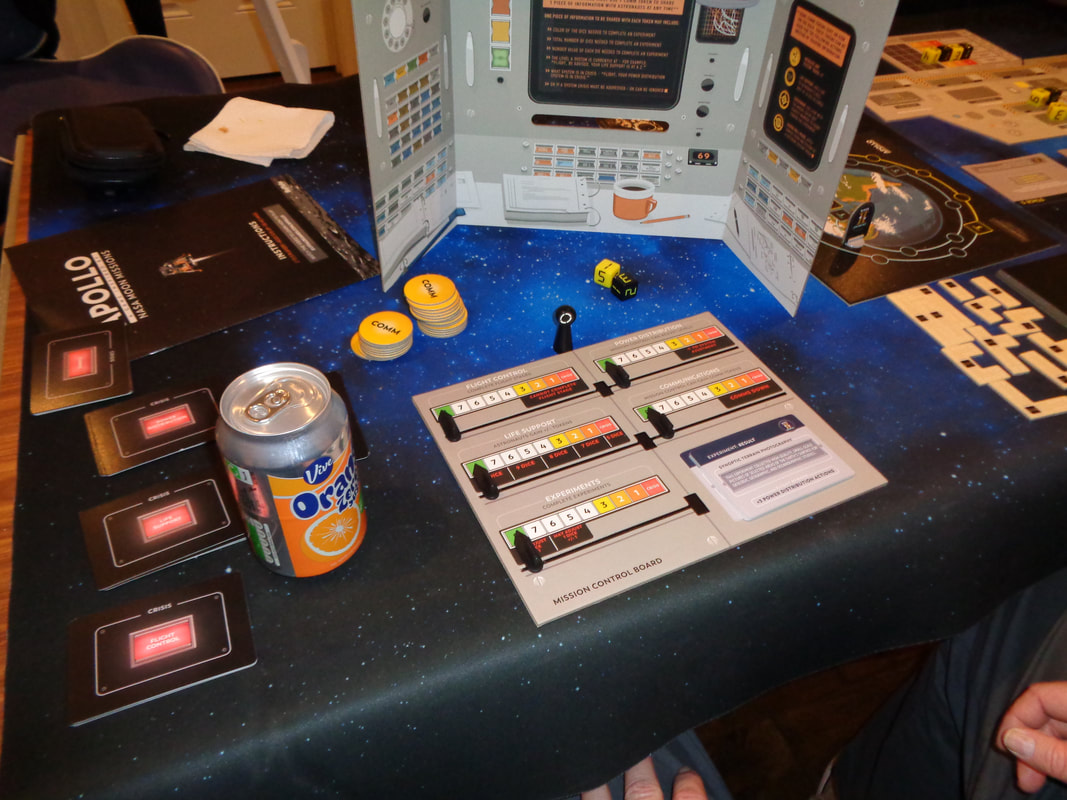
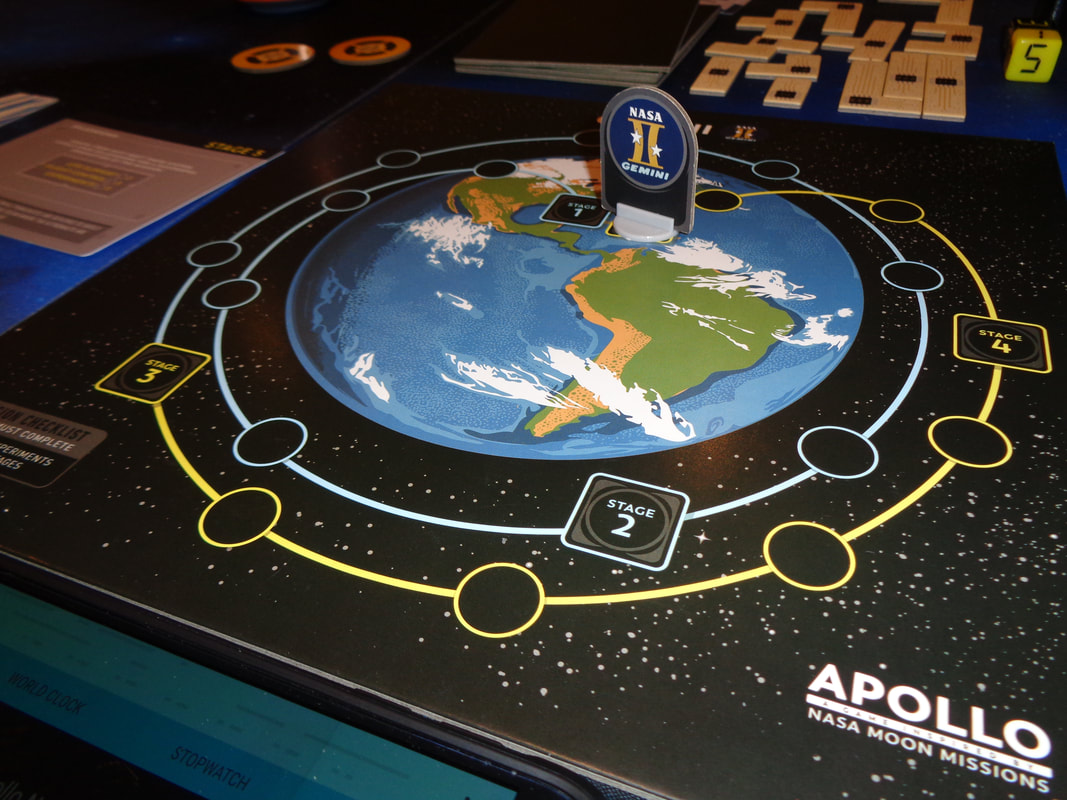
28th January 2022 It's Friday evening and we're round Simon's for a night of gaming. The game of the night was Apollo. Houston.... we've had a game here. One small step for gaming and errr, umm... one cooperative game for gamers? Anyway, enough of the bad jokes. What's in a game? Apollo is an symmetrical cooperative game where 1 player take on the role of mission control and the other players take on the role of astronauts on the titular mission.
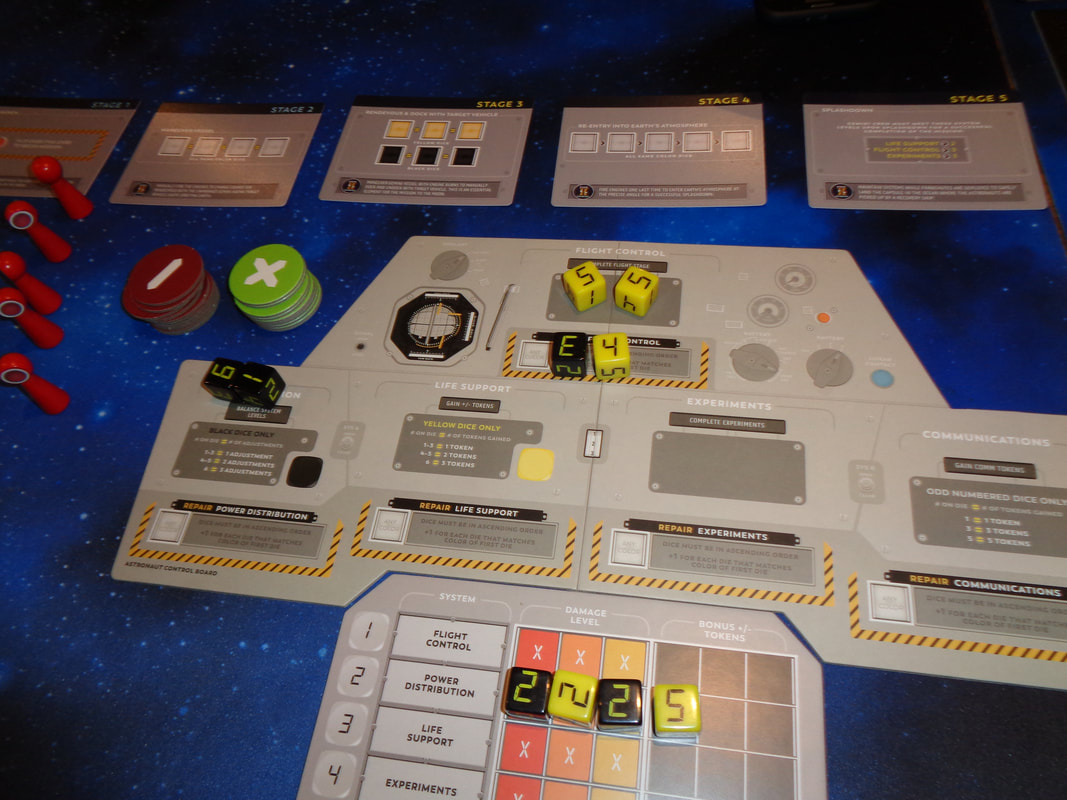
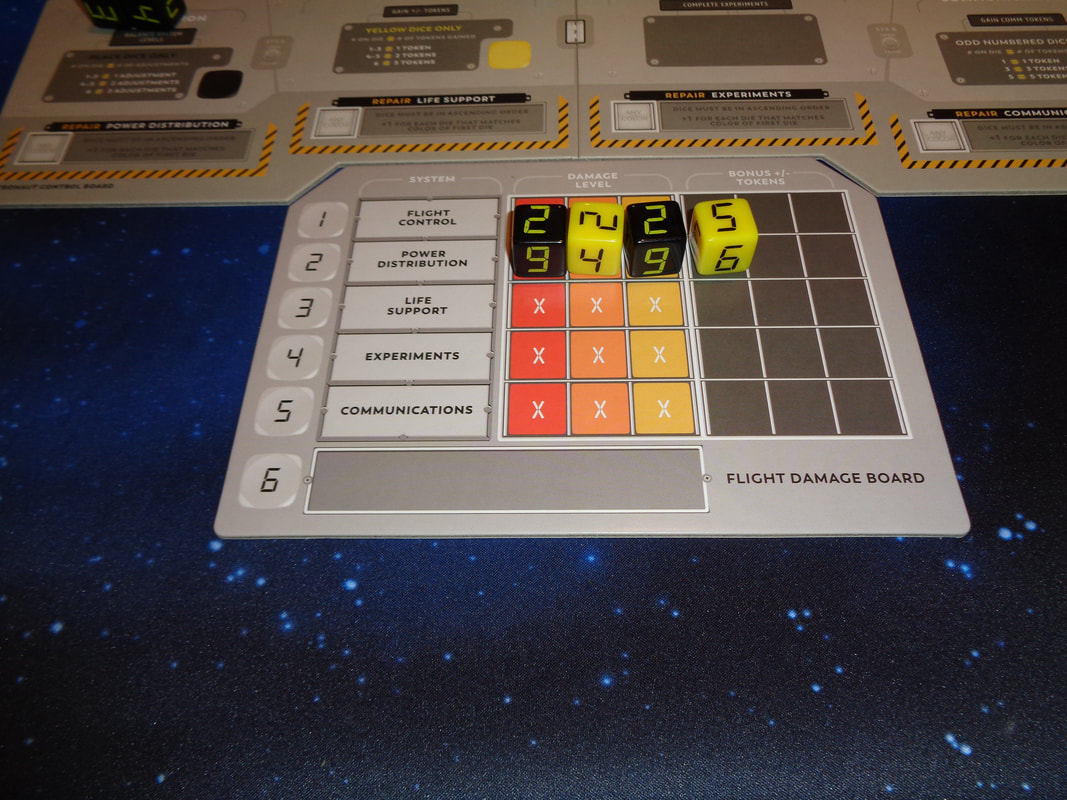
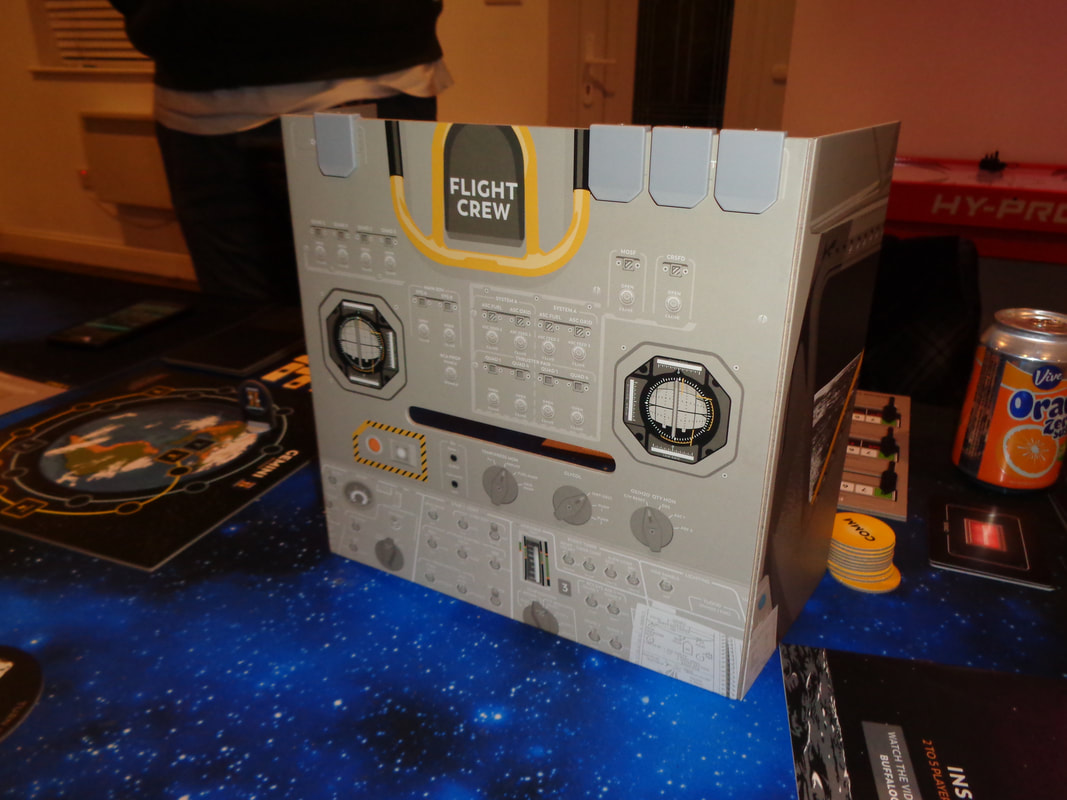
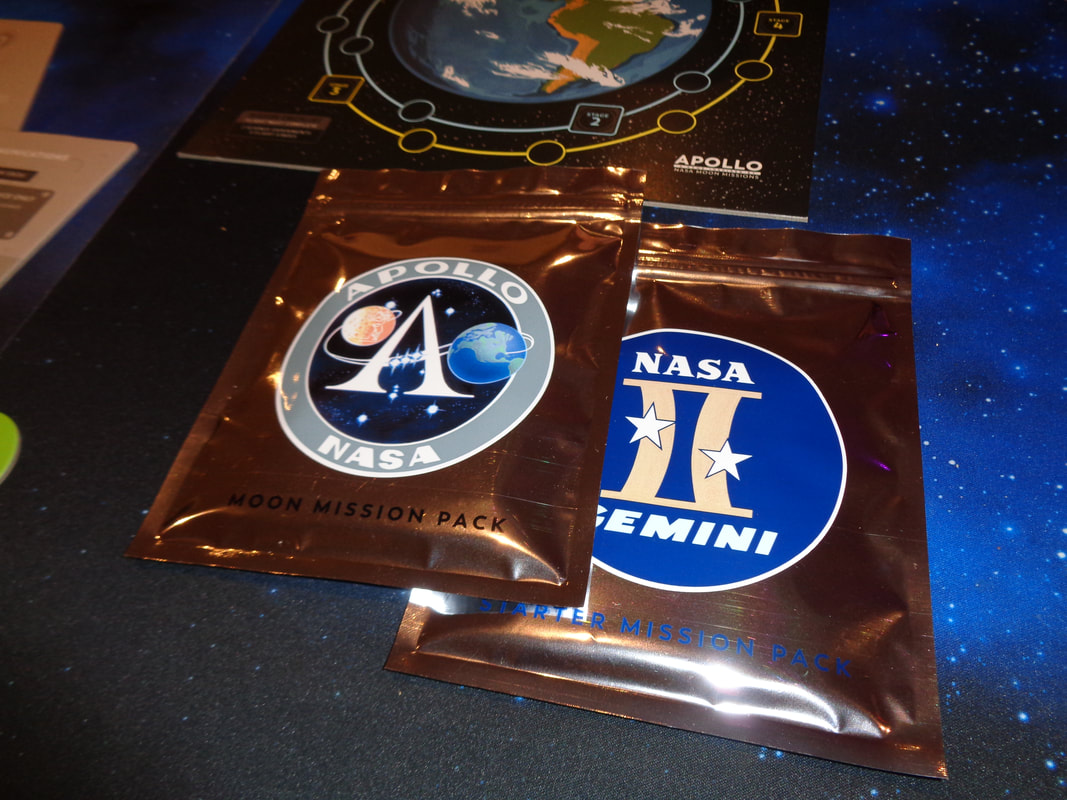
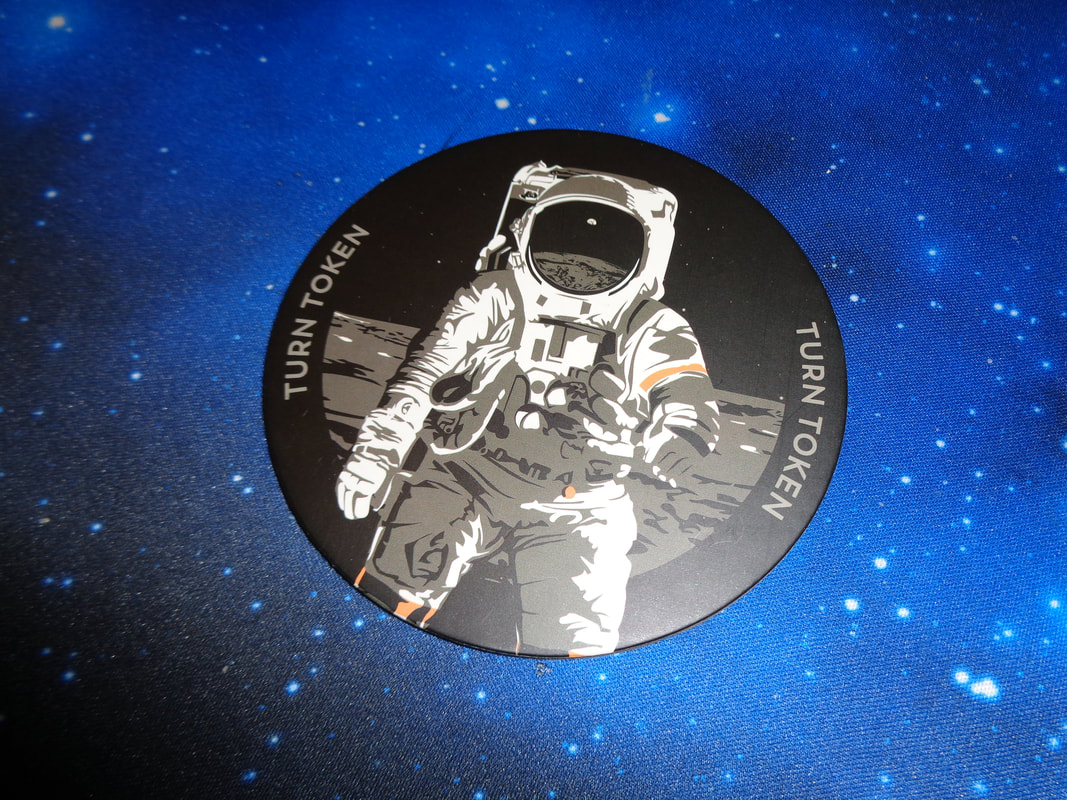
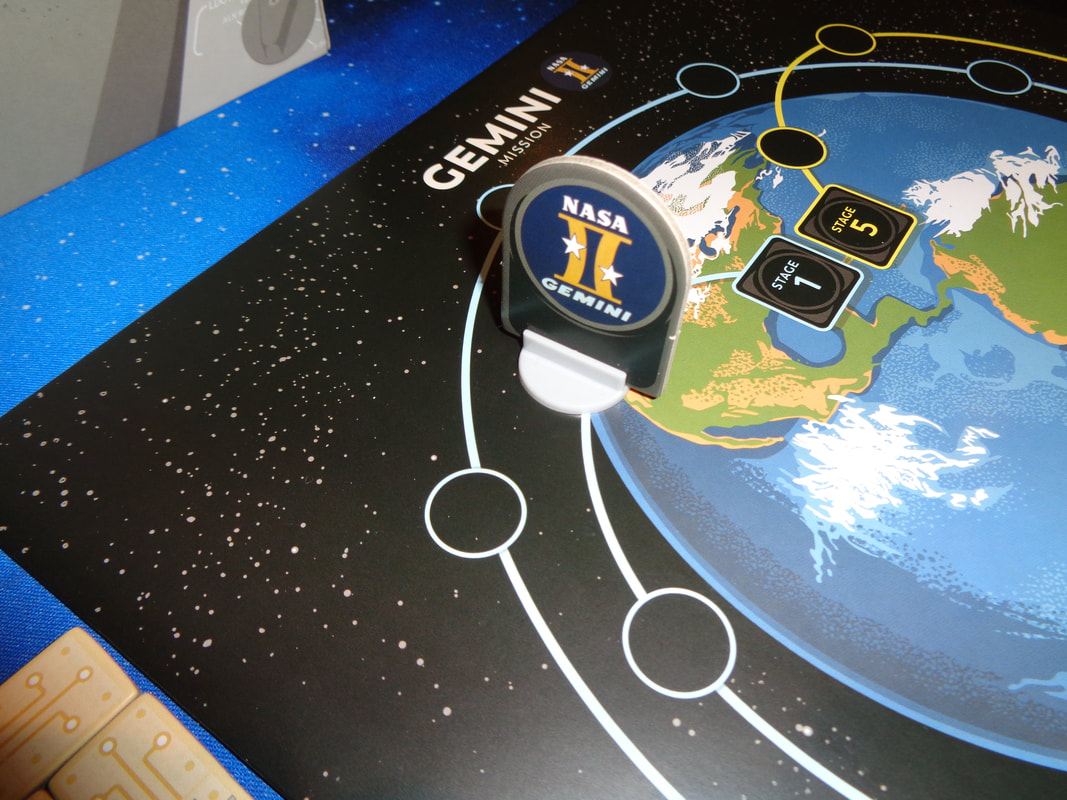
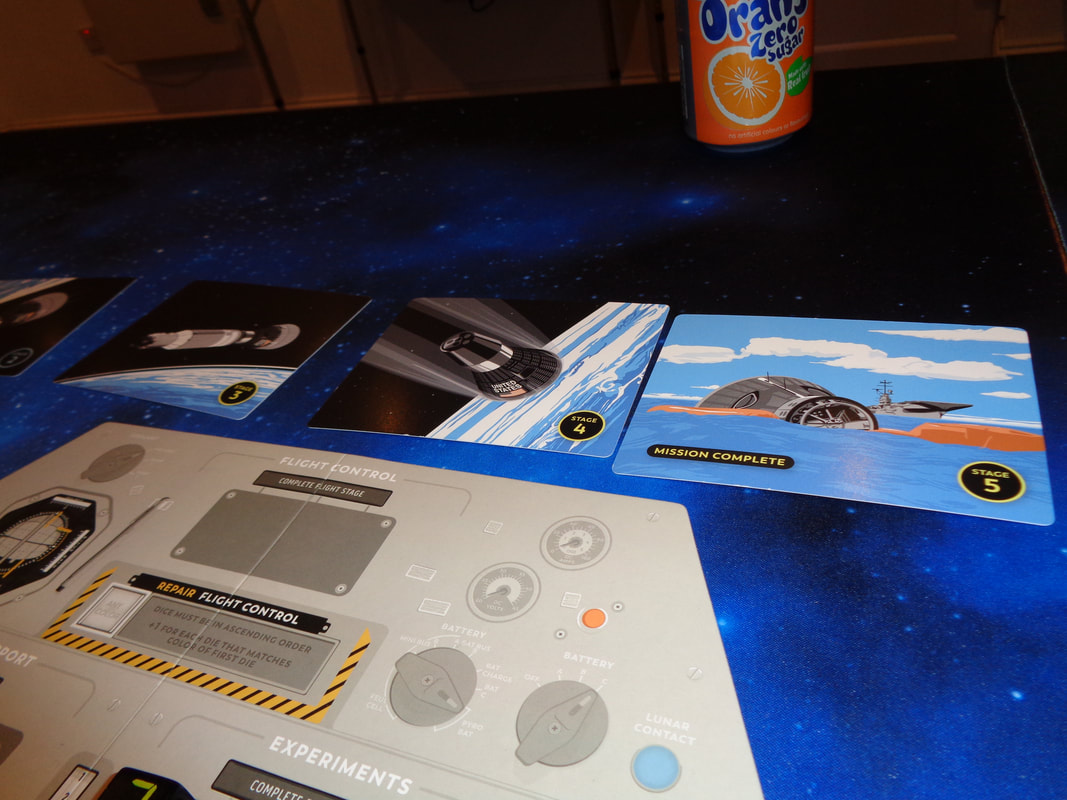
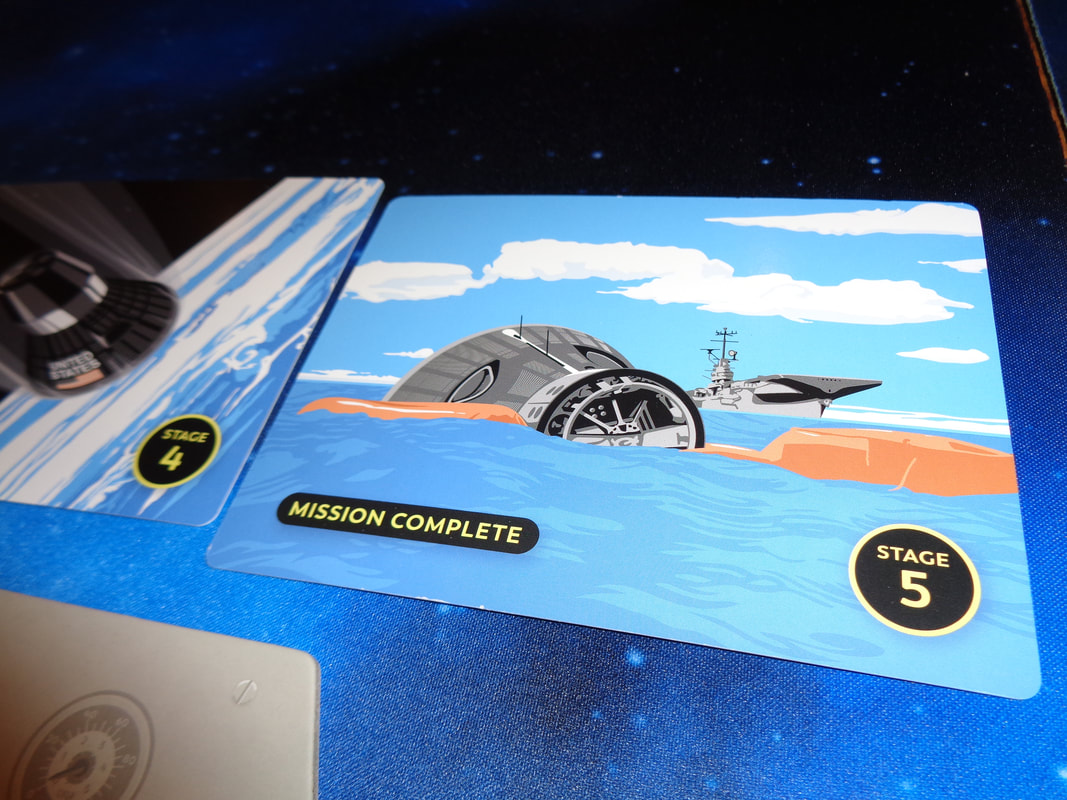
The boards, tokens and player screen are all constructed of suitability thick card. While the dice are not wooden, they use a old school LCD numeric font for the numbers which is pretty cool, as are the pouches to store the mission cards. The astronaut board and particularly the player screen feature very well themed artwork that calls back to sixties computer tech. The art on the astronaut board displays various dials and buttons is perhaps a little sparse but is also clean and doesn't interfere with the game element. Most of the player screen is decorated with evocative artwork of of what I imagine is module controls, the inside has some game information but the rest is an illustration of what mission control might look like. Dig the cup of coffee! The art that depicts the Earth and the Moon is perfectly fine, they look like what they're meant to. Finally, the flight stage cards are double-sided and as each one is completed, it's flipped over to show an illustration of that actual stage, which is a nice touch. The game features little in the way of dedicated iconography, all the information is presented clear terms and is easy to comprehend. How's it play? Setup Since Apollo is a asymmetrical game, it has a asymmetrical setup.
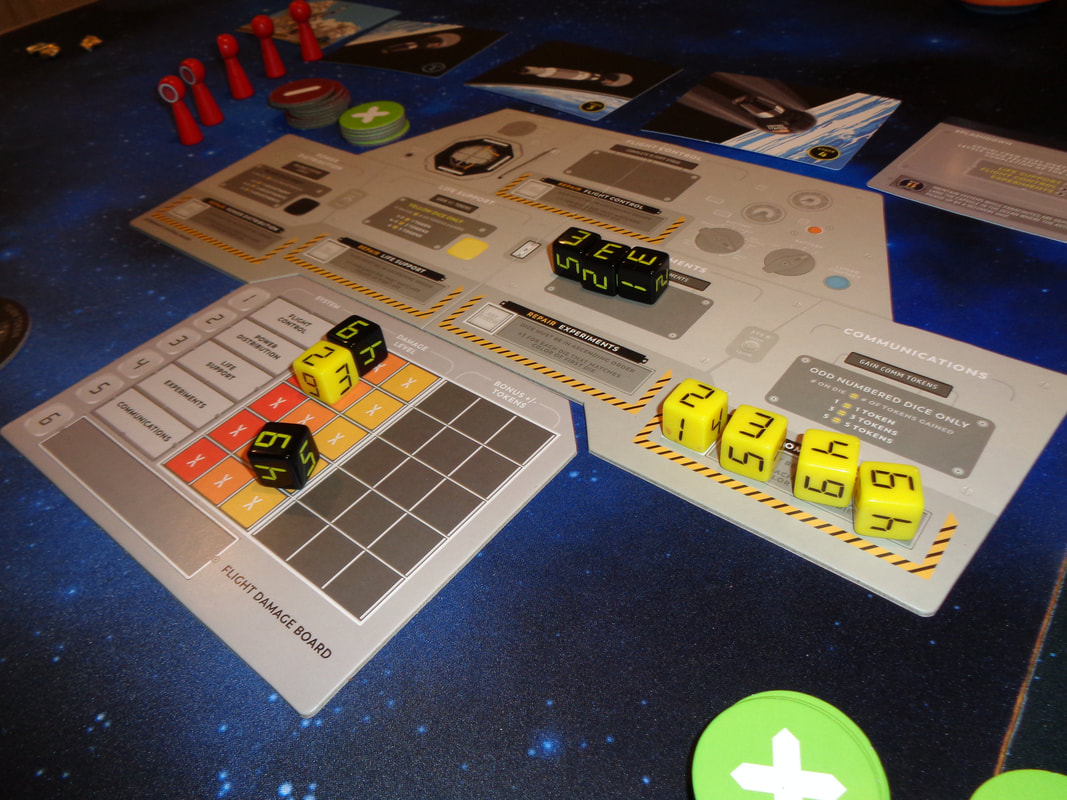
On to play Apollo is played over a number of rounds, each round has its setup and then is played over a number of turns. To make matters worse, Apollo is played in real time and each round only lasts 4 minutes.
What are these actions and how do they work?
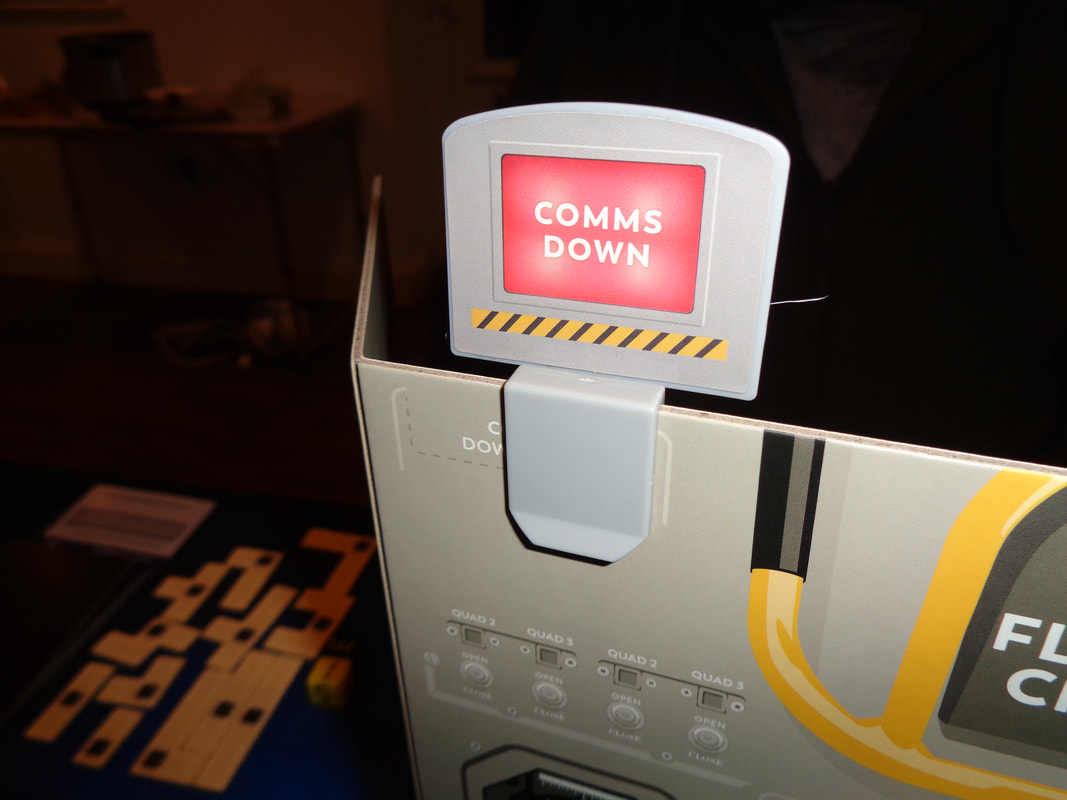
Endgame During play, if the module passes a flight stage space on the board without completing its requisite task or the flight control rating is lower then 4, then the mission immediately fails. If the module reaches splashdown without completing the required number of experiments, then the mission fails. However, if all the flight stages and experiments are completed, then mission is a success and the players win the game. Overall
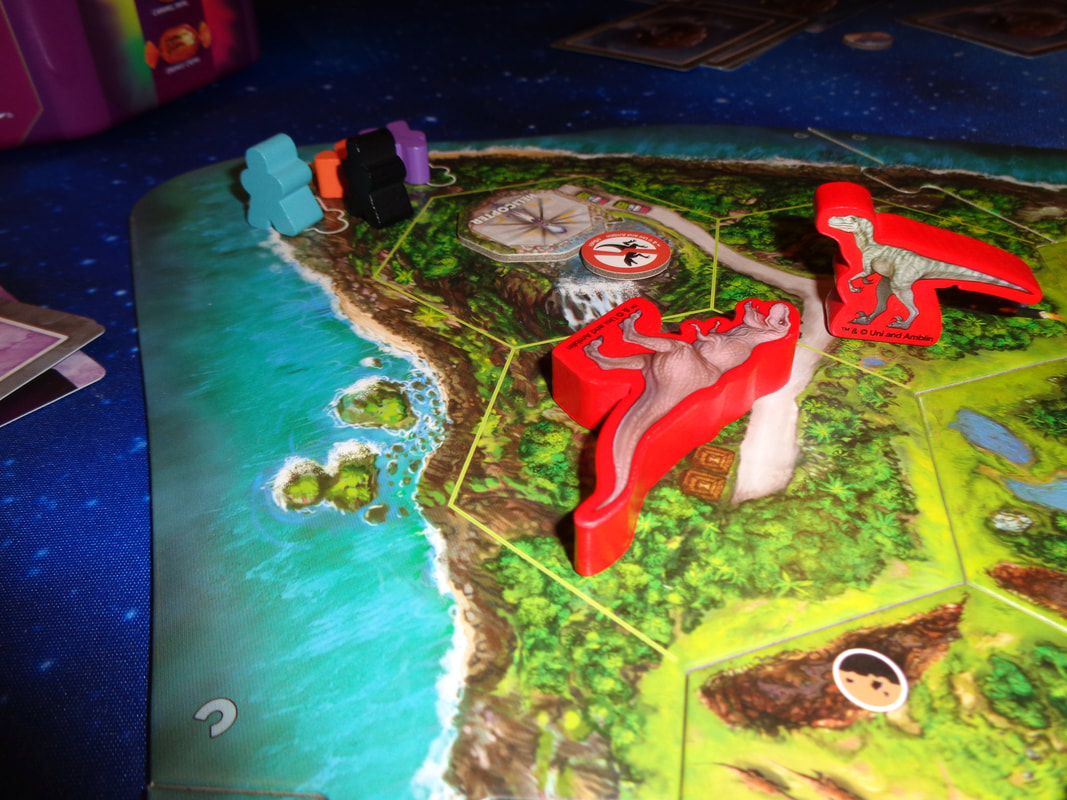
The rules for Apollo sound quite clunky in writing but in actual play, they felt straightforward and once players begin performing actions, it becomes quite understandable. I wouldn't call it a crossover game but I imagine that it would be easy to pick up. Apollo is quite unusual, being an asymmetrical cooperative game and I think it fits its theme quite well too. Having that slight disconnect between mission control and the astronauts somehow lends the game a greater sense of teamwork. Astronauts having to rely on mission control to get information and mission control having to rely on the astronauts to get comms tokens and to be able to make changes to systems means players have to work together. It's definitely a bit different to the typical cooperative game where players are cooperating but generally sort of off doing their own thing. Another noticeable and welcome difference is how there's no characters running round a global board trying to stop the spread of something here. During the game, players will be, broadly speaking, faced with 3 types of obstacle; successfully completing flight stages, successfully completing experiments and firefighting damage that occurs during the flight. There's a real need to strike a balance between these 3 priorities and players will also have to approach this as efficiently as possible, the flight module moves along the board after every turn and is in essence another countdown timer. It means planning for the known variables of the flight stages, somewhat knowable experiments and also reacting and adapting to unpredictable damage inflicted on the command module and there will be damage! There are 15 damage spaces on the flight damage board and only 10 dice to cover them, that means at least 5 damage to the systems every round. Being a cooperative game, Apollo uses the luck or specifically the bad luck that arises from rolling those dice to challenge players. The game also features a time limit in the form of a 4 minute timer: On paper this might not seem like much time but in play it's perhaps a little overgenerous. 4 minutes to assign 10 dice works out to be 240 seconds for 10 dice or 24 seconds per die, which we did not find much of an issue. We played the Gemini mission board a couple of times and it didn't present too much challenge for us, there were a definite couple hiccups and dicey (sic) moments but otherwise it was pretty much plain sailing or more accurately, plain err.... orbiting? Mission control never had to reach for the puzzle boards. However, we are a fairly experienced band of players and maybe for once, the luck went our way this time. We didn't get round to playing the Apollo mission board which is probably where the meat of the game lies and certainly looks more challenging, so I'm reserving judgement on the game's difficulty. I'm not certain about the game's replay-ability either, it wasn't boring but at the same time felt a little samey, players are ultimately just assigning dice to tasks, some of which may become quite familiar over multiple plays. Easy to learn with a reasonable play time and providing some interesting decisions to make, I'd say that Apollo is a good game to play every once in awhile and if cooperative games are your cup of tea, then it's definitely worth checking out this fresh take on cooperative gameplay. 21st December 2021 It's a Tuesday, it's nearly Christmas and we're round Simon's for some gaming goodness. Jurassic Park: Danger! is a board game themed after the very first Jurassic Park film from 1993. Is it a good game? 'Your game designers were so preoccupied with whether or not they could, they didn't stop to think if they should...' What's in a game?
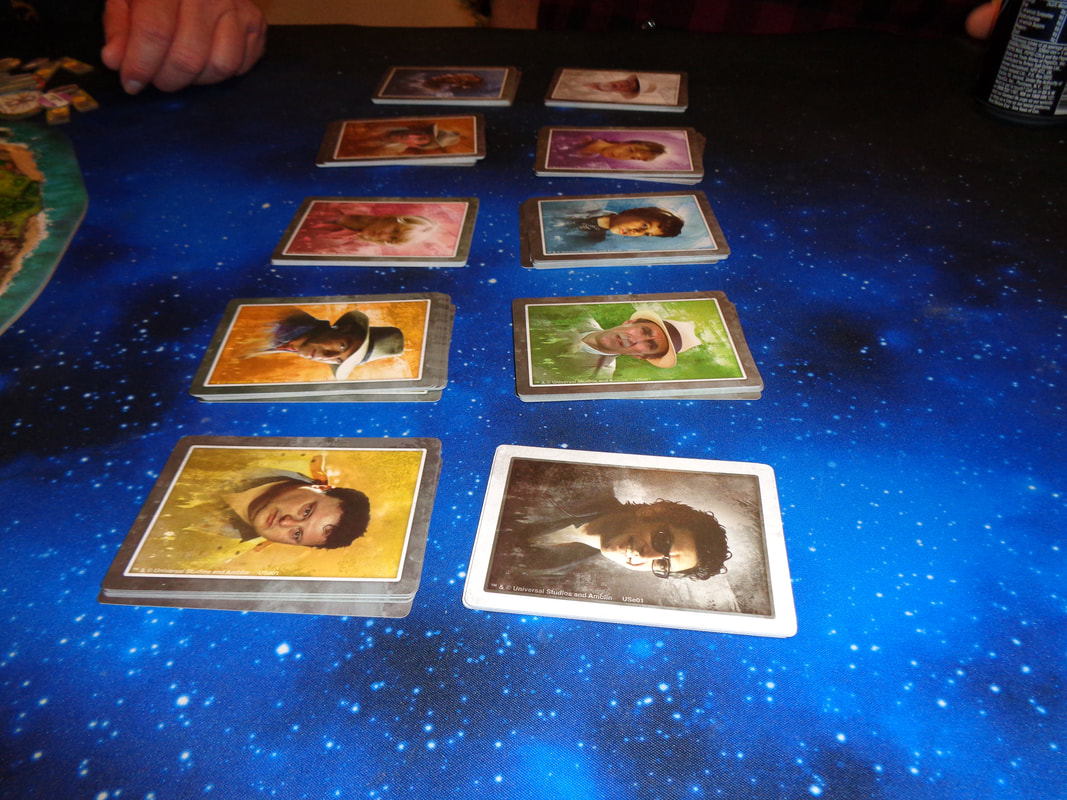
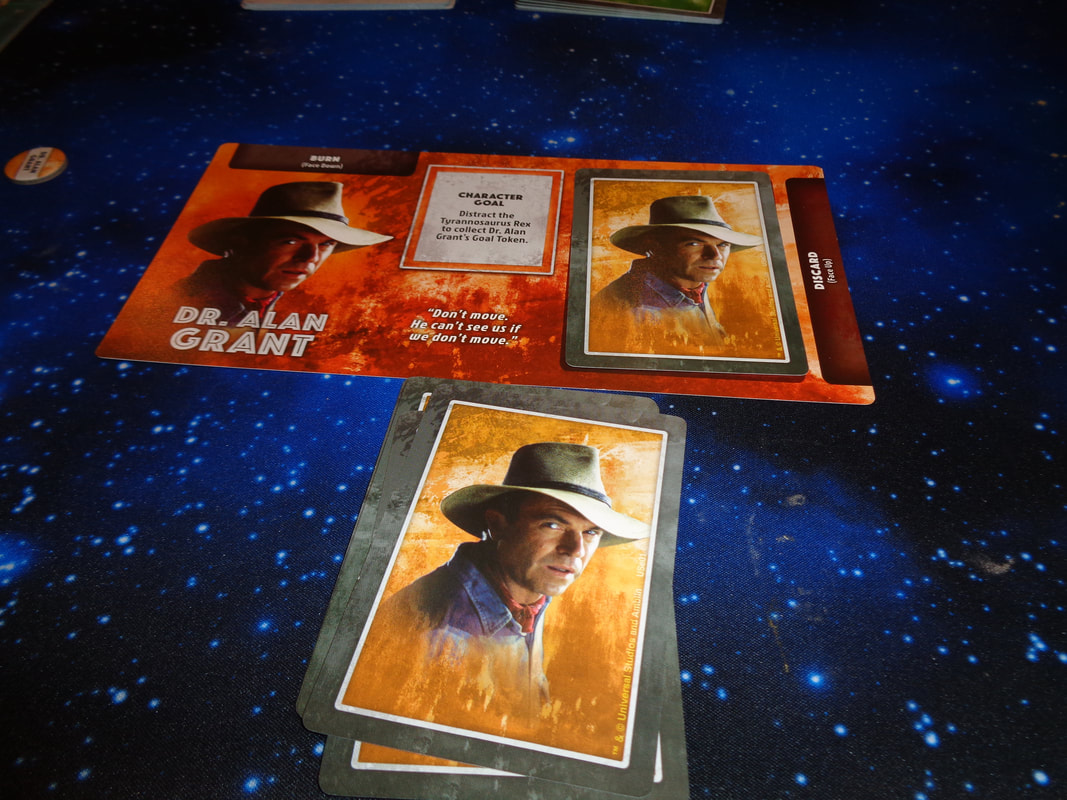
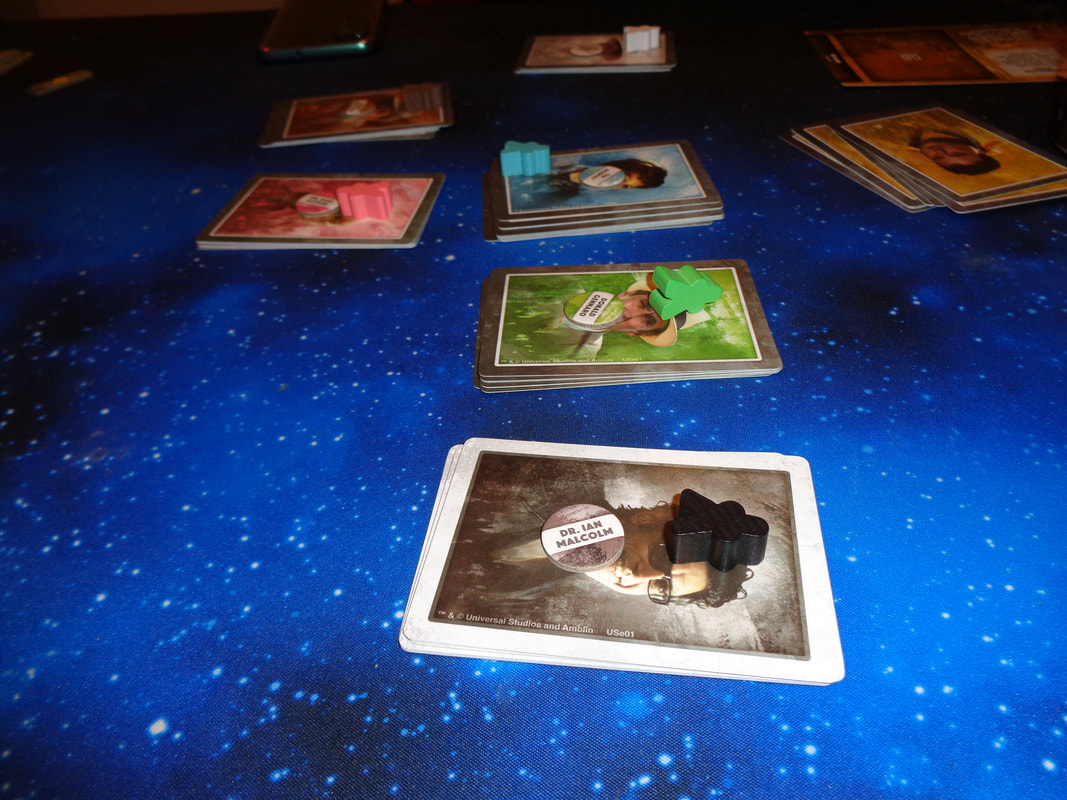
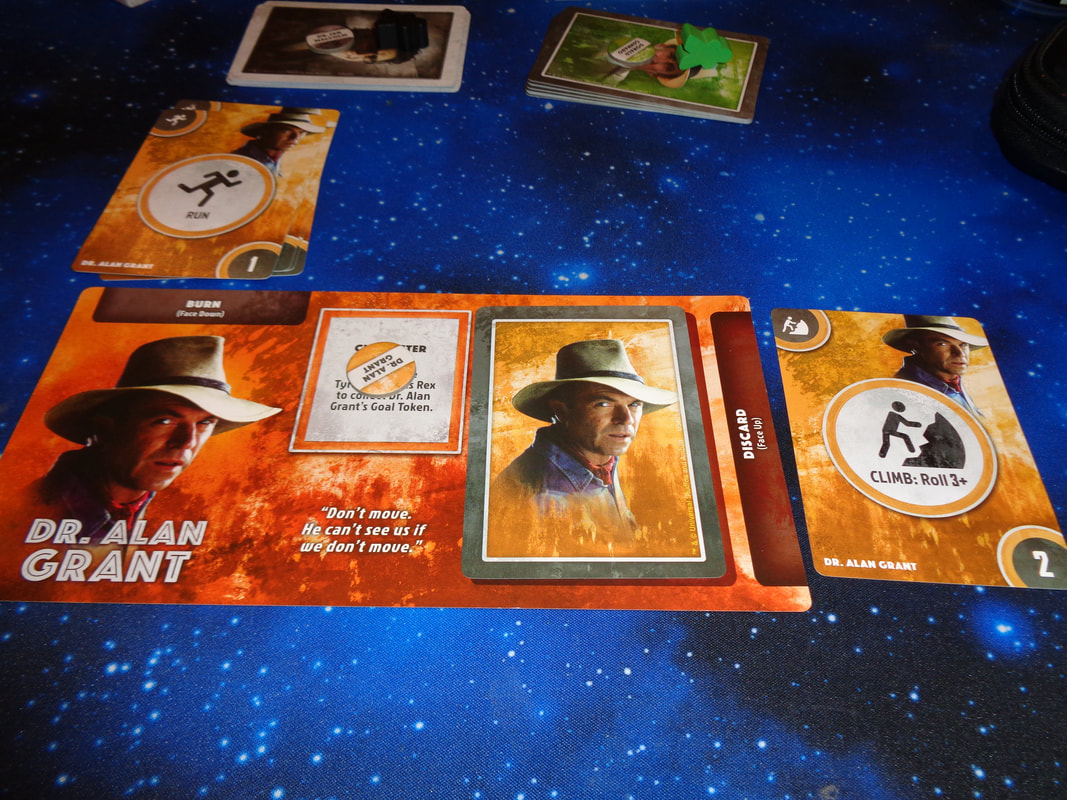
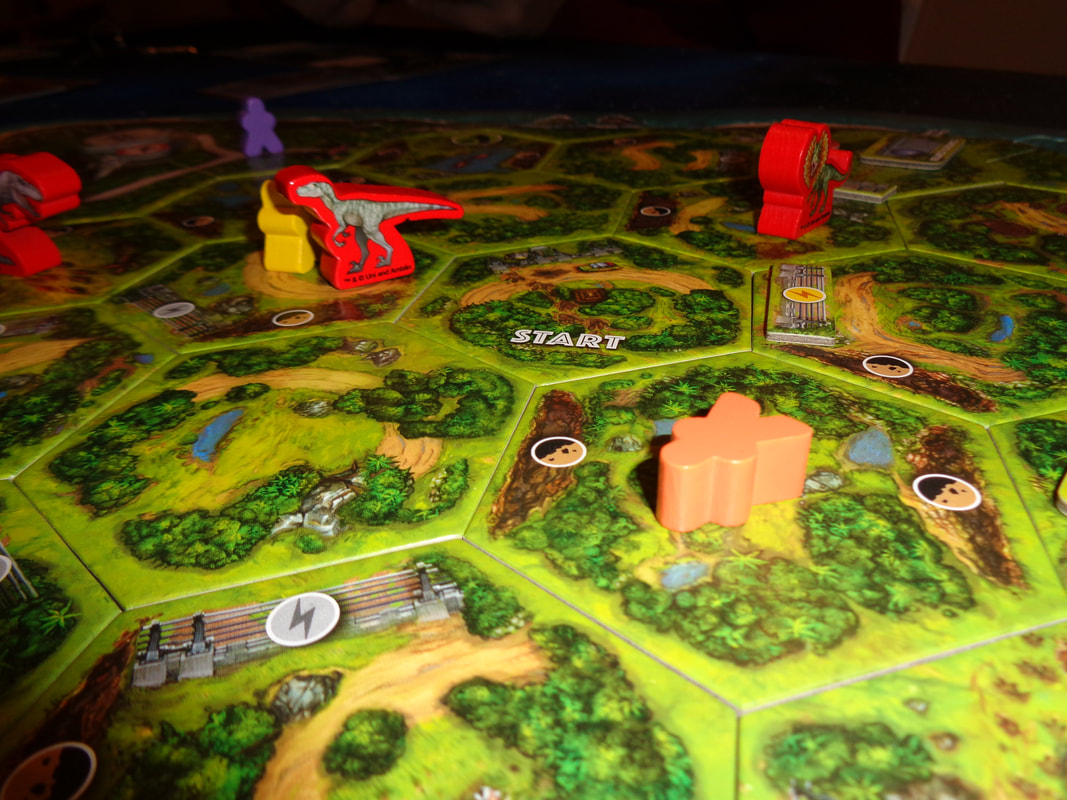
This neatly brings me to the game's art-style, which is a bit of a mixed bag. There's some appealing and colourful art on the tiles but the cards are sort of plain. The game also makes use of photo art of the actors who appeared in the film and it doesn't quite sit right with me. It's understandable why it's been done, I'm sure the licensing for this came with a not inconsiderable fee and being able to plaster the faces of well known Hollywood personalities may attract extra customers, additionally; use of the film's marketing photos saves on having to commission art work. Maybe that's it, maybe the use of photos gives the game a cheap feel. Furthermore, the game's actual art clashes with it's use of photos and it feels a little jarring. Much of the game's iconography is intuitive but the 10 different character decks are all personalised to some degree and each will contain something unique which will probably require referencing the rulebook, none of it is a deal breaker though. How's it play? Setup
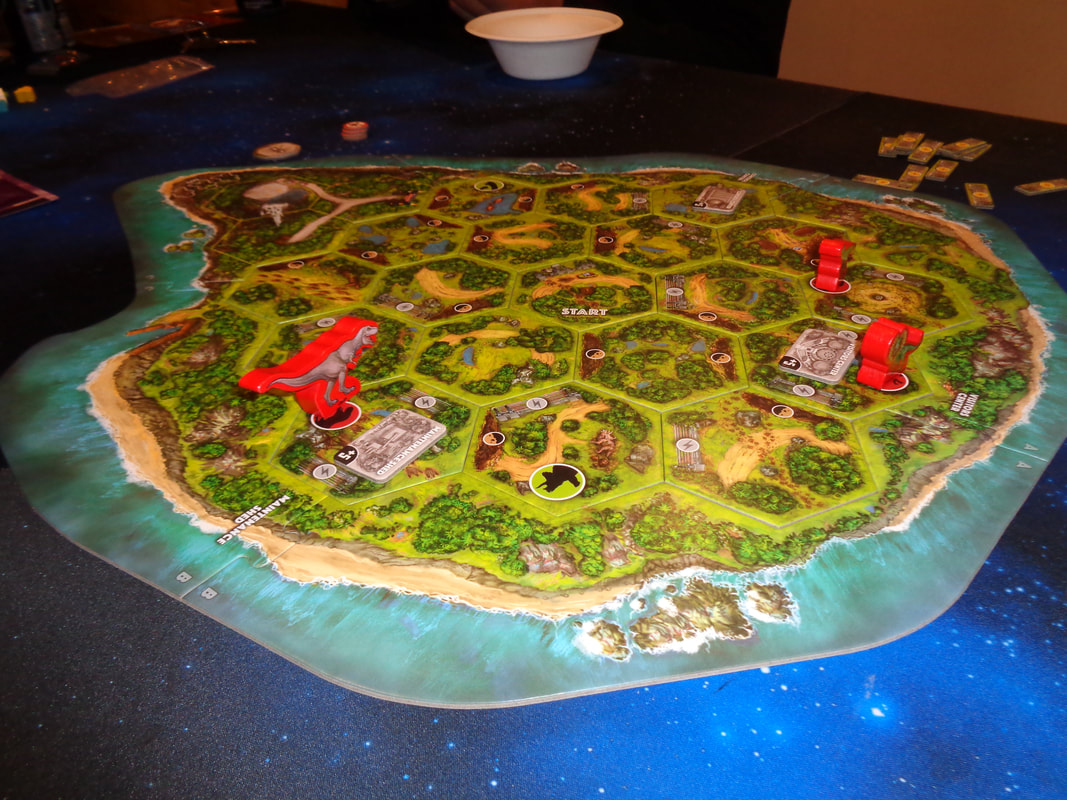
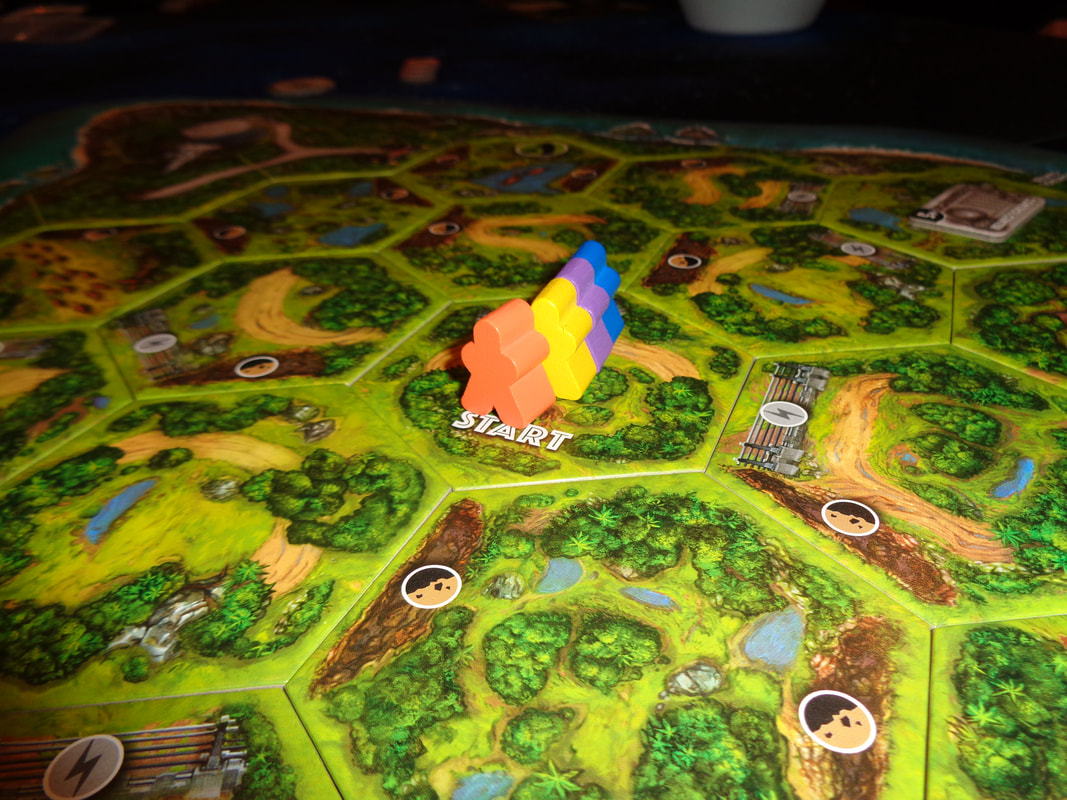
On to play Jurassic Park: Danger! plays asymmetrically but has some similarities between players.
Endgame Play continues until 1 set of victory conditions is met. Character players: For the character players, they have to:
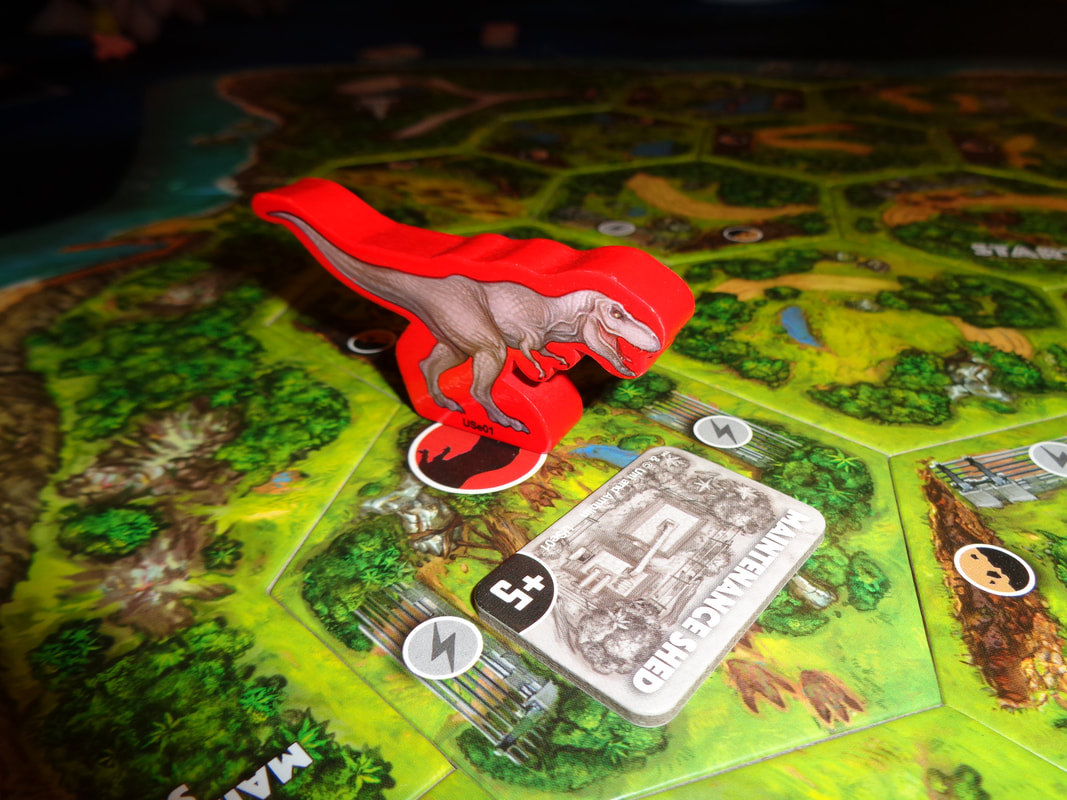
Dinosaur player: The objectives for this player are much simpler:
Overall
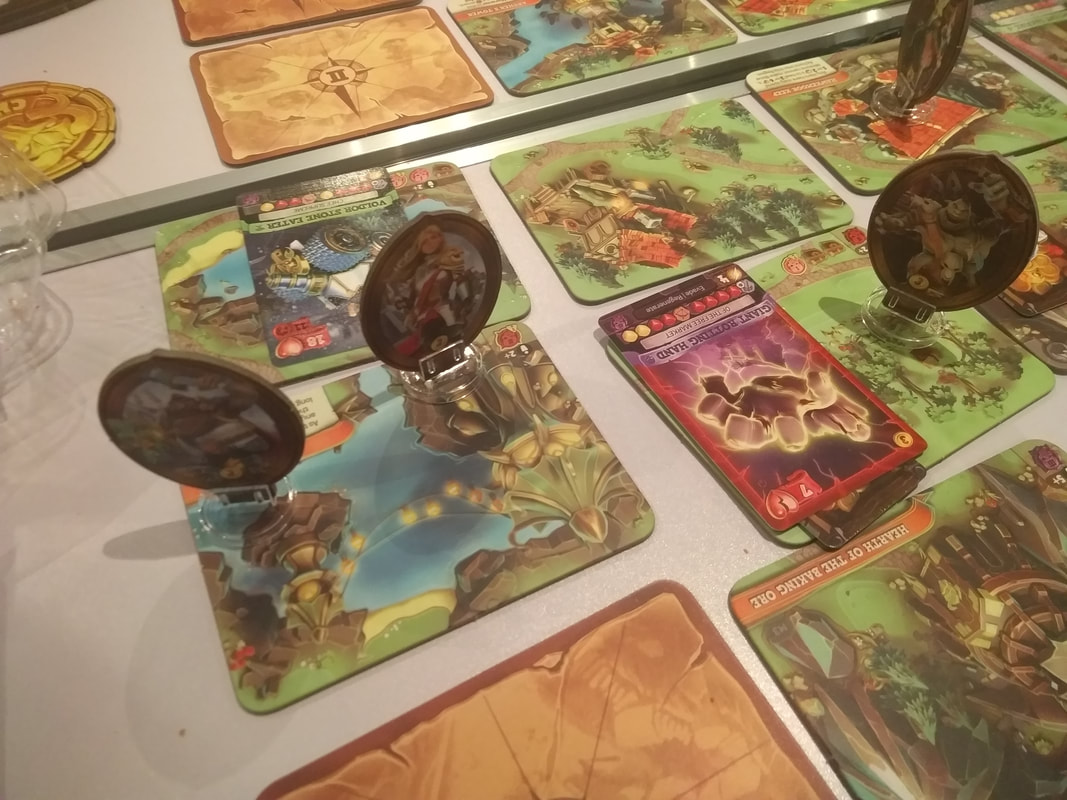
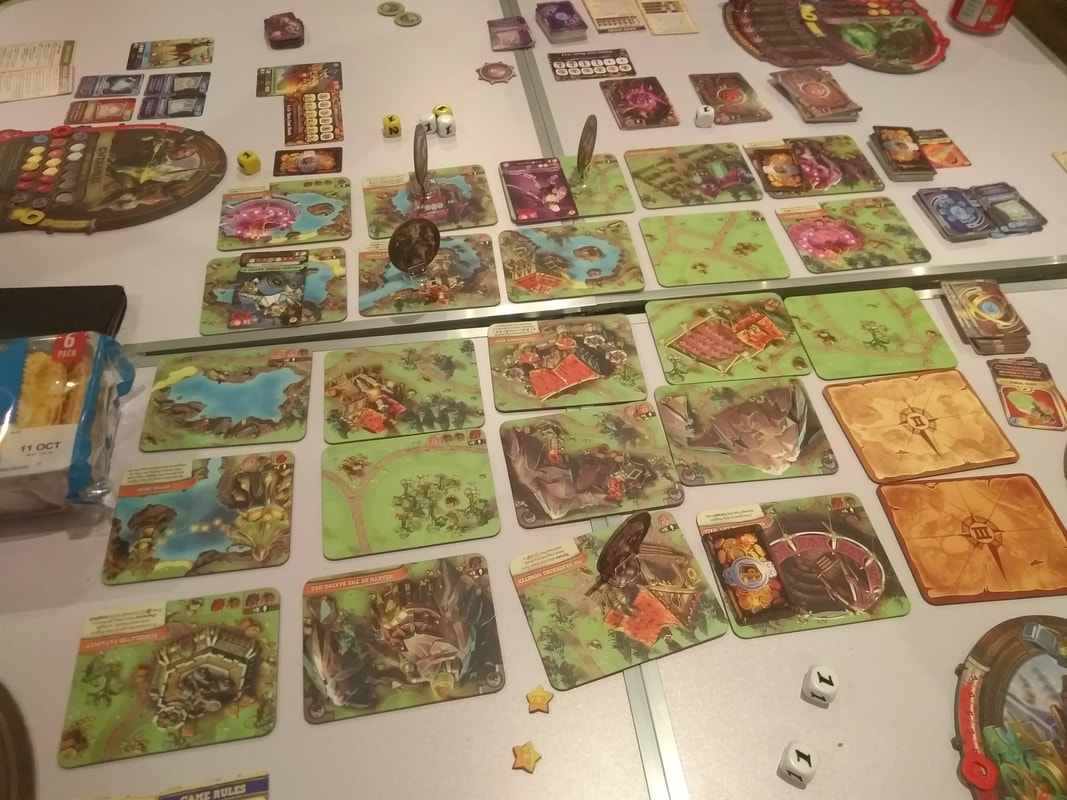
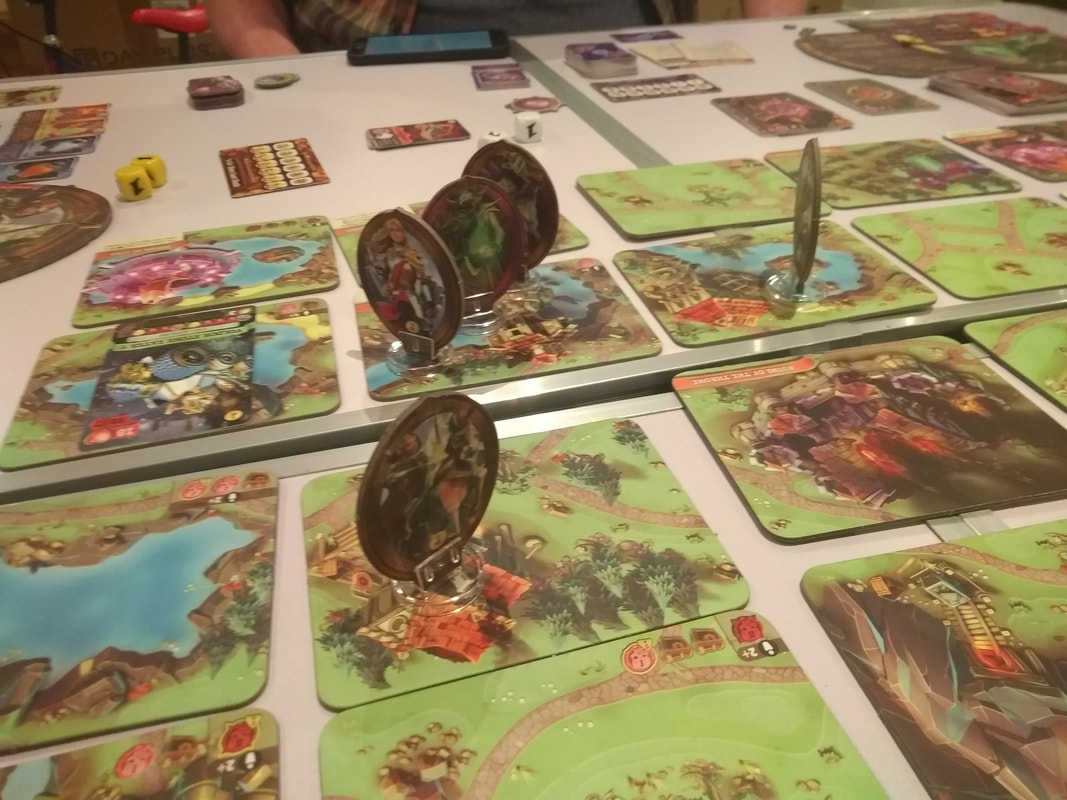
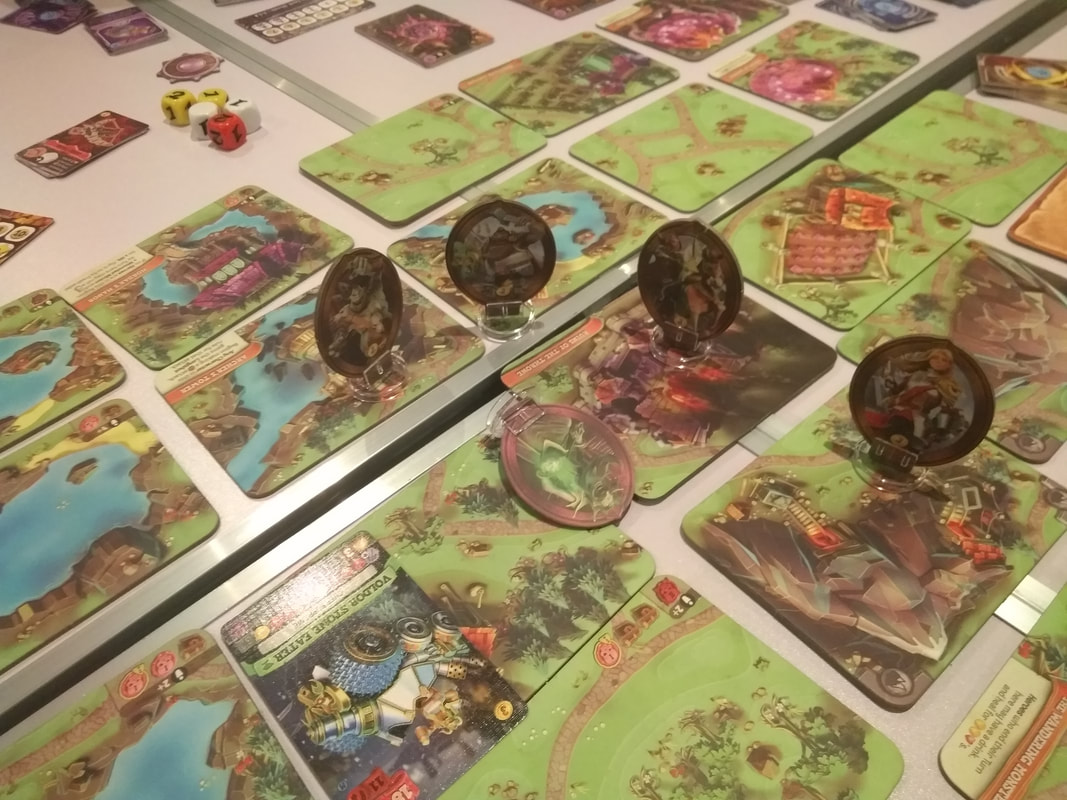
Jurassic Park: Danger! is a cat-and-mouse game all about asymmetrical play. Not only do the dinosaur and character players have different rules, the characters will have differences between them. Each character may have different numbers they need to roll for climbing or sneaking, giving them strengths and weaknesses, additionally, they'll have a card or two which are unique to them. The game does feature some sharp cat-and-mouse gameplay. Due to the limited size of the playing area, a dinosaur will generally never be more than a hex or two away from a character player and this keeps the game feeling quite taut. Players will always have to make meaningful decisions and to make what they hope is optimal choices. Characters need to coordinate to complete their objectives, sometimes putting themselves at risk to protect others, particularly if that other character is close to something important and they can't afford to procrastinate either, as their decks inevitably dwindle. The dinosaur player will face tension too. They of course need to prevent the other players from completing objectives. Unlike the character players, their cards cannot run out, so they can be patient. However, since the dinosaur player only ever has 3 cards in hand and limited actions per dinosaur, they're never fully in charge of what they can do, a hand of 3 cards will limit the dinosaur choices and to a degree randomise their actions, the dinosaur player may not get the moves they need when they need them. While there are only 3 actions for a dinosaur to use, the way in which they become available is unpredictable - to both sides of the game. I think the most interesting mechanic in Jurassic Park: Danger! is the character elimination rule. It's adds the potential for some real tactical moves by the character players, e.g., they could choose to sacrifice someone to distract a dinosaur at the right time, brutal, but maybe effective? This brings me to my criticism of that mechanic: It feels like the game treats characters as just resources to be managed and not people trying to escape. It seemed quite hard to complete objectives, personal goals and get 3 characters out to the helicopter without losing other characters on the way. I know this is just how the game is balanced and not really an issue, especially since it has no effect on winning, but it did detract from the feeling that you're trying to survive. It felt a little unsatisfying. Speaking of balance, this brings me to another criticism, which is my dislike of one-vs-many games. The balancing between one player and several others never seems quite right and I don't see Jurassic Park: Danger! being any different. Multiple brains will always out strategize a single brain. I have to wonder who this game is aimed at? I think many dedicated gamers, myself included are leery of licensed games and as a dedicated gamer, I personally found Jurassic Park a little underwhelming and uncompelling; a little too light for my tastes. It's something I have any inkling to play again. More casual gamers will probably be unfamiliar with some of the mechanics here such as card management, the game isn't particularly complex but neither is it particularly accessible. So I guess we're left with Jurassic Park fans who're gamers! 6th October 2021 Time for some midweek gaming! It's a Wednesday and we're round Simon's. Valor & Villainy: Minions of Mordak is the game of the evening; an open-world styled, fantasy-themed, RPG-inspired exploration game with one player assuming the role of big-bad Mordak and the others taking on the mantle of heroes. What's in a game? Valor & Villainy is fairly involved game that features a lot of components.
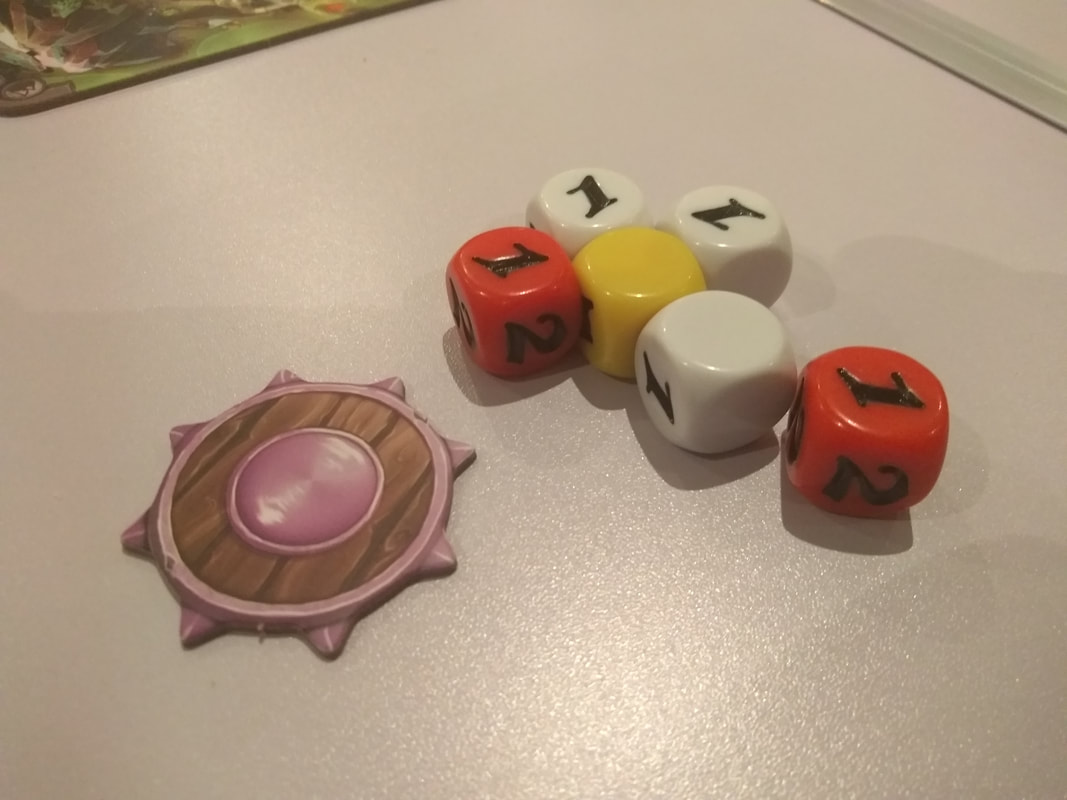
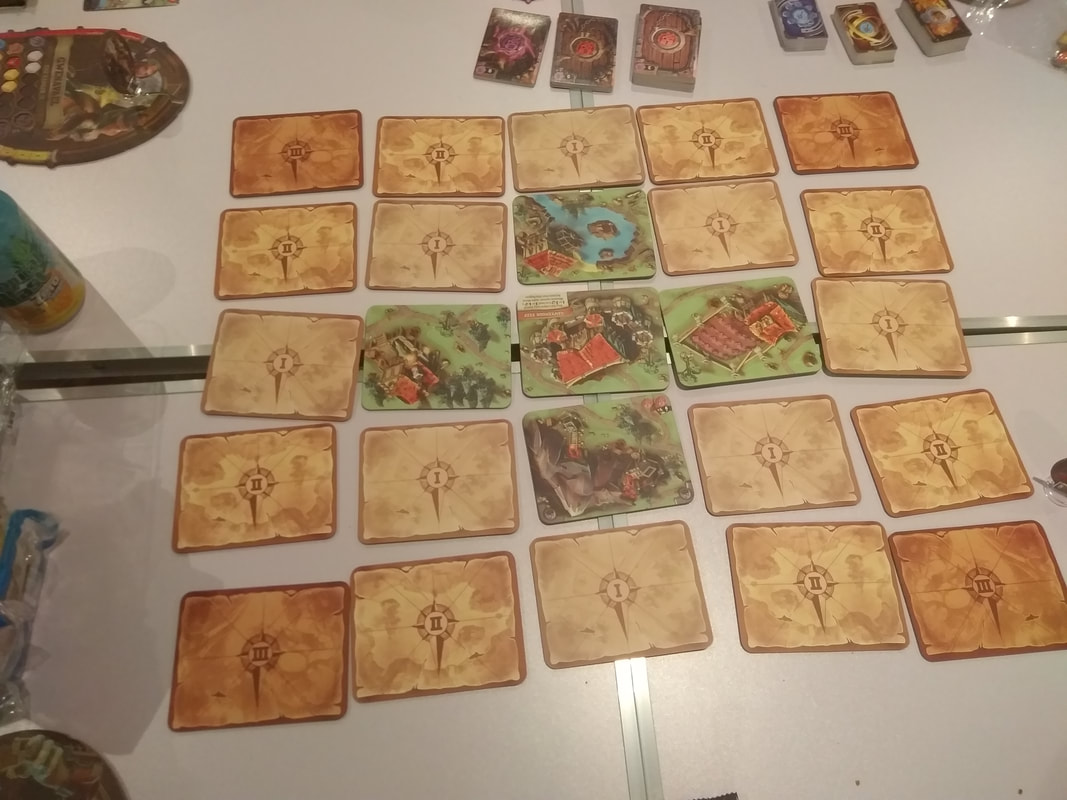
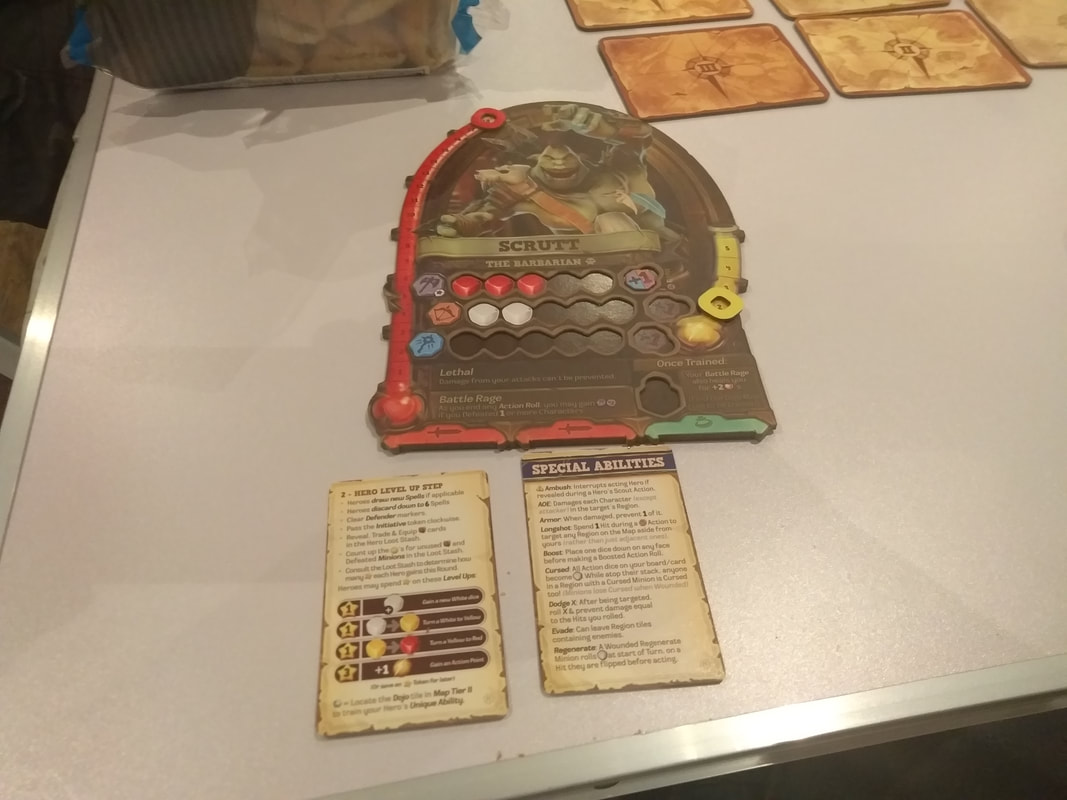
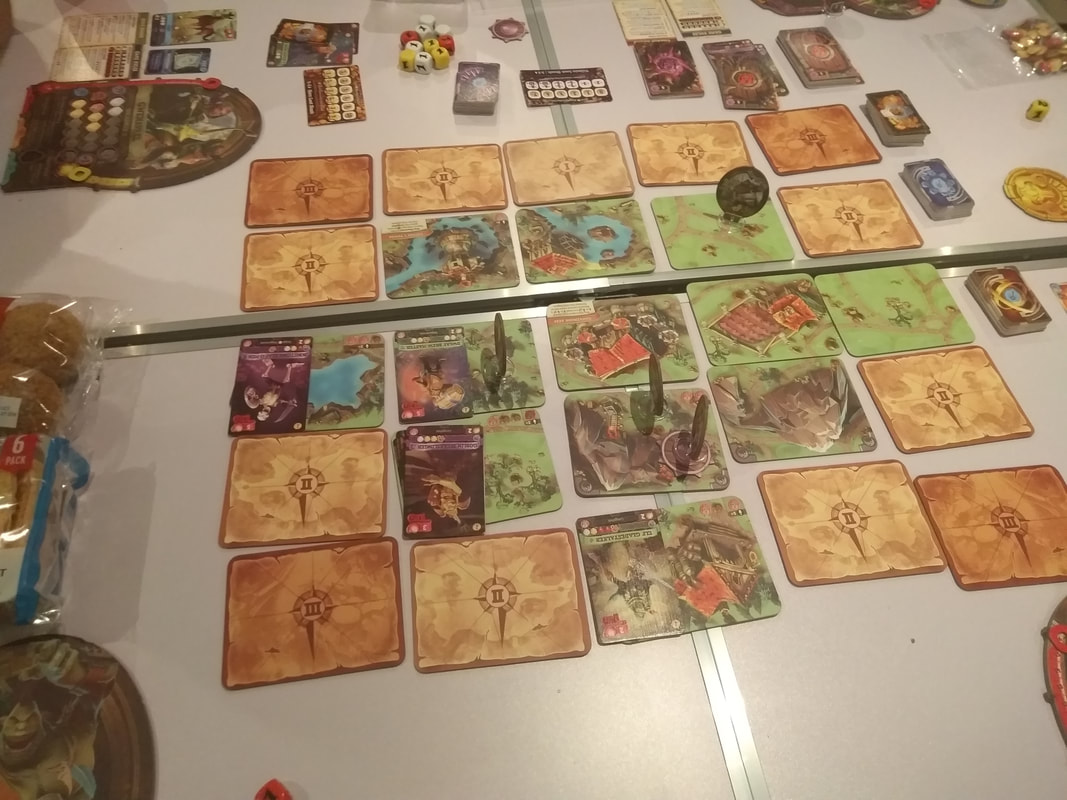
The components are all high quality, tiles and tokens are suitably thick and sturdy, as are the standees. The cards are all well made and the rounded plastic dice feel weighty enough but the standout components are the chunky recessed hero boards which feel solid and also fairly practical. Artwork throughout the game is excellent. The landscapes on map tiles are well produced, clear but also colourful. Character illustrations are bold and slightly-cartoony, it's a style that gets used quite a lot in fantasy-themed games, but it looks good in Valor & Villains. As you'd expect for a open world game like, Valor & Villainy uses a variety of icons and symbols, particularly on spell cards - which essentially are all different. For the most part, the iconography is intuitive and pretty straightforward to understand. How's it play? Setup
On to play In Valor & Villainy, the hero players are trying to discover the 3 shrines hidden somewhere amongst the face-down tiles to weaken Mordak and the Mordak player will be trying to make it hard for the heroes to find them until he arrives on the map after the 6th round. Heroes always act first with the starting player beginning, then going left. The Mordak player may then act after the hero players. The Mordak player essentially gets 2 turns to act, 1 for Mordak himself (Although Mordak doesn't have much to do in the early game.) and 1 for minions. When players take their turns, they will have a number of actions points they can spend to move or act as they see fit, there are also some free actions that can be performed
Endgame Once 6 round have been completed (Or all 3 shrines have been discovered.), the game goes into The Final Battle! During the final battle, Mordak himself will appear on the map and directly engage the hero players in combat. Mordak has a large amount of health; 70-100. If the hero players reduce Mordak's health to 0, they win the game. Conversely, if the Mordak player manages to defeat 3 heroes during the final battle, then the Mordak player wins the game. Overall
There's a lot of charm to Valor & Villainy's presentation, especially the bold, chunky artwork for characters and minions. Mechanically, the game is actually quite straightforward, unremarkable even (At least it is for the hero players.), although it does contain a fair amount of exception driven and situational rules. Using cards for minions makes it a little fiddly to move them around and handle, it also looks a little dull and flat (sic) but conversely, it makes it easy to track minion health and combat initiative. Valor & Villlainy has several quibbles in my opinion One of the most significant is the game's one-vs-many mechanic, these types of mechanic rarely work well in my opinion. Obviously the game will have been balanced to try and take this into account, but few games can balance the difference between 1 human brain versus 4 human brain and the hero players will always have this to their advantage. It almost feels like the game is set up to advantage hero players over the Mordak player. The game also has a weird tonal shift thanks to this one-vs-many mechanic. For most of the game, the Mordak player will be a thorn in the players' sides, a source of constant minor irritation. Then, during the endgame, it becomes straight up, directly confrontational PvP as Mordak appears on the map. It feels weirdly more aggressive. For the heroes, the game is mostly about managing encounters as they appear, recognising and prioritising threats, then dealing with them using the most efficient method, allowing them the maximum opportunity to explore the tiles. For the Mordak player, it's about exploiting any opening or weakness that the heroes present, not only defeating heroes but stymieing and thwarting them whenever possible. Valor & Villainy is a open-world RPG-esque experience where a varied band of heroes, explore, fight monsters, acquire treasure and level up. The ingredients of an RPG are all there, but it doesn't feel quite right and I think there're a couple of reasons why. There's a lack of storytelling to the game and variety to the encounters, there's randomness when setting up a map and not all tiles will appear in any single game, but they're just encounters, they feel a little bland and there's no sense of travelling, journeying or adventuring. The normal map (For 4+ players) will have 20 face-down map tiles to scout, to explore all of them will require turning over 3-4 map tiles per round. Scouting tiles is actually a bit of a balancing act and one of the challenges the hero players face. if the heroes scout too slowly, they risk not finding all the shrines, if they do it too quickly, they risk revealing more minions than they can handle at once. This will require players to head off in different directions and in an RPG you should never split the party! In relation to combat, it seems the most efficient way for the Mordak player to accumulate experience points is to relentlessly pick on one player until they are defeated, then choose another player to pick on. It feels particularly un-RPG-like where combat tends to distributed amongst all heroes. Even then, when a hero is defeated, on the next turn, the hero will reappear in the centre tile like it's a videogame spawn point. All of this adds up to make Valor & Villainy feel disconnected from RPGs. But for me, by far the biggest problem the game has, is its run time. We played with 5 players in total and a game took somewhere between 2-3 hours to play out. If felt like each player took about 4-5 mins to complete their turn and don't forget that the Mordak player essentially gets 2 turns in a row, 1 for themselves and 1 for their minions which makes a round 25-30 minutes long and that's before adding in The Final Battle. It also meant players had about 20 minutes of downtime between turns. It's too much, if Valor & Villainy was an exceptional or engaging game, it wouldn't be such an issue, but it's not. It's not a bad game either, it's just slightly bland and slightly average. There's nothing wrong with an average game, so long as it doesn't outstay it's welcome. The effort Valor & Villainy requires to play doesn't quite justify the experience it provides. 11th September 2021 All day Saturday continues, the next game I played at Wogglecon was Betrayal at the House on the Hill. What's more fun than exploring the local haunted house with your disparate band of friends. I mean, what's the worst that could happen? It's not like one of them is going to betray you, right? It's not like it's in the game's title! What's in a game?
The character tiles are decorated in monochrome illustrations with one colour - the player's colour. Artwork used on the room tiles is a little plain but unobtrusive. The paintjobs on the models is nice addition. Thematically, it all fits though. The game's iconography was straight forward. How's it play? Setup
The objective in Betrayal at House on the Hill is to explore the house until the 'haunt' is discovered and then maybe defeat it! Broadly speaking, the game is divided into 2 stages, the second stage begins once the 'haunt' has manifested. On their turn, the active player can do the following:
Endgame The heroes and the traitor continue taking their turns until one or the other complete their objective, in which case they win. Overall
Mechanically speaking, Betrayal at the House on the Hill is straightforward, especially in the first stage of the game. Players add tiles to the map and deal with whatever randomly comes with it, it's fun, but players are just reacting to encounters, all a bit unchallenging mentally. When the traitor is revealed, this all changes though. The heroes will find themselves having to complete their objectives while invariably having to keep out of the clutches of the traitor and their monstrous allies. They'll probably have to collaborate to have a chance of success. Meanwhile, the traitor will have their own objectives, this may or may not involve capturing or defeating the heroes. The traitor can be sure that the heroes' objective will be bad news for them and will want to thwart them. Betrayal at the House on the Hill has now become a very tense game of cat-and-mouse. However, there are number of things about the game that irk me. I'm not fond of traitor mechanics, nor am I fond of one-vs-many mechanics and Betrayal at the House on the Hill uses both! It's a bit of a put-off for me, obviously, YMMV. Additionally, when the haunt is revealed, all the players must split up to secretly read their objective and in the case of the heroes; discuss their actions while the traitor sits around waiting. This creates a strange, pace-breaking awkward pause to the game. Finally, having the playing area actually split into 3 playing areas, one for each of the house's floors feels somewhat clumsy to me, it's not a dealbreaker, but it does take up table-space. There's nothing wrong with the game, it's just not really for me and isn't a game I'd pick to play. If the haunted house theme appeals and you're happy to play with traitor mechanics, Betrayal at the house on the hill will probably be an enjoyable experience. 20th October 2019 Sunday gaming at 'The Sovereigns' in Woking continues as there is no 50 Fathoms. The final game of the day was 'Aye, Dark Overlord!'. A compact and simple 'storytelling' card game about making excuses to your boss. So if you've ever had a job you were really bad at, you'll be right at home. What's in a game? Aye, Dark Overlord! is a pure card game and has no other components.
How's it play? One player will assume the role of the Dark Overlord, remaining players all take on the role of his inept minions. The hint and action cards are shuffled and each player is dealt 3 hint cards and 3 action cards. The premise of Aye, Dark Overlord! is that the minions are returning from some mission that they were tasked with by the Dark Overlord. The mission was yet another failure! Now the Dark Overlord wants to know why it failed?
As well as hint cards, action cards can be played.
Withering look cards are only played by the Dark Overlord player.
Endgame Once a minion has received a 3rd withering look card it's game over - and not just for the game! The minion is carted off to the Dark Overlord's dungeons for an 'appropriate reprimand'. All the other minions breathe a sigh of relief. For the next game, whoever got 3 withering look cards should be the Dark Overlord. Overall
Aye, Dark Overlord! is a strange beast and I don't know entirely what to make of it. Mechanically, it's a very, very light game, almost nonexistent. However, to me it seems that this game has its roots in 'improv' acting or storytelling. Pass the buck seems it's a bit like 'yes, and' and interrupt a bit like 'yes, but', which are improv terms. Which I think, for a game like this, means you need a particular kind of player for it to work, it just won't work if players don't 'buy in' to it. Personally, I found it quite hard to 'gel' with the game. Maybe I need to give it another try? But if you have an interest in the improv side of this game, it may be your cup of tea. 7th September 2019
Saturday evening. Matakishi's. Game night. Tonight we decided to play another classic board game. This time it was 'Britannia', a game originally published in 1986, over 30 years ago. Britannia is a historical game of invasion and conquest and when I say invasion and conquest, I really do mean constant invasion and conquest. In Britannia, players do not play a single nation or tribe or whatever. Instead they play a colour and each colour has 4 nations of varying size. Each colour will have 1 nation that benefits from a 'major invasion', this explained later. Britannia is played over 16 rounds and centuries of time. The game starts with the Roman invasion (So around 43 A.D..) and end with the Norman invasion (Around 1066 A.D..). Even though each player has control of 4 factions, the factions do not appear at the same time in the game. They appear when 'historically appropriate' in various turns throughout the game. What's in a game?
How's it play? The rules for Britannia are relatively simple. The complexity comes from the interaction with the other players. Before the game begins we have set up. Each player chooses a colour and is given all the relevant tokens for that colour, the play begins.
One other thing worth noting are 'major invasions'. Each player will have a faction that has a major invasion at some point. A major invasion means that the relevant faction gets to turns in a row. Endgame Britannia is played over 16 rounds. Scoring occurs throughout the game, but not on every round. In fact not all the factions score at the same time, some factions score on entirely different rounds. Additionally, when scoring is carried out, different factions score different points for controlling different areas of the board. Which means that different factions may have different priorities. However quite often opposing factions score points for the same regions, invariably pushing them into conflict with one another. After all the rounds have been completed, points are tallied and highest score wins. Overall Britannia is a wargame and as such is very confrontational. It's a game that charts the historic invasions and conquests of early Britain. It turns out there were a lot of invasions and conquests! Players will more or less be in constant conflict with other players and there's no way to avoid it. Combat is a key component in Britannia: Luckily, the basics of the rules are simple to remember. Mostly players will be looking into how to expand into and hold high scoring areas and this drive most of the game's conflict. Asymmetrical rules make Britannia interesting and quite unique. I like how the asymmetrical factions give different players advantage at different times. So for example; whoever has the Romans will gain an early lead, but after that they will have smaller factions appear. Combined with the asymmetrical scoring that gives different players different objectives means that the end score is always unpredictable. I do have a couple of minor criticisms of Britannia. Britannia should only really be played with 4 players. Sure you can play with 3 or 5 players, but it's not optimal. Britannia can take about 4 hours to play, so it requires quite a time commitment. I guess a millennia of invasions of Britain can't be played out quickly! But these small criticisms aside; Britannia is an involved but entertaining game to play, provided you don't mind a game about conflict with other players. 29th June 2019
It's a Saturday lunchtime at 'The Sovereigns'. We should be playing 50 Fathoms, but sometimes life interferes. So instead we are playing Princess Legend. Will the Prince find his Princess (Yay!), or will he get the Queen instead (Boo!)! Only you can find out in... Princess Legend. Princess Legend is a 'bluffing/social deduction/hidden' role card game. Everyone is given a role to play and the 'Prince player' tried to guess who is the Princess. What's in a game? Princess Legend is pretty light on components. A deck of 8 cards. They are actually coasters and not traditional playing cards in size. Each card has a colourful portrait on it. There 3 types of character on the 8 coaster.
A bunch of tokens to track scoring. And that's it! How's it play? Set up. The amount of coasters that are used in a game is equal to the number of players plus 1. Thus if you play with 4 players, the game would be played with 5 coasters. Princess Legend is played with a minimum of 3 players and 4 coasters. The Prince, the Princess, the Queen and the Maid are always used in all games. The other characters will be used dependant upon the number of players participating. Every player will play the role of the Prince. The Prince's role moves clockwise round the table in every round. Firstly, the Prince coaster is given to the player in the Prince role in this turn. The coaster is kept face-up as everyone knows who is the Prince. Secondly, the remaining coasters are shuffled and dealt face-down to the remaining players. One coaster is placed into the middle of the playing area is played by nobody. Once dealing has finished the Prince must close their eyes, then all the other players must reveal their roles (Now only the Prince does not know what everybody else's roles are.). Then all the players (With their eyes open.) are satisfied that they've seen everyone else's role, they turn their coasters back face-down again, the Prince can open their eyes once more. Now play can commence. Let's do this thing! The Prince's objective is to guess which player is the Princess (Or if it's the coaster in the middle). To do this, the Prince must ask the other players questions. However, the objectives of the other players will be different. Other players will want to get the Prince to pick a certain face-down coaster. Each player's objective is different according to their role.
However, there is a limit to the questions that can be asked. The Prince can ask each player only one question each (In any order.). When all players have answered a question, then the Prince has one final question that they can ask anyone. Not only is the Prince limited to the number of questions that they can ask. They are also limited in what the question can be. There are only 3 questions that can be asked. They are:
How the players answer this question is dependant on what role they have.
Once the Prince has made their guess on who is the Princess, all the other players reveal their roles. Then we see who has scored a point in this round.
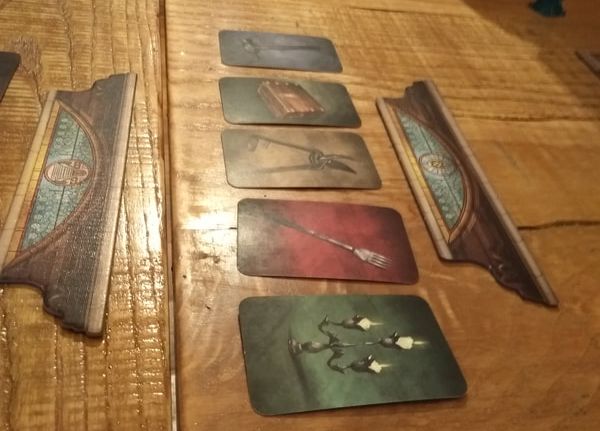
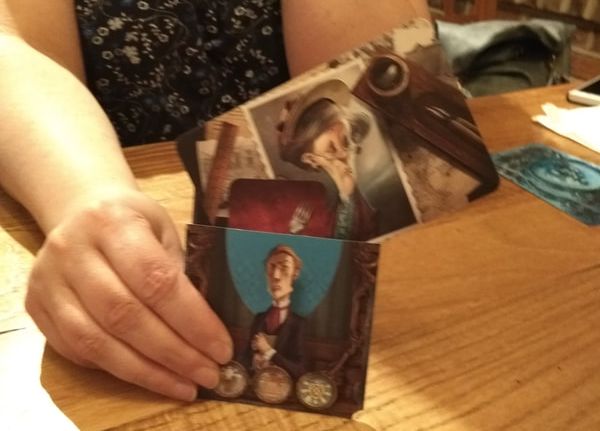
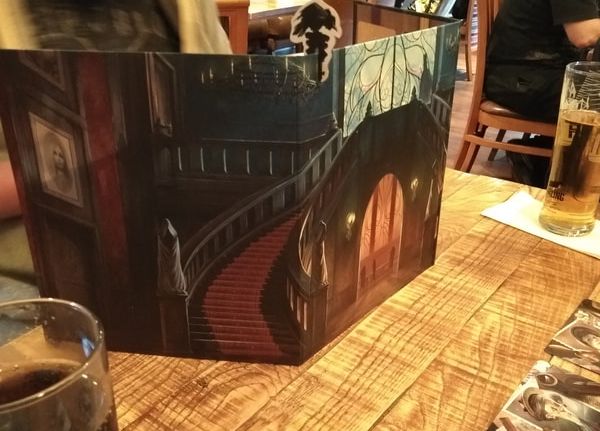
Endgame. Play progress until each player has played the Prince 1, 2 or 3 times (Depending on number of players). Then points are tallied. Highest score wins. Overall? Generally, I dislike bluffing/hidden role games. But this is one of the better ones I've played. I like how your put into random, shifting teams each round and then trying to work with your temporary colleagues. Princess Legend also seems to differ to many other hidden role games: In most hidden role games, your role is hidden from all other players. But in Princess Legend, your role is only hidden from the Prince. I think that this makes the game a little less intense, a player only has to deal with questions from one other player and even then, there's a maximum of 2 questions to answer. And those answered are never really challenged, because the Prince play must use logic and reasoning to try and figure their choice. When a player lies to the Prince, figuring out it's a lie will provide information in itself. So I think Princess Legend is a 'tolerable' hidden role game - which for me means it's quite good - for that sort of game. 14th May 2019. Tuesday has rolled around again and that can only mean gaming night at 'The Sovereigns' First game of the night is Mysterium'. Mysterium is like a ghostly version of Cluedo. It's quite unusual in that it is both an asymmetrical and co-operative game. One player takes on the role of the ghost of a murder victim. All the remaining players assume the roles of psychics or mediums. The game takes place during a 'seance' in which the ghost will feed all the other characters with confusing and strange imagery, hoping they will figure out the murder The ghost player knows who their murderer is and is trying to communicate this to the other players. What's in a game? The ghost player sits behind a screen which contains information pertinent to them. The ghost player also keeps a deck of cards behind the screen. Each of the other players is given a character to play in the form of a character portrait printed on what can only be described as sort of 'pocket'. The art for the characters is good and makes them look suitability exotic for people that can communicate with the dead. Each player is also given a meeple. Markers are set out for the 3 different clue types. These represent the classic Cluedo cards for person, location and weapon. The game also has a vintage looking clock which serves as a turn counter. Before the game starts the ghost player determines who the murderer and suspects are. The in line with each respective clue marker they layout a number of cards (dependant upon difficulty). Thus next to the person marker, they would lay the murderer, suspects and innocent people. Next to the location marker, they would lay the murder site, suspected sites and unrelated sites - and the same for the murder weapon. And now you're pretty much ready to go.
How does it Play? The ghost player is trying to provide the other players with the information on who the killer is, where the murder occurred and what was used to do it. But cannot talk to the other players at all. Every turn, the ghost player draws a number of cards from their deck. The ghost play can give them to the other players. These cards contains all manner of strange and weird imagery. When the ghost player gives other players these cards, they are trying to get them to pick the correct clue card. For example; if the killer was a fisherman, you might give them a card with picture of a boat or a fish or even the colour blue. So once the psychic players have received cards from the ghost player, they have to use them to try choose the right card. When they have selected what they feel is the right card, then they put their meeple on the card. Once all the players have done this. The ghost player will indicate if they are correct. If a psychic player is correct, then they take the clue card, put it into their pocket and move their meeple on to the next set of clues. If the player's guess was incorrect then they stay on the current set of clues. Play proceeds until all psychic players have 3 cards in their pockets, or time runs out, (In which they all lose.). If all the players manage to get their 3 clues in time, the play proceeds to the epilogue. During the epilogue, all the clues for all the characters are revealed. The psychic players now have one attempt to guess who the killer is from all the available clues. If they guess incorrectly, everybody loses. If they guess correctly, everybody wins.
Overall
I've glossed over the rules somewhat, but the gist of it is there. Apparently, the game can involve using a secret voting mechanic when making choices. But all the players I spoke to prefer the idea of open discussion when making choices and I have to agree. The group discussions add a lot to the game in my opinion. This makes the game a much more relaxed and enjoyable experience. The art on the cards is a mixture of weird and wonderful imagery, highly detailed and allowing the ghost player a lot opportunities to use them as hints and clues. In fact the whole look of the game and it's art direction is moody and evocative. I like the clock as the game timer. I also like how the game manages to be both asymmetrical and co-operative. Quite often asymmetrical games can be a lonely experience, (As anybody who has played the prison guard in 'Escape from Colditz can attest.), but Mysterium changes that dynamic. I think this is an entertaining game and one to be played socially. It's also straightforward enough that anyone can join in a contribute. Finally, now everyone is on the same side and you can watch the ghost player try to keep a neutral expression when you are about to make a stupid choice! |
AuthorI play, I paint. Archives
March 2024
Categories
All
|


 RSS Feed
