|
2nd April 2019
The second game of Tuesday at 'The Sovereigns' was an old favourite - Port Royal. You can read my blog about it here.
0 Comments
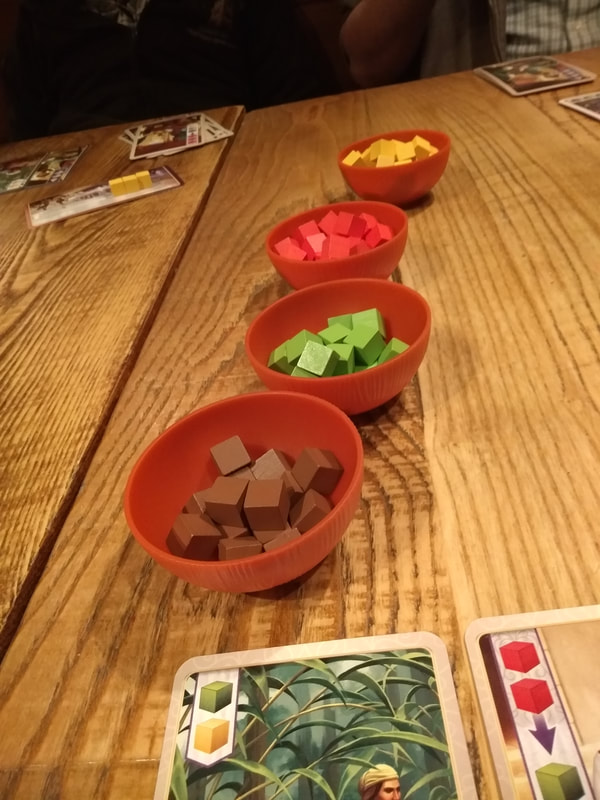
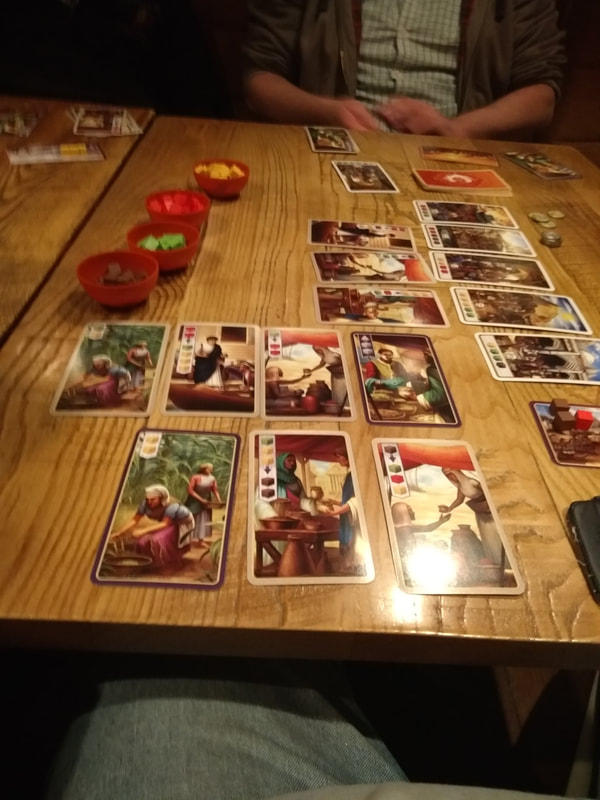
2nd April 2019 It's a Tuesday, so that means a pleasant evening of tabletop gaming at 'The Sovereigns. Proceedings began with 'Century: Spice Road'. This game is first part of a gaming trilogy. I blogged about the 2nd game - 'Century: Eastern Wonder' here. in that blog I said that I found playing Century: Spice Road to be a frustrating experience. Well I've played Century Spice Road again, so here we ego! Century: Spice Road, as they name suggests is about 'The Spice Road' which means travelling and trading spices. Like Eastern Wonder, Spice Road is about trading the same 4 types of spice, represented by identical components (which makes sense and is fine). Century: Spice Road is a engine building card game. As well as the aforementioned spices, there are 2 types of card, scoring cards and trading cards. The cards sit in the playing area in 2 rows, with the scoring cards on top. Also some 'gold coins' are placed just above the leftmost scoring card and some 'silver coins' are placed just above the second leftmost card. The ultimate objective of the game is to get the highest score. Can you guess how you do that - yep accumulate scoring cards. Scoring Cards Each scoring cards has to be bought with a combination of spices, like 3 reds and 2 greens, 5 yellow or 1 of each colour etc. The more expensive the spices required to obtain, the more points the card is worth. Trading Cards These are the cards that allow you to generate and trade spices. There are different kinds of trading cards.
How the game plays
Each player starts with a small hand of trading cards and can do 1 action in their turn.
The game continues until one player has acquired the required number of scoring cards to trigger the endgame. Scores are tallied and a winner declared. How does it play? In an earlier blog I expressed my frustration at this game. This is entirely to do with the game flow to do with scoring cards. After buying a scoring card, a new scoring card will appear. It's frustrating when you buy a scoring card and the next card that is dealt is slightly better. Particularly so you had the spice to buy it, but have used it on the previous card and now have no chance of getting it. Additionally, when a new scoring card appears that you easily have the spice get, there's no sense of satisfaction in do so, it just feels a little cheap. So grumbling aside, Century: Spice Road is easy to learn and play. It also has a fair amount to strategize. When buying trading cards, you want ones that fit what you want to do as efficiently as possible. Overall my opinion of it has softened a little over time and after playing Century: Eastern Wonder. I may end up buying both of them. 30th March 2019 Gaming night continues at Matakishi's. Our RPG had finished early so we played Machi Koro as a finisher for the evening. I've reposted my original blog about it below (it was originally part of another blog). Machi Koro is another game we play a lot and is popular with everyone.
Currently there is the base game and 2 expansions. 'The Harbour' and 'Millionaire's Row'. Generally we only play with the first expansion. The base game is average, if I'm being honest. But The Harbour expansion makes it a much, much better game. None of us have been sold on the Millionaire's Row expansion and were not certain it adds enough to the game to warrant its inclusion. Anyway enough of that and on to describing the game. In Machi Koro, each player is the mayor of a blossoming city on the cusp of rapid expansion. The game is won by being the first player to build all of their city's landmarks. Landmarks and city establishments are represented by cards. The first thing to do is to create a marketplace, this involves turning over 10 different city cards and placing them in a central area. If you draw a double of a card you simply stack on the other one. You keep doing this until you have ten different cards available. Each player then takes a set of landmark cards and put them in their own playing area face down. Each player then receives their starting cards, a wheat field and a bakery. These too are placed in their own playing area, but face up. Finally each player takes 3 coins from the bank. Next I need to explain the anatomy of the cards before writing more about the rules. Each city card contains 3 pieces of vital information:
Right - so this is how play goes. First the active player rolls the die or dice, then cards may be become activated according to the rules above. Once this has been dealt with, the player has the choice of buying a card from the marketplace or building a landmark in a turn (or passing). Both of which cost coins. Acquiring establishments increases the chances to earn more money, the more cards with different activation numbers the more chance that a card of some sort will be activated. When a landmark is built, it grants the player a special ability. First player to build all their landmarks, wins! And that's it for the basic rules. What I like about this game, is that there is no single winning strategy (Other than the Tuna Boats - we all know about the Tuna Boats!!!). The cards that appear in the marketplace are random and you have to adapt to what it available to buy. It keeps the game fresh. Machi Koro blends quick set up and play-time with replay-value and enough strategy and depth to keep us interested. This is a game that we've played a lot, probably more than any other single game in the last few years. 30th March 2019
Another night at Matakishi's and the session 5 of 'Oubliette' a 'Black Hack' campaign that we are playtesting. You can read Matakishi's report about it here. 26th March 2019
The 2nd game of the night at 'The Sovereigns' was Sleeping Queens a very light little card. You can read what I thought about it here. 26th March 2019 Another Tuesday comes round and another evening of pleasant gaming at 'The Sovereigns' in Woking. We begin the night with Pandemic: The Cure. Pandemic is a popular board game that was released a while ago. It's a co-operative game in which the players travel the globe against the clock in the search for cures before the hideous diseases ravage the world. Pandemic: The Cure is another co-operative game. It replaces the game's movement and actions with dice and a push-your-luck mechanic. It also replaces the global board with an errr acrylic ring?!? The set up So the acrylic ring is placed in the centre of the play area. 2 pegs are placed in holes in the ring to represent the infection rate and number outbreaks. 6 'region' discs, numbered from 1 to 6 are placed around the ring. Each disc representing a different region of the world. The 4 diseases are represented by 4 sets of different coloured six sided dice. They are all put into a bag. When you need disease markers, you blindly draw the required number of dice from the bag and then you roll them and place on the relevant. This gives you both the type and location of disease markers. It's worth nothing that even though these are six sided dice, they are not regularly numbered from 1 to 6. For example one colour might be missing 3 and 4 and might have an extra 5 and 6. This means that certain types of diseases are more likely to appear in certain regions. This is something important to remember. Some event cards are laid out, during the game these can be bought to grant the action described on the card. Just like in the board game, each player assumes a different role like a dispatcher or a scientist. Each role has it's own set of custom dice, a card granting them a special ability or two and a meeple. Before the start of the game, each player places their meeple on to region disc 1.
Gameplay
Player action. When a player takes their turn, the first thing they do is roll their dice. This will give them their choices. You 'spend' a die to perform it's action.
Those are the basic actions, each player will have actions unique to the role that they are playing, but there's no need to list them all here. Once a player has spent all their dice, there are some other actions they will perform. Give research. If you are on the same region disc as another player, you mave give them all the researched disease dice of one colour - and your research dice along with them! Cure disease. If a player has any disease dice (and research dice) on the role card. Then they can attempt to cure a disease once in their turn. To do this the player takes all the dice of one colour (of their choice if there are more than 1 colour available) and rolls them and adds them up. If they get 13 or more then the disease is cured, otherwise not. It's worth noting here that it will normally take at least 3 dice to get 13. Some colours of disease dice may not have higher numbers such as a 5 or 6, that means it will require even more dice to stand a chance of curing a disease. Spread infection. The final action of a player is to spread infection! The players draws dice from the dice bag, the amount that they draw is equal to the current infection rate. The player rolls these dice and then allocates them to respective region disc. That's it for what players can do. There are some other rules to note such as: When things go bad. There are a couple of things that can go wrong.
How you lose the game. There are 3 ways to lose this game.
The players win the game, if they manage to research all 4 diseases. That's it for the rules. Is it a good game? I like how Pandemic: The Cure manages to replicate some of the 'feel' of the original and also how it replicates the kind of decision making that will be familiar to players of Pandemic. I also like how they've managed to incorporate a push you luck mechanic. The game small and portable and has a small footprint on the table. But... But, there seems one glaring issue with this game. It seems a bit too easy. Whenever I've played Pandemic, there's always been a feeling of apprehension that you could lose the game! After a couple of initial losses, we've never lost the game since really. Tonight we played the game twice, once on moderate difficulty and the second time on the hardest difficulty. We won the game both times, I think the second victory seemed even easier. Maybe we were lucky, maybe we've gotten good at his type of game. I don't know. But I do know that Pandemic The cure is a good game that is a little disappointing. 23/03/2019
Saturday night at Matakishi's and our play test of the Oubliette campaign continues with session 3 or level 2. You can find his report here. 23rd March 2019.
It's Saturday lunchtime at 'The Sovereigns' and we're ready to start session 7 of 50 Fathoms. Location: Bubbly Bay, Torath Ka (Really need to stop letting Win name things.) We have acquired the elemental fire we require and we're on to our next object: Finding 'Tressa The Red'. This means travelling to 'The Teeth' whatever that is? Our journey to The Teeth is uneventful, but as we approach we observed something very unusual from over the horizon. Ahead is a giant waterspout and on the giant water spout was a castle! Our skiff draws closer and we spot 'The Gullett', a river that leads into The Teeth. Hmm, I'm sensing a theme here.. We try to signal to the castle on the spout - to no avail. We then decide to enter The Gullet. Cautiously we enter, it is tricky to navigate. As we are progressing, we spot a wrecked boats here. One of the wrecks has a perfect and unblemished figurehead. Our curiosity is piqued and we investigate. We discover the figurehead has some sort of magical nature to it, so we take it and attach it to 'The Delilah'. Then we push on until we have safely passed through The Gullet. We are now inside the spout. We attempt to communicate with the castle, once again to no avail. But we must have got the attention of someone as a parrot comes out and descends down to us. The parrot speaks to us and tries to dissuade us from entering the castle, we ignore the parrot. Win decides to use her elemental magic to protect herself from water so she can try and 'climb' the water spout. It's a successful strategy and Win reaches the base of the castle and secures a rope there. We climb up and once again the parrot approaches us again and tries to dissuade us again. We ignore the parrot again. Entering the castle we find ourselves in a large rectangular room (even though the castle is round from the outside). We also notice there are windows (even though there are no windows from the outside). In the room we see a large map of Caribdus, we also observe a lot of books here as well. The parrot reappears and finally introduces himself as Califax. Califax tells us that we must prove ourselves to Tressa in 4 trials before we can meet her. We surmise that the 4 trials are related to the 4 elements. We think that we are in the 3rd trial and this is the 'earth' trial. Navigating The Gullet was the 1st trial, the 'water' trial. Ascending the giant water spout was the 2nd trial, the 'air' trial. So now we have this trial to complete. After scrutinizing the room and the map, we discover that part of the map is wrong. It is not showing part of the land correctly, this is related to earth. So we press down on the part of the map is wrong - and a door opens! Success. So we leave the room, enter a corridor - hopefully to the 4th and final trial. Further down the corridor, we find it is entirely filled with fire! Looks like this is the 'fire' trial. Looking closer we see tiles on the floor. There are 3 sets of tiles, each set of tiles consists of 4 tiles. 12 tiles in total, all depicting creatures of some sort. Examining the tiles, we see that each of the 3 sets of tiles contains a depiction of a creature associated with fire. These are; a salamander, a devil and a dragon. We step on these tiles and pass through safely and we're on to the next corridor. We find the corridor ahead inexplicably filled with water from floor to ceiling. I guess this must be the water trial and navigating The Gullet was not! We pass through the water by swimming through it! It's hard going, but eventually we pass through it and continue on. We continue to follow the corridor and find ourselves in a living room! Then we spot a stunning red-headed woman with golden. She congratulates us on completing the trials and asks how she can help us. We explain that we are investigating the slow flooding of Caribdus. Tressa explains that the flood is caused by a 'leak' from 'Earth' into Caribdus and is mostly likely occurring at a place called 'Devil's Cross' and was caused by 'The Sea Hags'. In order to stop this we must summon The Sea Hags. To do this we must pour water from another world on to Ograpor (Devil's Cross). When Hags appear we will need to defeat their fleet of ships. This will require a fleet of our own. For the water, we are told that we could search shipwrecks from other worlds. We could also use 'The Tears of Lys'. We are also told to seek out 'Tomas Drago' on Grey Island in relation to this, he is a privateer. Tressa also tells us that she seeks 'Carroway' fruit. We agree to gather whatever fruit we can to aid her. Tressa also tells us about the Kraken ship 'Carcanus', a wreck which has magic sails which may of use to us. After this we return to The Delilah, after exiting the room, we found ourselves back on our boat. 20th March 2019
It's a Wednesday and Matt has come round my place and we're going to play a 2-player game. We've chosen to play Fog Of Love again. You can read my initial blog about it here. After playing it a second time, I don't think my opinion of it has improved at all. It's a bit of an oddity that feels like it's more of 'story-game' than anything else. The scoring seems extraneous and it be better off being a game plan for fun. Perhaps it's because there appears to be little variation or breadth in strategies you would want to employ that it all point-scoring feel a bit pointless. I don't know really, but it makes for a strangely unsatisfying experience. |
AuthorI play, I paint. Archives
March 2024
Categories
All
|


 RSS Feed
