3 Spellcasters and a Dwarf
  • Home
  • Special Effect
    • Special Effect
    • The Final Return of The Indiana Jones Charity Globe Trot
    • The Warlock of Firetop Mountain Challenge
    • Return of The Indiana Jones Charity Globe Trot
    • Bard's Tale Challenge
    • Fighting Fantasy Challenge
    • The Indiana Jones Charity Globe Trot
    • Mirkwood Charity Walk
    • Middle-earth Charity Walk
    • Dungeon Daze
  • RPGs
    • The One Ring
    • The Evils of Illmire
    • Beach Patrol
    • The Surrendered Lands
  • Game Blogs
    • RPG Blog
    • Gaming Blog
  • Painting Blog
  • Contact

Gaming Blog

HeroQuest - First Play!

19/8/2022

0 Comments

 
18th August 2022

Broadsword! It's a Thursday and we're in Aldershot for some gaming fun!

According to Wikipedia, HeroQuest was originally published in 1989, which makes me feel very old.
The version that we are playing though, is the 21st iteration.

So grab your staff and pull on your loincloth as we set into vaguely generic fantasy world of HeroQuest in search of treasure.
Alternatively, take on the role of Zargon and oppose the heroes.

What's in a game?
  • ​Game board: The game board depicts was is essentially a underground dungeon. It displays rooms of varying size differentiated by colour which are boarded by a perimeter corridor, 4 more corridors go north, south, east, west and sort of divide the rooms into 4 areas along with a large central room.
  • Miniatures: HeroQuest is a miniatures heavy game and comes with several types of all plastic miniature.
    • Heroes: There is a miniature for each of the game's heroes; barbarian, elf, dwarf & wizard.
    • Monsters: Enemies abound in HeroQuest and include goblins, orcs, skeletons, zombies and more.
    • Furniture: As well as closed and open doors, there's dungeon dressing for tables, altars, bookcases and so forth.
  • Tiles: card tiles are used to represent hidden doors, traps and dead ends among other things.
  • Cards: There's also a variety of cards in the game.
    • Hero cards: Each hero has their own card that details their stats, which are
      Attack
      Defence
      Body
      Mind
      Also listed are their movement dice and starting equipment.
    • Monster cards: Each type of monster also has its own card. Monster basically have the same set of stats as the heroes.
    • Spell cards: There are 5 sets of spell cards, 1 set of 15 (Dread Spells) is for the Zargon player. The remaining 4 sets of 3 cards each (Based on fire, earth, water & air.) are for the wizard and elf players.
    • Treasure cards: This is a deck of cards that contain both treasure and booby traps such as wandering monster and the like.
    • Equipment cards: This deck contains various pieces of equipment that can be purchased with the cash the heroes acquire and will improve their abilities and stats.
    • Artefact cards: These cards represent items that are particularly powerful, they cannot be bought but only found in specific dungeons throughout the campaign.
  • Game master's screen: This is a 3-panel card panel of the kind that could be found for RPGs and is used by the Zargon player to hide their stuff.
  • Quest book: HeroQuest has a 14-part campaign that is detailed in the quest book. There's also space for industrious players to create their own quests.
  • Dice: 2 types of dice are used in HeroQuest.
    • Red dice: There are 2 red dice, these are typical six-siders.
    • Combat dice: These are not the usual six-siders. Instead 3 faces show a Skull, 2 faces show a White Shield and the remaining face shows a Black Shield.
  • Character pad: A pad of character sheets to be used by players to track the stats and wounds of their characters.

HeroQuest's components are all generally good.
The board, tiles and cards are of an acceptable quality.
The dice are also fine and in a move that pays homage to the original HeroQuest, there still aren't enough of them to split conveniently between the hero players and Zargon player! The game really could do with a few more combat dice!

Probably the biggest components are the miniatures. All the heroes and monsters miniatures come in single colour plastic according to type, heroes are red, goblinoids are green, undead are beige and so on.
I'm pretty certain the sculpts are all new as well, the games has undergone cosmetic changes due to licensing issues regarding the original.
Speaking of sculpts, I found their quality to be... OK. If I were assessing the miniatures exclusive of the game, they wouldn't be good but since they are meant to be part of a game; and in that context they're pretty cool. Especially since I feel that they're designed to hark back to the original style and design, which I think they do a good job of doing.

The scenery and dressing is also a bit of a mixed bag. The scenery in this version is all made of plastic and is much more durable than the original scenery which in part was made of cardboard.
However, that cardboard scenery with its printed artwork was a lot more colourful. The modern scenery in comparison is a just drab, monochrome, grey plastic.

HeroQuest's art is good wherever it appears, mostly on cards and has a brash, chunky cartoony aesthetic that suitably fits the style of the game.

There are a few icons in the game that are easily learned, the Zargon player has to learn a bit more due to having to comprehend the scenarios in the quest book but again, it's not an obstacle.


How's it play?
​Setup
Before any play can begin, one player must decide to take the role of Zargon who is essentially the 'Games Master' in RPG parlance and controls all the enemy forces that oppose the players. Whoever plays Zargon will probably be doing so for all 14 quests presented in the quest book.
Up to 4 other players will assume the role of heroes adventuring through the campaign. Generally, once players have chosen a hero, they will stick with that hero until the end of the campaign. Having said that, there's nothing to stop players swapping or switching around heroes if they so desire.
  • Zargon player: The Zargon player should familiarise themselves with whichever quest is being played from the quest book. It will tell them how many doors they need, how much scenery, what and how many monsters, which dread spells to use and so on.
    The Zargon player should gather all the required items and place them adjacent to the central playing area.
    Monster cards: Place these face-up adjacent to the central playing area so they are visible to all players.
    Treasure cards: These should be shuffled into a face-down deck adjacent to the central playing area.
    ​Screen: The Zargon player should keep the quest book hidden behind their screen.
  • Hero players: Players should decide which of the available heroes they are using between them.
    Copy stats: Each player should take a sheet from the character pad and copy the stats and information from the hero card for their chosen hero on to the sheet.
    Spells: Whoever is playing the wizard should take 3 sets of spell cards, that is a total of 9 spell cards. The elf player should take the final set of 3.
    The wizard and elf players are free to decide who gets what sets.
  • Game board: Place the game board in the central playing area. The Zargon player should place the stairs tile in its appropriate spot as dictated by the quest book. All players should put the miniature representing their hero on the stairs tile.
    Then the Zargon player should read out the quest's flavour text to the other players.

On to play
In HeroQuest, all the hero players will each take their individual turns and then the Zargon player will finally take their turn.
Generally this is done with the player to the left of the Zargon player going first with turns progressing to the left until eventually the Zargon player goes last.

The general flow of play will involve the heroes exploring the dungeon game board (Which is unpopulated at the game start.) and in response, Zargon revealing what the heroes encounter, be it doors, dead ends, traps or monsters and so on.
Once the heroes have had their turns, Zargon can act. This means they can move any visible monsters to attack the heroes. Thus if no monsters are visible on the board, Zargon basically does nothing.
  • Heroes: The hero players can move and perform one of the following actions.
    • Move: A hero can move before or after performing an action. They cannot split their movement.
      Roll dice: The active player rolls the 2 normal red dice and the result is how far they can choose to move in their turn. There are some limits though.
      Orthogonal movement: Heroes cannot move diagonally.
      Other heroes: A hero may move through a space containing another hero but cannot  end their movement there.
      Monsters: Heroes cannot move through spaces occupied by monsters.
      Trap: When a hero steps on to a space with a trap, their movement immediately end and the trap is triggered.
    • Actions: One of the following actions may be performed by a hero.
      • Attack: A hero may attack a monster, this can be melee or ranged.
        Melee: To engage a monster in melee, a hero must generally be orthogonally adjacent to it (No diagonals allowed!), there are some weapons such as staffs that allow heroes to attack to attack diagonally adjacent enemies.
        Ranged: A hero with a ranged weapon can pretty much attack any enemy they can see and is in line of sight. More on line of sight below.
        Roll the dice: The attacking player rolls a number of white combat dice equal to their attack score and each skull result deals 1 wound to a monster.
        Monster defends: When a monster takes 1 or more wounds, the Zargon player rolls combat dice equal to targeted monsters defence. Each black shield result blocks a wound! Any wounds which are not blocked by the defence roll are inflicted on the targeted monster and they lose an equivalent amount of body points.
        Weaker monsters tend to have only 1 body point and will be eliminated by any damage.
      • Cast spell: The wizard and elf may cast 1 spell. Depending on the spell, this can target themselves, an ally or a hostile monster. If cast on a ally or monster, line of sight rules apply.
        Each spell card will describe its effect and once it is resolved, it is discarded from player and cannot be used again in the current quest.
      • Search for treasure: When a hero is inside a room (Corridors cannot be searched for treasure.) and there are no monsters present in that room. The active player may search for treasure, this will have one of several results:
        Draw treasure card: The active player draws a card from the treasure deck. This may result in them receiving gold or potions. It may also result in encountering a wandering monster, which must be fought or triggering a trap.
        Quest treasure: As per the quest book, some rooms will contain a specific item or treasure, usually as part of the scenario.
        Artefact: Also as per the quest book, searching certain rooms will grant a specified artefact card to the active. Artefacts are generally better than mundane items.
      • Search for secret door: Provided there are no monsters in sight, the active player may search for hidden doors. This can be done when the hero is in a room or corridor and searches the entire room and in the case of a corridor all the corridor which is in line of sight.
        If there is a secret door in a room or corridor, the Zargon player must reveal it to the hero players and place a secret door tile on the relevant space on the board:
      • Search for traps: This is fundamentally identical to searching for secret doors except it reveals traps.
      • Disarm trap: If a hero has a tool kit they may attempt to disarm a trap that has been revealed by moving on to the trap space on the board.
        The dwarf hero as his special ability may disarm traps without a tool kit.
        Roll the die: A combat die is rolled, the result will determine if the trap is neutralised or trigged - in this case whoever was attempting to disarm the trap suffers whatever effect it deals out.
  • Zargon player: For a large part of the game, the Zargon player will be reacting to player actions in their turns. Revealing doors, traps, monsters and dead ends as they are encountered by the players.
    • Monsters: Monsters are only active during the Zargon player's turn and even then only revealed monsters become active.
      Movement: No dice are rolled to move monsters, instead they have a set number of squares they can move before or after acting. The fastest monsters move 10 spaces which will nearly always outpace heroes!
      Attack: Functionally, combat for monsters is identical to how it works for heroes except as far as I know, monsters do not get ranged attacks. When monsters are adjacent to heroes they can attack them. The Zargon player rolls a number of combat dice equal to the monsters attack value and each skull potentially inflicts a point of damage to a hero.
      Hero defends: Heroes can defend damage by rolling dice equal to their defence value and each white shield result blocks 1 point of damage. Any unblocked damage is dealt to the hero's body points.
      Dread spells: As per the quest book, some monsters may be equipped with dread spells which can be used against the heroes. As with all spells, the caster of a dread spell must have line of sight on their target. Once a dread spell is resolved, the card is discarded out of play.
  • Other rules: There are some other rules which also apply in HeroQuest.
    • Line of sight: Both heroes and monsters can see as far as a straight line could be drawn. Thus they can see all the way down a straight corridor but not round a corner.
      For the purpose of targeting ranged attacks, allies do not block each other's line of sight but opponents do block line of sight. Thus a hero cannot target the 2nd monster in a line of monsters and vice versa.
    • Looking: This is a free action and can be used at any time in their turn even in between moving spaces and as often as desired.
      When a hero player decides to look, the Zargon player must reveal any features, traps or monsters which are in line of sight.
    • Doors: Doors always closed when encountered and can be opened as a free action.
      Once opened, doors cannot be closed again
    • Treasure: When the heroes acquire any kind of treasure (Other than that found on a card.) it should be recorded on one player's character sheet.
      Gol coins can be collectively spent at the end of a quest,
    • Traps: Various types of traps are featured in HeroQuest, there are spike traps, pit traps and so on. Generally inflict 1 wound as well as a some other effect (Such as falling down a pit.). Triggering a trap generally ends a hero's movement.
    • Death: Monsters die when they reach 0 body points and the same is true of heroes. If a hero reaches 0 body points, they are killed and their controlling player is eliminated from the current quest.
      Fortunately, new heroes can be recruited in between quests.
    • Potions: Players can discard potion cards out of play to gain their benefits.
      Using a potion is a free action and can be done at any time. They can even be used in Zargon's turn and in fact can be used by a hero player after they reach 0 body points. Needless to say, potions can be lifesavers.

Endgame
Play continues until the hero players complete quest objective, in which case, they collectively win! Otherwise, if all the heroes are instead killed, then the Zargon player wins.
Additionally, if the hero players retreat (By returning to the stairs tile.) for whatever reason then they also lose.

That's not the end!
Once a quest has ended, players can spend their hard won loot and cash to buy equipment. Weapons can increase a hero's attack score and armour can increases defence scores, while daggers and crossbows offer ranged attacks and so on.
When buying equipment, the player who will use it takes possession of the card. Furthermore, once all copies of a certain item are bought from the equipment deck , then that item can no longer be bought. Conversely, consumable items such as potions and daggers are returned to the equipment deck when used.

End Endgame!
If the hero players manage to succeed at all 14 quests, they have won the campaign.


Overall
There's quite a lot to write about here and my thoughts will probably wander, so please indulge me - and let's get started!

HeroQuest was a pretty ground-breaking game in 1989. Published by a mainstream games producer, it offered people who had never played an RPG an accessible slice of the RPG experience and introduced some game concepts to people who had never encountered them before.
It's also a window into how games played 35 years ago and what player expectations were like back then.

For example, a modern game with similar themes to HeroQuest probably wouldn't employ a roll-and-move mechanic.
Another example are rewards and the game's equivalent of levelling up: As explained below, HeroQuest rarely rewards to players - which come in the form of equipment upgrades. These upgrades occur quite infrequently but are quite significant statistically, i.e., going from 2 combat dice to 3 is a big jump.
A modern game would try and find a way to do the opposite and drip-feed players constant but low-impact rewards in what would be called a gameplay loop or moment-to-moment engagement.

HeroQuest occasionally also trolls player, forcing them to deal with multiple traps and putting no reward on the other side.

Mechanically, HeroQuest is actually a fairly straightforward game.
While heroes have 6 actions they can perform, 3 of those are almost identical actions and 1 is very situational. Players will find themselves moving and searching, opening doors and defeating monsters behind them, searching, then moving on.
Rinse and repeat.
While there are definitely some tactics that players can adopt and repeatedly employ, the random placement of challenges - particularly monsters who form the majority of heroes' encounters - means that players will need to adapt to situations and respond effectively.
There's also some randomness to player actions - the roll-and-move mechanic means that heroes may not reach their opponent when they need to and also may not be able to escape enemies when they need to.

The combat system is also straightforward and runs smoothly enough, it does feel quite swingy and unpredictable though but that might just be me grumbling about dice rolls!
We found that the tougher monsters are very hard to wound. Once their defence is high enough, they're generally guaranteed being able to absorb 1 wound from an attack. This means the heroes will need to rely on luck to get 2 wounds in an attack or use at least 4 dice to attack and have a passable chance of getting 2 wounds.
How do the heroes get higher attack scores?

This brings me to equipment. Generally, we ended up equipping the 2 front line fighters (Primarily the barbarian but to a lesser extent also the dwarf.) with weapons above anyone else as well as providing the elf with a crossbow. Getting an attack stat up to 4  and gaining ranged attacks were real game changers.


Getting the right equipment or getting equipment and using it the right way can enhance or change tactics, improve the odds of surviving, winning fights and so on.
What's also interesting is that at the end of a quest, the hero players have the opportunity to buy equipment. However, because the cost is so high, in practice it means they will only get to buy something once after every 2 or 3 quests. It means that the heroes will get maybe 6 or 7 pieces of equipment throughout the entire campaign and will need to choose wisely. 

Some equipment such as consumables seem very expensive for what they provide. During our playthroughs, we never seriously considered buying things like throwing daggers or holy water.


Thematically, HeroQuest is a bit of a strange beast.

It has obvious elements derived from tabletop RPGs such as having a games master, combat screen, dungeons to explore, character classes and stats, scenarios, campaigns and narratives, rolling dice for combat etc but there are also some key differences.

There's no experience points or levelling, instead character improvements happen via buying better equipment.
Also, a key difference for me is the role the Zargon player has, they are part games master but also part antagonist and opponent to the heroes which is different to the majority of RPGs. Why is this significant? Let me explain.

The HeroQuest campaign has 14 quests, it took us a total of 15 attempts to complete all of them, in other words we only failed 1 of the quests, the other 13 were completed successfully at the first try.

I think that in part this is due to the fact that we're all experienced gamers and it feels the game is targeted at the early teenage market so we mostly breezed through it.
(A little more about this below.)
I also think this because the game utilises a 'one vs many' system and I've always felt that it's very hard to balance this type of game fairly, 3 or 4 human brains will always have the advantage over 1 human brain.

This is compounded by the fact that HeroQuest has a campaign.
It means that if the heroes fail a quest, they will invariably have to repeat it again, why is this significant? The purpose of a campaign is to advance through the multitude of quests until the final one can be completed and it can be tedious repeating failed quests, especially if more than once.
When the surprise of knowing what is behind a door is gone, the game can become an exercise in rolling dice over strategy.

Returning to difficulty: I read that it was originally envisioned that the hero players would behave competitively and cooperation between them would make the game too easy.
This of course contradicts the RPG nature of the game and it contradicts the rule book too, which states the players should cooperate and they will collectively win or lose.

Finally, it also contradicts player sensibilities; without cooperation, the wizard in particular for example, has a fairly low chance of surviving a dungeon.

All of this leads me to suspect that either deliberately or accidentally, the game is skewed in favour of the players.
It sort of makes sense because it gives the campaign momentum and keeps events moving forward.
The problem though, is that it can become a frustrating experience for the Zargon player, who in essence has to lose over and over.
It may have been better to do away with having a antagonistic games master role and have a more traditional games master. I get the feeling though that it was done that way to make HeroQuest seem a little more like a 'traditional' board game.
It would have been even better if the game master role could have been automated entirely. I imagine though, that it would've increased the game's difficulty significantly.

Ultimately, I found HeroQuest just about engaging enough to keep my attention, you could never afford to become complacent. Not paying attention was a sure-fire way to get your hero into trouble.
​The campaign does have a narrative, however it's fairly generic and also fairly forgettable.
For me, the pleasure I think, came from the opportunity to play a game cooperatively along with friends.

If you want a light and accessible RPG adjacent experience that's easy to manage without much prep time, you could do a lot worse than HeroQuest.

If you're a parent or adult looking for a way to introduce youngsters to some more elaborate game mechanics and concepts or introduce them to a beginner RPG, then HeroQuest is definitely worth a look in.
0 Comments

Jaws - First Play!

16/8/2022

0 Comments

 
16th August 2022

It's a Tuesday and were at The Sovereigns with the Woking Board Gaming Club for some gaming goodness.

​Have you ever watched the classic Jaws movie and decided, 'y'know I wanna be the shark going round chomping on hapless swimmers'?
Then this might be the game for you!

Jaws is a asymmetrical game of 2 halves where up to 3 players take on the roles of film's 3 protagonists and 1 player becomes the shark. 
At first the protagonists will seek to defend Amity Island from shark attacks before finally engaging it in a deadly cat-and-mouse game.

Jaws is played over 2 acts (Essentially 2 different games in reality.) and as such, has a lot of double-sided components mostly relevant to each act.
For the purposes of this blog, I'm mostly going to write about each act separately.

Act 1
What's in a game?
  • Game board: This is a double-sided board.
    Amity Island: For act 1 on one side is depicted Amity Island, the fictional setting for the film. It looks like Amity Island is modelled after Martha's Vineyard - which is cool as Martha's Vineyard was used for location filming.
    The island is divided into several different areas, Many of which are numbered 1-8 as well as beaches denominated as N,S,E & W. These areas also include features suck as the docks or mayor's office.
  • Meeples: Jaws uses quite a few meeples. They are all wooden tokens
    There are meeples not only for Brody, Hooper and Quint but also their boats which have room to hold their respective meeples! - Except for Brody, he has some binoculars to make up for it instead!
    Obviously there's a big meeple for the shark.
  • Cards: Only 1 type of card is used for Act 1.
    Event cards: Each event card will list some of the sections on the map where swimmers will appear. E.g, if an event card states NN3, 2 swimmers will in section N and 1 swimmer will appear in section 3. They may also list a special move that becomes available to the 3 crew or hero protagonists.
  • Player boards: Player boards are also double sided.
    Each of the 3 crew (Brody, Hooper & Quint.) gets their own player board. These boards list the moves and abilities of each hero, many of which are similar but some of which are unique to each hero.
  • Shark board: That's right, the shark gets their own double-sided board.
    The side used for act 1 allows the shark player to track how swimmers they've eaten. It also has spaces to track barrels attached to the shark.
  • Tokens: Jaws has several types of card tokens.
    Crew tokens: To go along with their boards, the 3 crew get tokens. Quint gets 2 barrel tokens, Hooper gets a... fish finder token and Brody gets binoculars and 'beach closed' tokens.
    Swimmers: There 16 swimmer tokens in the game, all of them can be tasty treats for the shark.
    Shark tokens: There are 4 'power tokens' that the shark player can use once per game to give them an edge during act 1.
  • Action log: This allows the shark player to secretly track their hidden movement, usage of power tokens and also track what information they have to give to the other players.
That's it for the Act 1 components, now on to...

Act 2
What's in a game?
  • Game board: The other side of the game is used for Quint's boat, 'The Orca'.
    The Orca: This side of the board shows open sea and has 8 spaces to place the 8 tiles that form Quint's boat in this act. There are also spaces to place the 'Resurface' deck, 3 cards and a discard pile. More on resurface cards below.
  • ​Orca tiles: There are 8 tiles used to represent Quint's boat which appears in act 2. They are double-sided, with one side showing the boat undamaged and the other wrecked. 
  • Meeples: Act 2 uses the meeples for the 3 crew and the shark, the boat meeples are not used.
  • Player boards: The other side of the player boards provide information on the actions that players can perform in Act 2. It also has a tracker for their hit points.
  • Shark board: The shark board for act 2 displays the moves the shark player can perform and tracks the shark's (Very High!) hit points.
  • Cards: Act 2 uses several of types of card.
    Gear cards: There are general gear cards as well as specific gear cards for each of the 3 crew. Generally they will be weapons and will show many dice are rolled to inflict damage. Although they are also attachable weapons and accessories which negatively affect the shark.
    Resurface cards: These cards will show areas where the shark might resurface to attack The Orca. It also shows how may dice the shark player rolls to attack and how hard it is for heroes to hit the shark back.
    Shark powers: The shark player will have a number of these that they can use to surprise the hero players.
  • Tokens: There are tokens for both the crew and the shark.
    Targeting tokens: There is 1 round card targeting token for each player.
    Resurface tokens: There are 2 sets of 3 resurface tokens, each token in a set is labelled A, B or C. They are also round and made of card.
  • Dice: There are 3 red six-sided dice that come with the game. They are not typical six-siders, instead of numbers they show 0, 1 or 2 'hit' icons.

Phew, I think that's it for rules!

Component quality for Jaws ranges from average to very good. Things like the cards and tokens are your pretty standard cardboard affair, which is fine.
The dice seem to be made of acrylic and although they're not as nice as wood, they feel quality with engraved icons instead of printed ones.
The wooden meeples are the standout component, particularly the wooden boats for Hooper and Quint, as well the shark meeple inspired by the films iconic artwork and I think they're cool.

As far as I can tell, the Jaws game has a relatively restrained use of photo art sourced from the film which only appears on a number of the event cards and even then it is used sparingly. It's wise decision in my opinion, as too much can make a game look cheap. The game also seems to reference artwork used for the shark from the film but because it's actually art, it looks good.
Otherwise, art used throughout the game is good, the swimmers tokens and player boards all look good.
The best artwork is found the Amity Island side of the game board though, it's an excellent illustration with lots of pretty detail.

There isn't too much iconography and what there is, is easily understood. Most of the rules information on components comes as written text.


Act 1
How's it play?
​Setup
  • Choose players: 1 player should be the playing the shark and the other players will be taking on the roles of the 3 crewmates. If there are less players than heroes, then they should split the roles between them.
    Player boards: Give all players their relevant boards, meeples and tokens.
    Brody gets his board, as well as his binocular and beach closed tokens.
    Hooper gets his board, meeple, boat and fish finder token.
    Quint get his board, meeple, boat and 2 barrels.
    The shark player gets their shark meeple, power tokens and action log.
  • Player board: Put out the player board.
    Brody: Put the Brody meeple on the Amity P.D. space.
    Hooper: Put the Hooper meeple on his boat and put the boat on the western dock.
    Quint: Put the Quint meeple on his boat and place it on the eastern dock.
    Put all the remaining barrels on the shop space.
  • Shark: The shark player should put their marker on the 0 space on their swimmer tracker. They should keep their 4 power moves face-down and hidden from the other players.
    The shark meeple IS NOT placed on the board at the game start.
  • Event cards: Shuffle the event cards into a face-down deck.

On to play
During Act 1, the shark player will be attempting to eat as many hapless swimmers as possible!
Meanwhile, the crew players will be using barrels both to try and locate the shark and to attach them to the shark. The more swimmers the shark eats, the more advantage the shark player has during Act 2.
The round is broken down into several phases and follows a more or less traditional turn order with each player having a number of action points they can spend to achieve their actions.
Phase occur as follows.
  • Event phase: 1 card is drawn from the event deck, it will distribute swimmers to various locations throughout Amity Island's beaches. It may also confer a special rule for this round
  • Shark phase: The shark player has 3 action points to spend in this phase and basically has 2 types of actions they can perform:
    • Move: All shark movement is hidden and tracked by noting it in the movement log. For 1 action point, the shark can move a space.
    • Eat: For 1 action point, the shark may eat a swimmer. This is hidden from the other players (For Now.) and also logged in the action log.
    • Power tile: The shark player may play on their power tiles, which they do by playing it face-down. Power tiles are once-only special abilities such as extra movement or extra stealth. Once used, they are removed from play.
    • Declare: Once the shark player has finished their actions, they must declare certain information to the other players. This can be done in any order the shark player sees fit.
      They must how many swimmers they've eaten and at what beaches is was at.
      They declare and name regions they passed through that contains a barrel.
      Finally, they must declare if they used a power token but not which one was used.
  • Crew phase: The hero protagonists each get 4 action points to spend in this phase and the player can choose the order in which the 3 crew act. However, a hero must complete all their actions before play progresses to another hero.
    There are a number of similar but also unique actions available to the hero protagonists.
    • Move: All the hero protagonists can spend action points to move. Brody doesn't have a boat and must stay on land, while the other 2 must stay in their boats on the sea.
    • Pick up barrels: Brody can carry and deliver 1 barrel from the shop space. Hooper and Quint can pick up multiple barrels from the sea or docks. Hooper can also deliver barrels to Quint.
    • Rescue swimmer: All the hero protagonists can spend an action to remove a swimmer at their current space from the board.
    • Use binoculars: Once per turn, the Brody player can spend an action use their binoculars while at a beach. If the shark player is at the targeted space, they must reveal their position and put the shark meeple on the board.
    • Close beach: Another Brody ability. If the Brody player is at a empty beach, they may spend an action point to put their 'Beach Closed' token on that beach.
      The next time an event card would place any number of swimmers on the closed beach, flip the token to the 'Opening Soon'. Then if a following event card would add swimmers to that beach, instead return the token to the Brody player. Thus, this action protects a beach from 2 event cards.
    • Fish finder: Once per turn and for an action point, the Hooper player may put their fish finder token into their current location.
      Then the shark player must respond in one of the following ways.
      If the shark is in the same space as the fish finder, they must put their shark meeple on the relevant space on the board.
      If the shark is on a orthogonally adjacent space, the shark player must declare 'nearby'.
      If neither of the 2 above conditions it met, then the shark player must state 'neither'.
    • Launch barrel: Once per turn and for action point, the Quint player may fire a barrel into their space or a orthogonally adjacent sea space.
      If the shark is in the space that was targeted by the Quint player, they must declare the barrel has hit them and add it to their shark board.
      If no shark was in the space, the barrel remains there and acts as a sensor to detect shark movement during the remainder of Act 1 or until it is picked up again.
  • Next turn: Once all the crew have taken all their turns, play progress to the next round, beginning with the event phase.

Act 1
​Endgame

Act 1 will immediately end if 1 of the following 2 criteria is met:
Barrels: 2 barrels are attached to the shark by the Quint player.
Swimmers: The shark player has eaten 9 swimmers.


Act 2
How's it play?
​Setup
  • Game board: Flip the game board over to the Act 2 side. Place the 8 tiles for The Orca on their spaces with the undamaged side face-up.
  • Player cards: Look at the marker on the shark board to determine how many cards the players receive.
    Gear cards: Give each crewmate their unique gear cards and targeting tokens.
    Now shuffle the generic gears into a face-down deck and deal a number of cards to the hero protagonists as indicated by the marker. The crew players should distribute these amongst themselves as they see fit. A players should put their gear cards face-up in their personal area.
    Shark ability cards: Shuffle the shark abilities cards into a face-down deck, again use the marker on the shark board to determine how many cards to deal to shark player. Shark ability cards should be kept face-down.
  • Resurface cards: Shuffle the resurface cards into a face-down deck and place them on to their allotted space on the game board.
  • Player boards: All players should flip their boards to the other side.
    All players should put a marker on the '0' space on their respective wound trackers.
  • Meeples: The crew players should put their meeples on any of the tile spaces as they wish.
    The shark player should keep their meeple off the board.
  • Tokens: Give the 3 large resurface tokens to the shark player


On to play
During Act 2, the shark player will be attempting to either totally destroy The Orca or deal enough damage to the crew to what amounts to eating them. Meanwhile, in turn, they will be attempting to deal enough damage to the shark to defeat it.
Play takes place over a number of phases.
  • Resurface options: The shark player draws 3 resurface cards and places them in their allotted spaces on the game board.
    Each card has information on the location of where the shark might attack as well how many damage dice will be rolled, how hard it will be for the crew to attack the shark and finally, if the shark will 'shake off' any attached objects.
  • Shark player choices: The shark player now decides on an action.
    Resurface token: From the 3 available resurface options, the shark player chooses which one to use and places the corresponding resurface token face-down in front of them.
    Shark abilities: The shark player may play one of their shark ability cards face-down in front of them. Each one of these cards provides the shark player with a bonus or surprise special move of some sort.
    Once played, a shark ability card is discarded out of play.
  • Crew Preparation: Now it's the turn of the crew players to make plans.
    Move: Each hero can move up to 2 tiles on The Orca unless they are in water, in which case, they must spend their entire movement to get aboard The Orca.
    Prepare gear: From their hand, each hero chooses a weapon to use, there are slightly different rules for the 3 weapon types which is explained below.
    Crew players may also use a 'chum' card that forces the shark player to reveal one of the 2 resurface tokens they didn't use which narrows the choices down for the crew.
    Use targeting token: Each crew player now puts down their targeting token on to a space, obviously choosing one of the spaces shown on the resurface cards. There are some rules for this though.
    Ranged: When using a ranged weapon, crew player can put their targeting token anywhere on The Orca.
    Melee weapon: While using a melee weapon, a crew player can only put their token on their own space or a orthogonally adjacent space.
    Attachable weapons: Targeting for these weapons is identical to melee weapons.
  • Shark reveal: The shark player now reveals the resurface token they chose and places their shark meeple there.
  • Crew attacks: Any crew players who correctly targeted the space that the shark resurfaced in, can attack it.
    The weapon that the player is using determines the number of dice used, sometimes it includes a bonus. The amount of 'hits' results rolled becomes the damage done to the shark. However, the resurface card will have a 'evade' value which is deducted from the damage dealt. If 4 damage is done and the evade value is 2, only 2 damage is done, it's possible to reduce damage to 0 this way.
    Attachable weapons are a little different, they automatically hit the shark and have a ongoing effect until the shark player manages to shake them off with a shake off action on a resurface card.
    To be honest, we found the attachable weapons to be of little value as the shark player generally managed to shake them off almost immediately.
  • Shark attack: Once the crew have had their attacks, it's the turn of the shark! 
    The shark player can attack a part of the boat that they are adjacent to or a member of the crew that is in the water.
    In a similar manner to the crew players, the shark player rolls a number of dice as shown on the resurface card they chose.
    If it is dealt to a crewmate, then that's the damage they take.
    Attacking the boat is a little more complex, each tile 2 numbers, one is the attack value needed to damage the tile and the second larger number is the value needed to outright destroy the tile. Damage does not accumulate and must be applied in a single roll to have an effect.
    Damaged tiles: These are flipped to the other side and have a new value to beat to destroy.
    Destroyed tiles: Are removed from play.
    In either case, any crewmates on a affected tile are put into the water.
    Finally, as a bonus action, the shark player gets a free attack at crewmates who are in the water adjacent to them.
  • Next turn: Once the shark player has had their attack, they remove their meeple from the water surrounding The Orca and take back any resurface tokens that were used. The resurface cards are then discarded
    The crew players take their targeting tokens.
    Then a new round begins.

​Endgame
Play continues until 1 of 3 criteria are met.

If the shark's damage exceeds its tracker, it is defeated and the crew collectively win.
If The Orca is totally destroyed, the shark player wins, or, if the damage on all the hero protagonists exceed their tracker, they are all eaten and the shark wins!


Overall
It's been a long time (And I do mean a long time!) since I watched Jaws but I feel the game does for the most part a good job of thematically emulating the movie.
Having Brody rushing around the island kicking pesky swimmers off the beaches and closing them only to have them open and fill with swimmers again felt like the movie. On the other hand, having Brody run around collecting barrels for Quint was strange.
While the shark popping up to attack swimmers before vanishing was cool, Hooper and Quint in their boats playing a cat and mouse game with the shark while trying to rescue swimmers seemed a bit strange. Especially considering the heroes are the cats and the shark is the mouse, which is a bit of a reverse of how the film plays out.
Having said all of that, Act 2 does a excellent job of emulating the protagonist's final confrontation with the shark.

So overall... This is more of a comment than a criticism on the game's theme.

Now, on to game play.
Act 1 presents an interesting cat-and-mouse challenge to the players which will change contextually according to how swimmers are distributed by event cards.
The shark player needs to eat swimmers but avoid spaces that the crew players might target and if possible, avoid the barrels that detect the shark.


Astute crew players will need to balance their efforts between trying to protect beaches with lots of swimmers and also covering lesser used areas. While the busier beaches might provide a target-rich environment for the shark, the shark player may anticipate the crew players protecting those beaches and avoid them for smaller 'quieter' targets.

I get the feeling that if the shark gets a lot of kills or very few, it will have a big influence on who will win in Act 2. Certainly, the shark getting 5 kills (Which is exactly in the middle.) led to a very close finish.

Act 2 also presents a sort of cat and mouse scenario with differing dilemmas for the shark player and the crew players.
The shark player will generally be faced with deciding whether doing damage or avoiding it, often the resurface cards will not allow the shark player to do both. The shark player will may also have the opportunity to target the crew instead of the ship. Eliminating one of the crew can be very beneficial as it lowers the number of attacks the shark may have to face but generally, it's harder and will take longer to kill a crewmate than it is to destroy one of The Orca tiles.

The crew players also face a dilemma. They know the 3 locations where the shark might resurface so with 3 protagonists could target all 3 locations, but this means spreading their firepower and it'll be a tall order defeating the shark this way. So the crew will need to try and anticipate which option the shark player will choose and this require assessing a bunch of contextual elements such as how much damage the shark will do, how high it's evade is and how damaged that part of The Orca is. 

All players will need to adapt to the random circumstances provided by the resurface cards and will probably have to trade off one strategy for another.
It presents the players will meaningful decisions to make, which is always a good thing.

However, there are somethings I definitely do not like about the game.
Firstly, Jaws is a one-vs-many game and I'm not a fan of this game type. Generally the mechanics of one-vs-many games can never balance for the fact that multiple human brains will have an advantage a single human brain. For the most part, it's fairly inherent that 3 players will see more strategies and opportunities than a single player.
Also; when someone is playing the 'one', games can be become a lonely experience since all the other players will be against them.
I can't help but wonder if the shark could have been automated and have the game be fully cooperative.

Secondly, because this is such a asymmetrical game, it means that one set of rules must be learned by the crew players and another by the shark player.
That's not the end of it!
Because there are 2 acts, it means that there are actually 4 sub-games that must be learned.
Luckily, none of the rules are particularly complex or hard to comprehend but even so, it feels like a lot of effort to play a game, then have to learn a new set of rules to continue. More effort than the entertainment the game delivers.

Normally I don't bother blogging about marketing or sales but I have to wonder who this is aimed at? Dedicated games, movie fans?

Most dedicated gamers are with good reason wary of licensed games. They tend to be quick cash-ins with lacking game.
To be clear I don't think that's the case for Jaws, while the rules are light-ish, there's depth of gameplay to found in the cat-and mouse mechanics that pits players against each other. I just didn't find it particularly compelling.

Jaws is a great, classic movie and I'm sure there are collectors of Jaws memorabilia and merchandise but will they care enough about the game to play it. I'm sure it will end up in the collections of those fans but will they be compelled enough to make make the effort to learn and play the game?

If you're really after a Jaws experience and are happy with the game's 2 act structure and cat-and-mouse gameplay. This is by no means a bad game and worth a try.
For me this didn't hit the spot and I have no desire to play it.
0 Comments

Jurassic Park: Danger!

22/12/2021

0 Comments

 
21st December 2021

It's a Tuesday, it's nearly Christmas and we're round Simon's for some gaming goodness.

Jurassic Park: Danger! is a board game themed after the very first Jurassic Park film from 1993.

​Is it a good game?

'Your game designers were so preoccupied with whether or not they could, they didn't stop to think if they should...'

What's in a game?
  • Hex Tiles: The game's playing area is created using hex tiles and is to some degree randomly determined in every game.
    They are decorated with greenery and jungle as well as symbols along their sides to represent cliffs, fences and dinosaurs.
    Start: The start hex is always the same and sits in the 'centre' of the playing area.
    Central hexes: There are 6 inner hexes that surround the starting hex.
    Perimeter hexes: These surround the inner hexes and there are 9 of them.
  • Frame: The frame goes around all the hexes and makes it look like an island, the frame also contains 3 hex-spaces including the escape hex!
  • Character decks: There are 10 differently coloured individual playable characters in Jurassic Park: Danger! as well as a dinosaur deck for 11 in total. Each deck contains 10 cards.
    All player actions are determined by cards played during the game and each card displays its available action and the related difficulty, a 'boost value' number is also displayed in the corner of some cards.
    Dinosaur deck: The dinosaur deck is a little different, it too contains 10 cards, but each card lists 1 or more actions which will be split amongst the 3 dinosaurs in the game.
  • Character mats: These go with the human character decks and therefore there are 10 of them in colours that match the character decks. Each of the human characters will have a special objective that needs to be completed before they escape the island as well as spaces for discarded and burned cards.
    Dinosaur mat: Again, the dinosaur mat is slightly different to the player mat, it tracks the usage of each dinosaur's special ability and also has a discard spot for the dinosaur cards.
  • Tokens: The game employs several types of tokens, mostly used to track events, these include:
    Objective tokens: There's 1 each for the 10 human characters, again in pertinent colours, some will be on the board and must be collected by that character's player, some are acquired by different methods.
    ​Fence tokens: A number of the tiles contain electric fence icons, when these are powered up, the fence tokens are used to represent this.
    Activation tokens: Players of the human characters must activate 3 locations in the playing area.
    Lock tokens: Certain buildings can be locked and keeps those pesky dinosaurs out.
    Helicopter token: Get to the chopper to win.
  • Die: A single normal six-sider.
  • Meeples: Each playable character has their own meeple their own colour and the dinosaur player will have 3 red, fairly large dinosaur meeples.
Except for the character mats which are quite thin, the components for Jurassic Park: Danger! are all pretty solid, the cards and the tiles are pretty much what you'd expect of them. The game comes with a wealth of meeples in 10 different colours, which is cool, it could have come with just provided 4 and no one would have complained but the standout meeples are the oversized dinosaurs which have been illustrated on the sides.

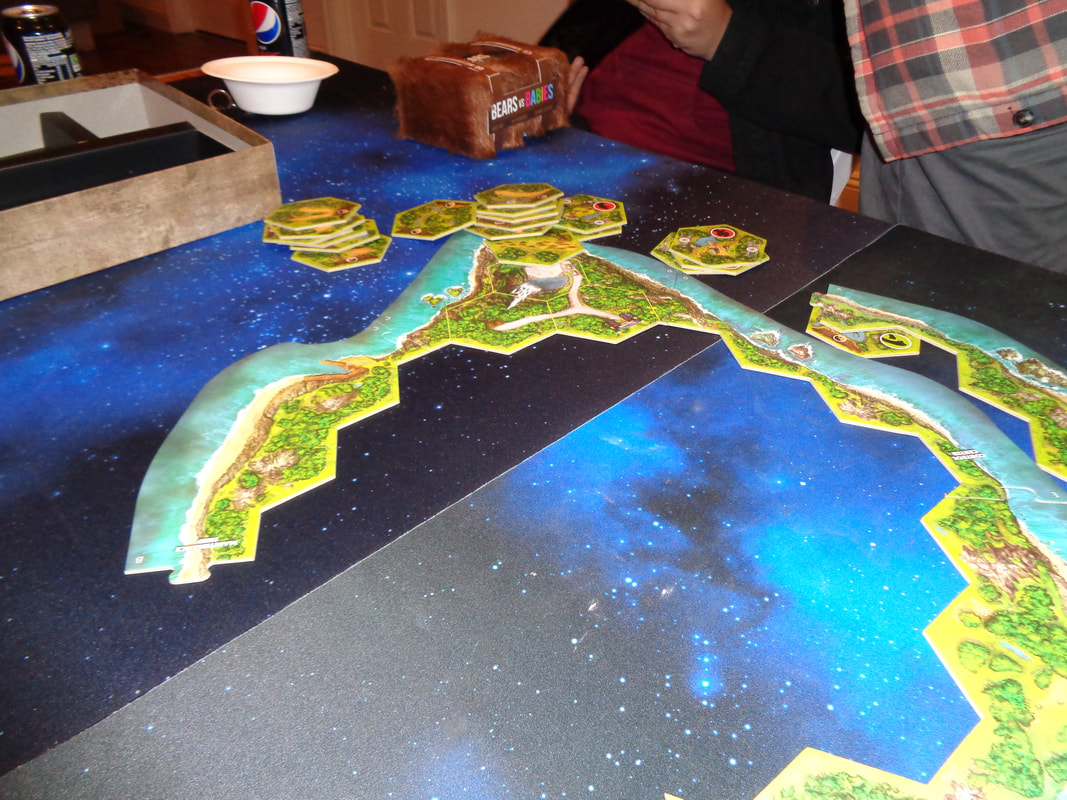
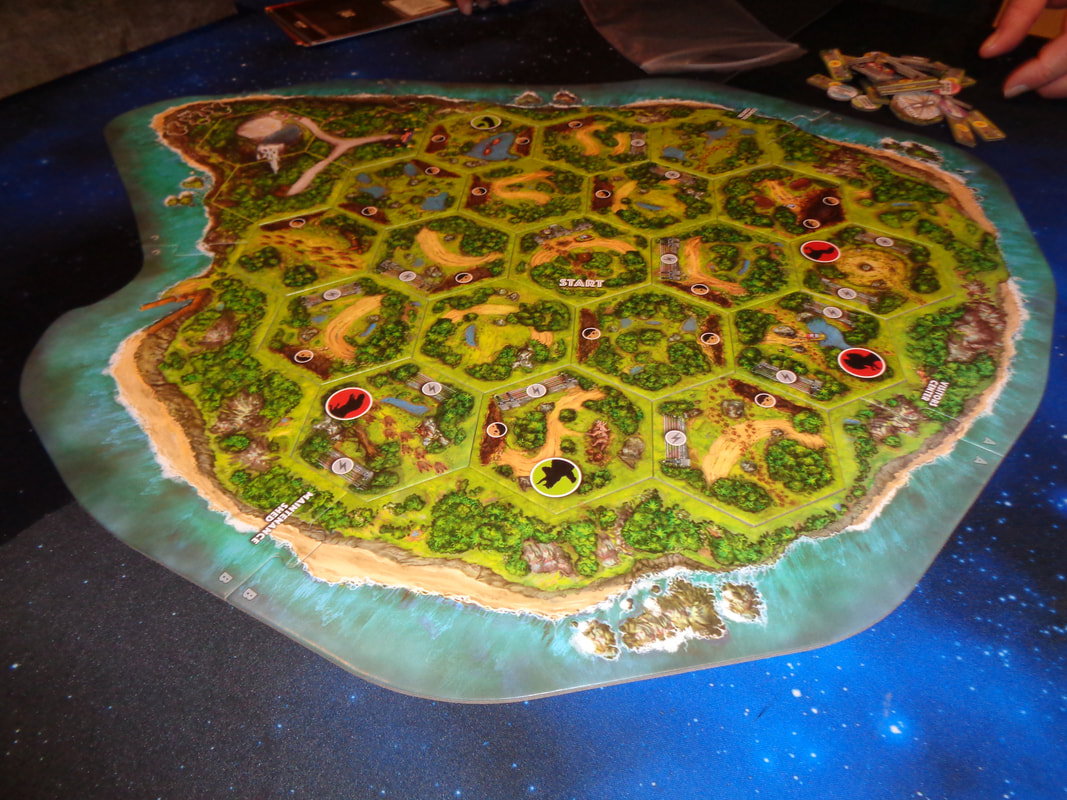
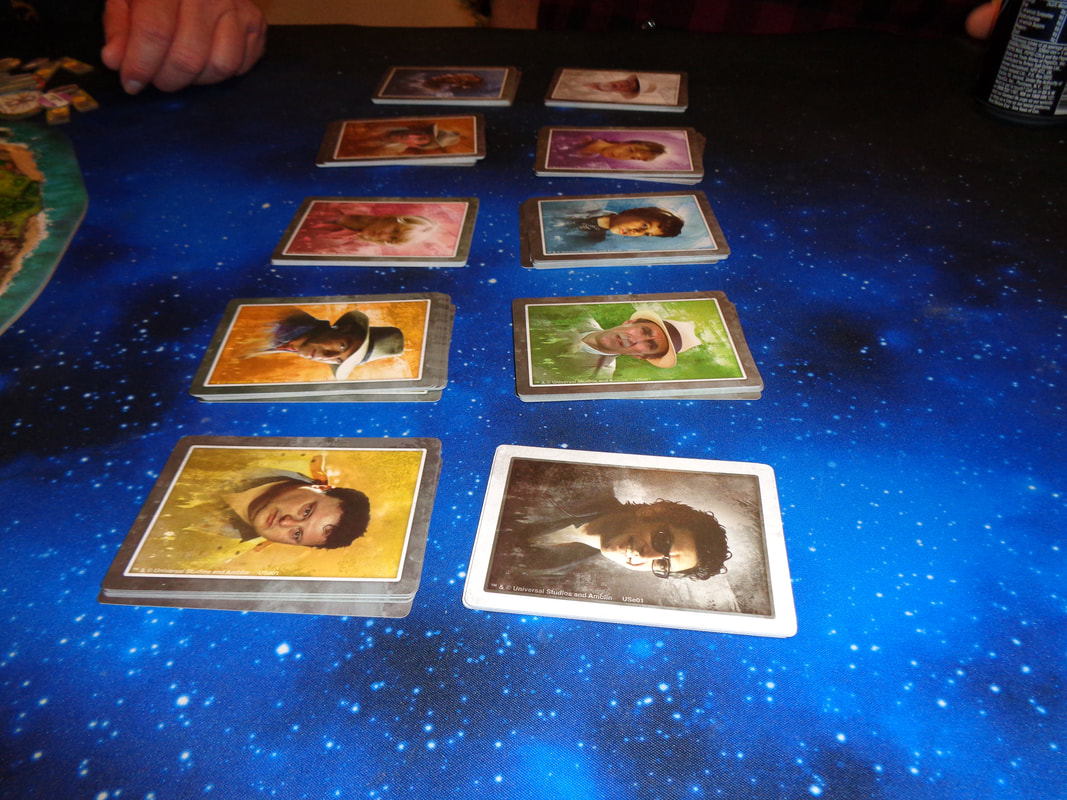
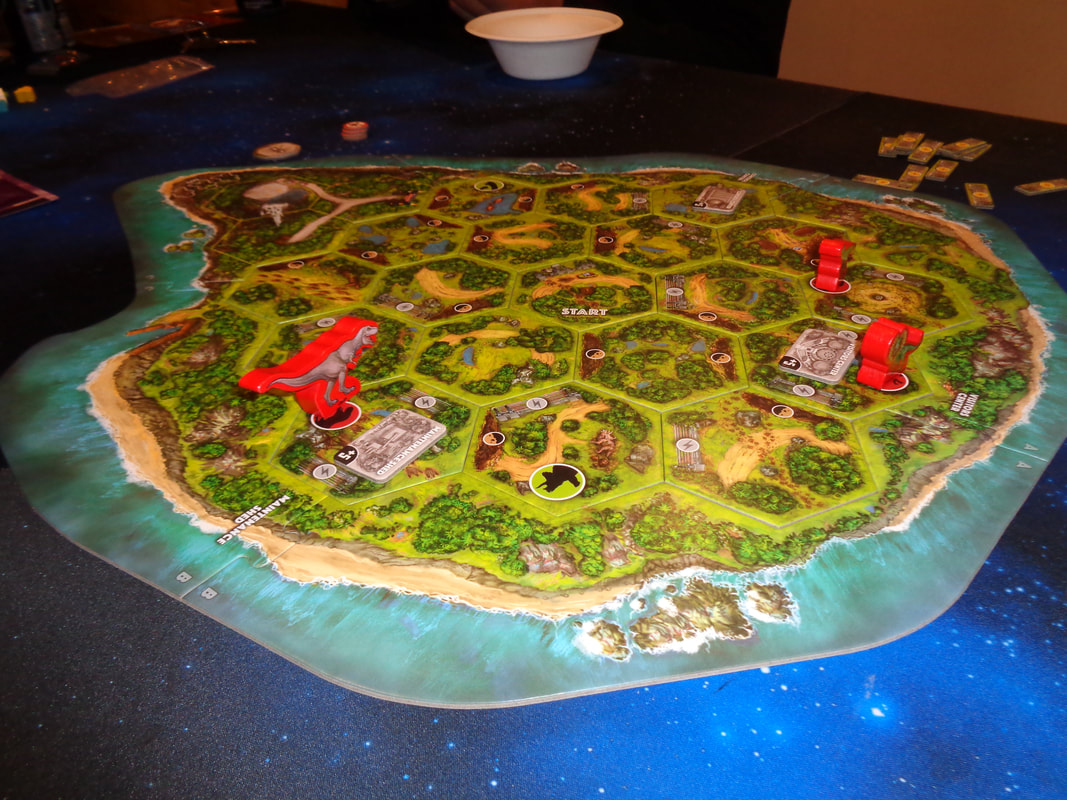
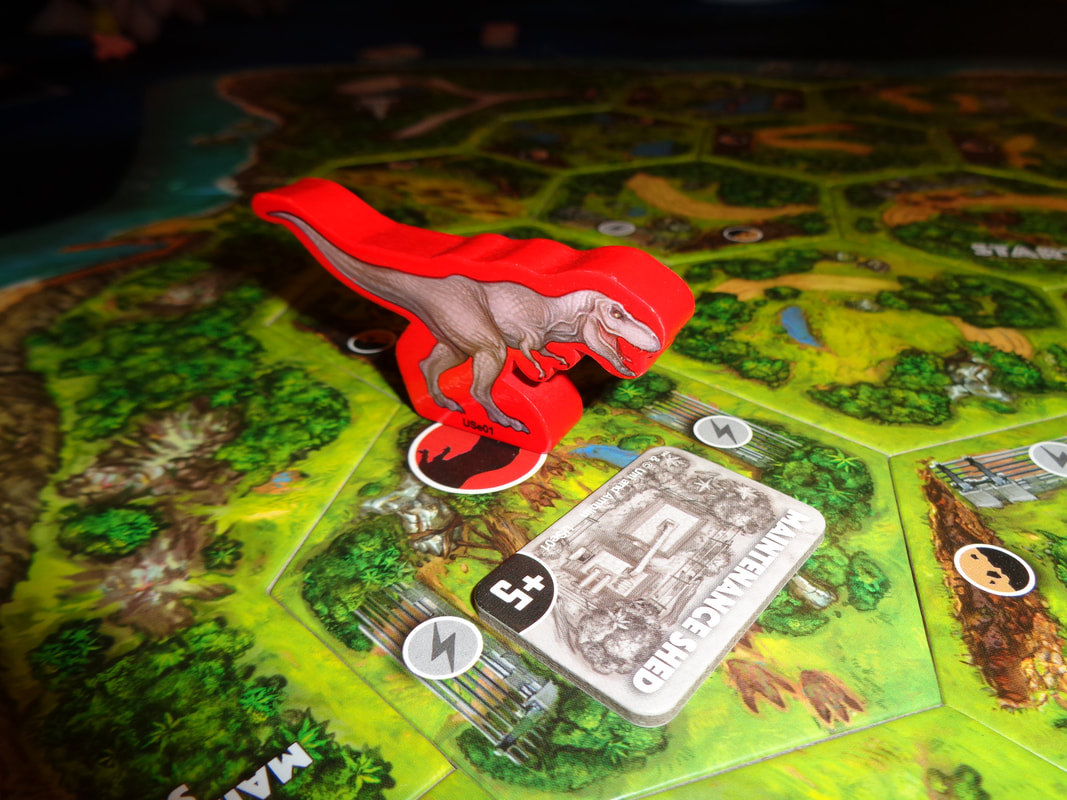
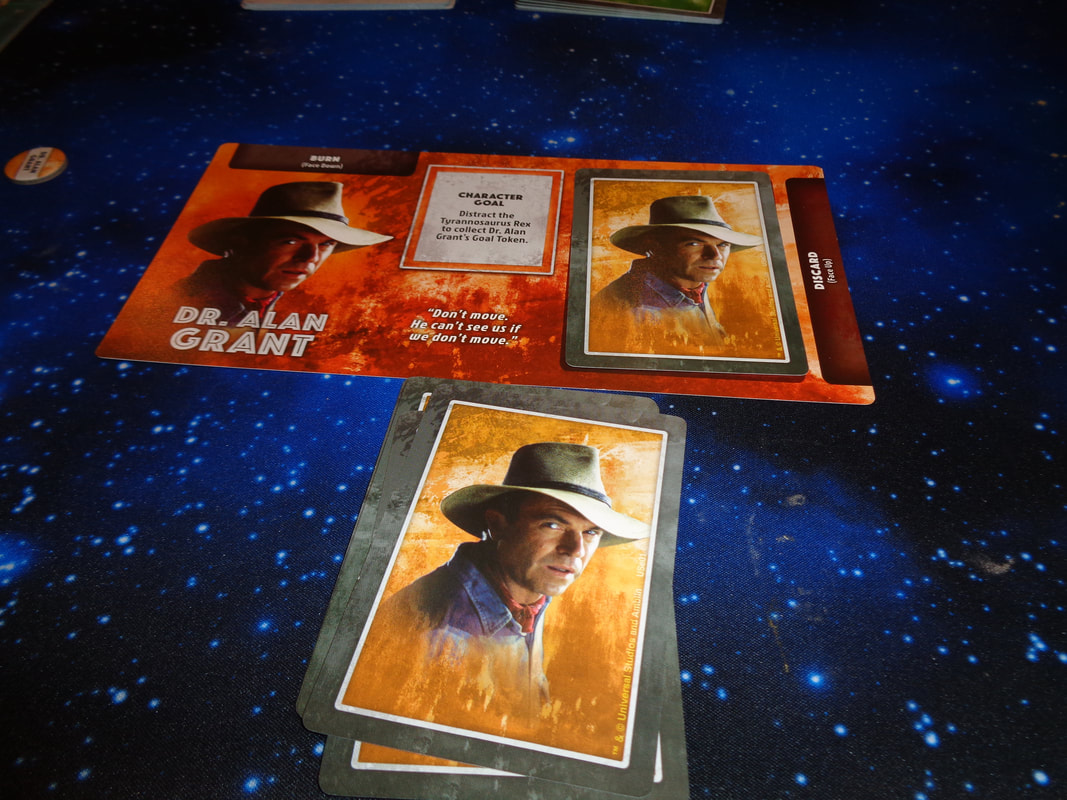
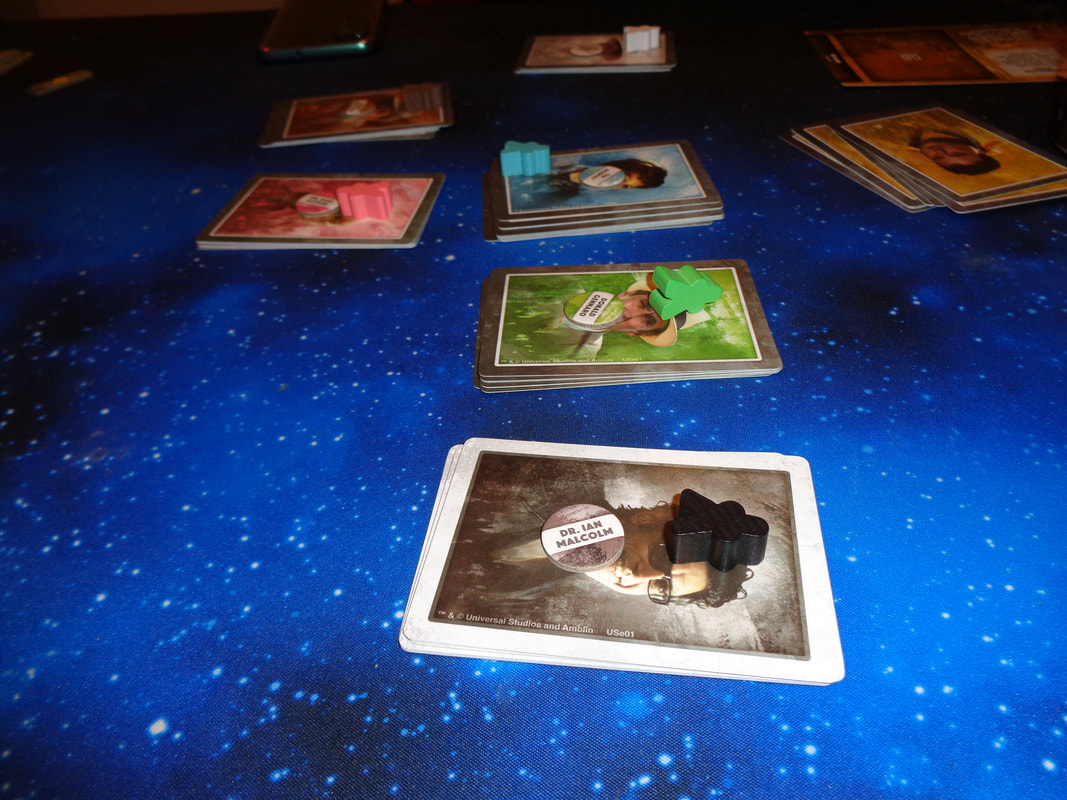
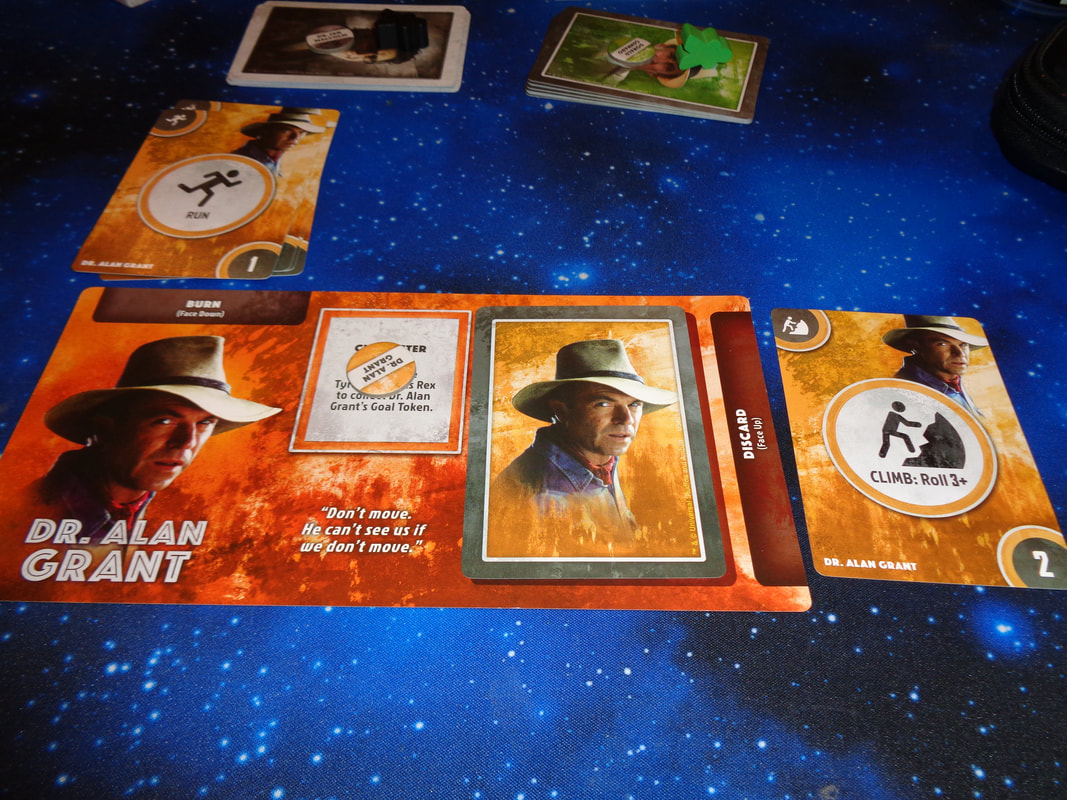
This neatly brings me to the game's art-style, which is a bit of a mixed bag. There's some appealing and colourful art on the tiles but the cards are sort of plain. The game also makes use of photo art of the actors who appeared in the film and it doesn't quite sit right with me.
It's understandable why it's been done, I'm sure the licensing for this came with a not inconsiderable fee and being able to plaster the faces of well known Hollywood personalities may attract extra customers, additionally; use of the film's marketing photos saves on having to commission art work.
Maybe that's it, maybe the use of photos gives the game a cheap feel. Furthermore, the game's actual art clashes with it's use of photos and it feels a little jarring.

Much of the game's iconography is intuitive but the 10 different character decks are all personalised to some degree and each will contain something unique which will probably require referencing the rulebook, none of it is a deal breaker though.


How's it play?
Setup
  • Map: Set up the frame and then randomly place the outer ring of tiles inside it, then randomly place the inner ring of tiles inside those! Finally, place the starting tile in the remaining spot in the centre.
    Then place the 3 location tokens on their spots.
  • Dinosaur player: Determine who will be the dinosaur player and give them the dinosaur mat and meeples which should be placed on their stating spots.
    The dinosaur player shuffles their cards into a face-down deck and draws 3.
  • Character players: The remaining players should either choose or determine randomly which characters they will start the game with an take the pertinent character mat, deck and meeple.
    Then players should their meeples on the starting tile and any relevant objective tokens on their spots.
    Character players keep their entire deck in their hand.

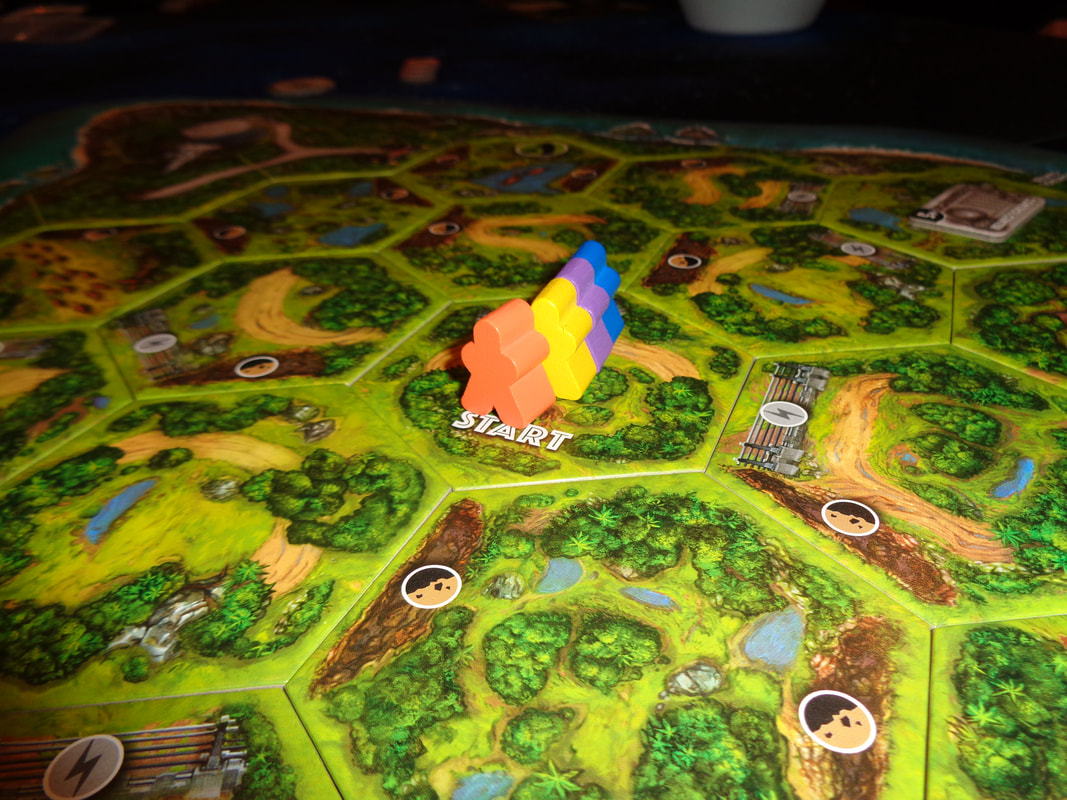
​On to play
Jurassic Park: Danger! plays asymmetrically but has some similarities between players.
  • Dinosaur card: The dinosaur player chooses 1 of their 3 cards and plays it face-down, then they draw a card from their deck to bring their hand up to 3 again.
  • Character cards: Each character player chooses any 1 of the move cards in their hand and plays it face-down, only move cards can be played.
Once everybody has played cards, the games to the resolution phase.
  • Dinosaur resolution: The dinosaur card is revealed, it will contain 1 or more actions which the dinosaur player can perform, there is a restriction however,  each dinosaur can only perform 1 action on a card, thus the actions must be spread between the dinosaurs.
    Actions include:
    Climb: This allows the dinosaur to move into an adjacent hex tile that involves crossing a cliff or unelectrified fence. They cannot pass a electrified fence.
    Run: Allows a dinosaur to move into an adjacent hex tile, it cannot cross a tile if it passes a cliff or any sort of fence.
    Sneak: This hides the dinosaur. Basically, it defers movement until the following round, in which case the dinosaur reappears in the same or an adjacent hex, although they still cannot cross electrified fences.
    Significantly, when a dinosaur reappears it doesn't count as a move, so it can be moved again in the same turn with an action card! A double move can be very powerful in this game.
    Special action: Regardless of what actions appear on the played card, the dinosaur player has the choice of using 1 of the special actions unique to each of the 3 dinosaurs. When a special move is used, it becomes locked out for the next round, thus they cannot be spammed.
    Attack: Strictly speaking, this is not an action and occurs automatically when a dinosaur is in the same hex tile as a character (unless either or both are sneaking.). Attacking a character forces them to randomly burn a card. More on card burns below.
  • Character resolution: Each character player reveals their card and resolves it, unlike with the dinosaurs, there's a little more going on during character resolution. Characters have moves similar to dinosaurs with a couple of differences.
    Climb: Allows the character to potentially cross cliffs and unelectrified fences into an adjacent hex tile. This is not guaranteed though and the card will display a number such as 4+, which means to successfully climb, the player must roll 4 or higher on the die.
    If the roll is failed, the player may choose to boost the result, see blow for more on boosting. If the player does not boost a failed climb, the card is returned to their hand and not discarded.
    Finally, a character cannot enter a hex with a dinosaur unless it is sneaking.
    Run: A character can move into an adjacent hex provided they do not cross a cliff or any kind of fence. Additionally, the same rule about entering a hex containing a dinosaur also applies.
    Sneak: This defers movement and is functionally identical to sneaking for dinosaurs. As with climbing, a roll is required to sneak and utilises the same rules. After reappearing, the rules about entering a hex tile with a dinosaur applies.
    Free actions: Characters will have free action cards available to them, a free action can be played by the active player at any time during their turn. When used, they are sent to the discard pile.
    Activate: Also a free action, but not related to cards, if a character is in a key building, they may try to activate it, this requires a roll.
    When each building is activated, it will confer it's bonus onto the character players.
    Discard: Once a character's card has been resolved, it is discarded on to the discard space on their mat.
    Burn: If a character card is burned for any reason, it is placed on to the burn pile on the character mat. Cards in the burn pile are permanently out of that game.
    Boost: Some character cards will have a number in the bottom right corner, this is its boost value. If a character fails a roll, then they can choose to burn one or more cards in their hand to add the boost value(s) to the roll.
    Replenish hand: You may have noticed that players may discard or burn cards  and will run out of cards very quickly, but there's a way to draw discard pile back in  hand.
    ​At the end of a round, a character player may replenish their hand: This involves burning their entire current hand and then putting the discard pile back in their hand. Obviously players should aim to only replenish cards when they have few cards in their hand. Remember a player must have at least 1 card to replenish their hand.
    Empty hand: If a player runs out of cards for any reason, then the character they're playing is eliminated (Which is a nice way of saying eaten really!).
    ​Luckily, the game has no player elimination, only character elimination, when this occurs, the player can simply pick another character to play who will join play on the starting tile.
Once all cards have been resolved, play progresses to the next round and players begin by playing cards again.

Endgame
Play continues until 1 set of victory conditions is met.
Character players: For the character players, they have to:
  • ​Activate all 3 buildings, when this is achieved, the helicopter token is placed on it's space.
  • Complete the character goal for 2-3 characters (Depending on player count.) and those 2-3 character must safely get to the helicopter.
Interestingly, once a character reaches the helicopter, they are safe and out of game but the player can select another character to begin playing.
Dinosaur player: The objectives for this player are much simpler:
  • Eliminate 2 or 3 characters.
Which side completes their objectives first, wins.


Overall
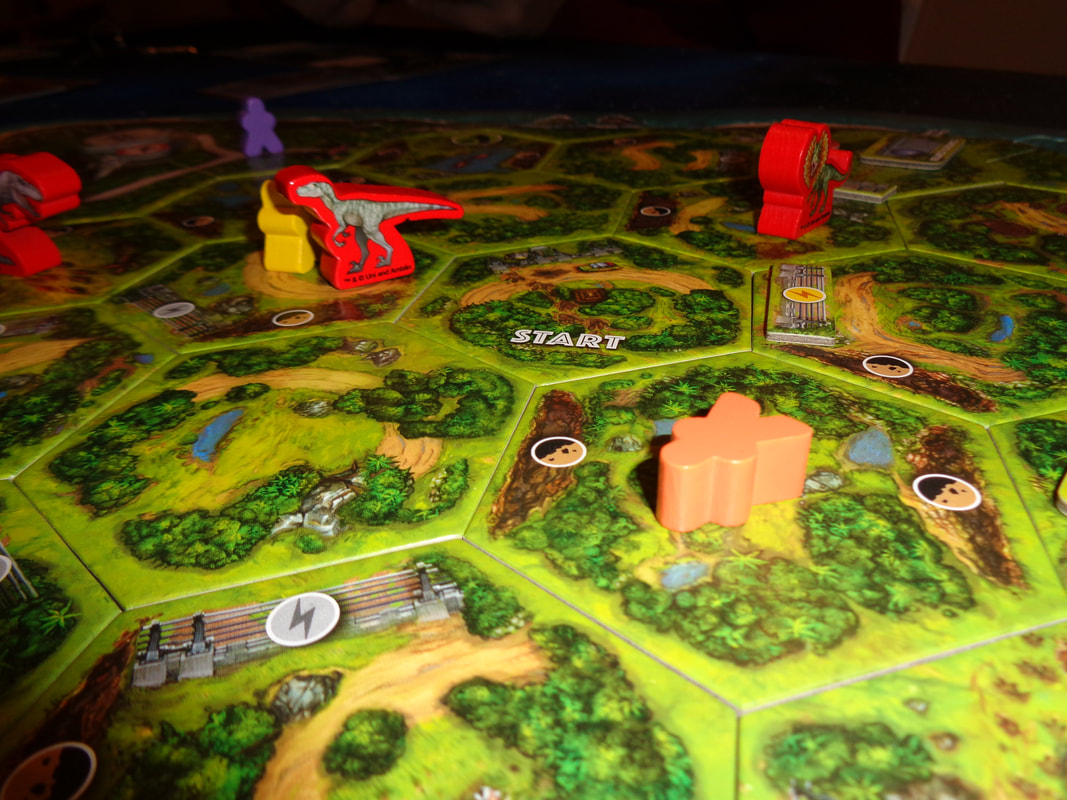
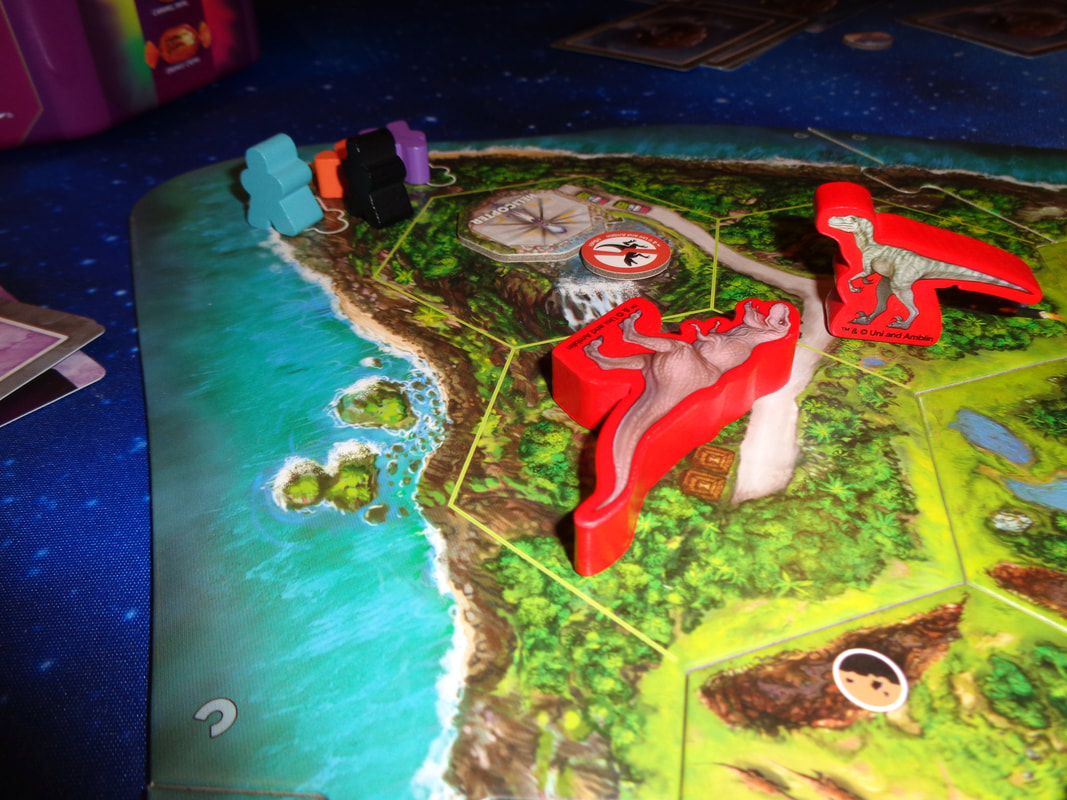
Jurassic Park: Danger! is a cat-and-mouse game all about asymmetrical play. Not only do the dinosaur and character players have different rules, the characters will have differences between them. Each character may have different numbers they need to roll for climbing or sneaking, giving them strengths and weaknesses, additionally, they'll have a card or two which are unique to them.

The game does feature some sharp cat-and-mouse gameplay. Due to the limited size of the playing area, a dinosaur will generally never be more than a hex or two away from a character player and this keeps the game feeling quite taut. Players will always have to make meaningful decisions and to make what they hope is optimal choices.
Characters need to coordinate to complete their objectives, sometimes putting themselves at risk to protect others, particularly if that other character is close to something important and they can't afford to procrastinate either, as their decks inevitably dwindle.

The dinosaur player will face tension too. They of course need to prevent the other players from completing objectives. Unlike the character players, their cards cannot run out, so they can be patient. However, since the dinosaur player only ever has 3 cards in hand and limited actions per dinosaur, they're never fully in charge of what they can do, a hand of 3 cards will limit the dinosaur choices and to a degree randomise their actions, the dinosaur player may not get the moves they need when they need them.
​While there are only 3 actions for a dinosaur to use, the way in which they become available is unpredictable - to both sides of the game.

I think the most interesting mechanic in Jurassic Park: Danger! is the character elimination rule. It's adds the potential for some real tactical moves by the character players, e.g., they could choose to sacrifice someone to distract a dinosaur at the right time, brutal, but maybe effective?
This brings me to my criticism of that mechanic: It feels like the game treats characters as just resources to be managed and not people trying to escape. It seemed quite hard to complete objectives, personal goals and get 3 characters out to the helicopter without losing other characters on the way. I know this is just how the game is balanced and not really an issue, especially since it has no effect on winning, but it did detract from the feeling that you're trying to survive. It felt a little unsatisfying.

Speaking of balance, this brings me to another criticism, which is my dislike of one-vs-many games. The balancing between one player and several others never seems quite right and I don't see Jurassic Park: Danger! being any different. Multiple brains will always out strategize a single brain.

I have to wonder who this game is aimed at? I think many dedicated gamers, myself included are leery of licensed games and as a dedicated gamer, I personally found Jurassic Park a little underwhelming and uncompelling; a little too light for my tastes. It's something I have any inkling to play again.
More casual gamers will probably be unfamiliar with some of the mechanics here such as card management, the game isn't particularly complex but neither is it particularly accessible.

So I guess we're left with Jurassic Park fans who're gamers!
0 Comments

Valor & Villainy: Minions of Mordak

9/10/2021

0 Comments

 
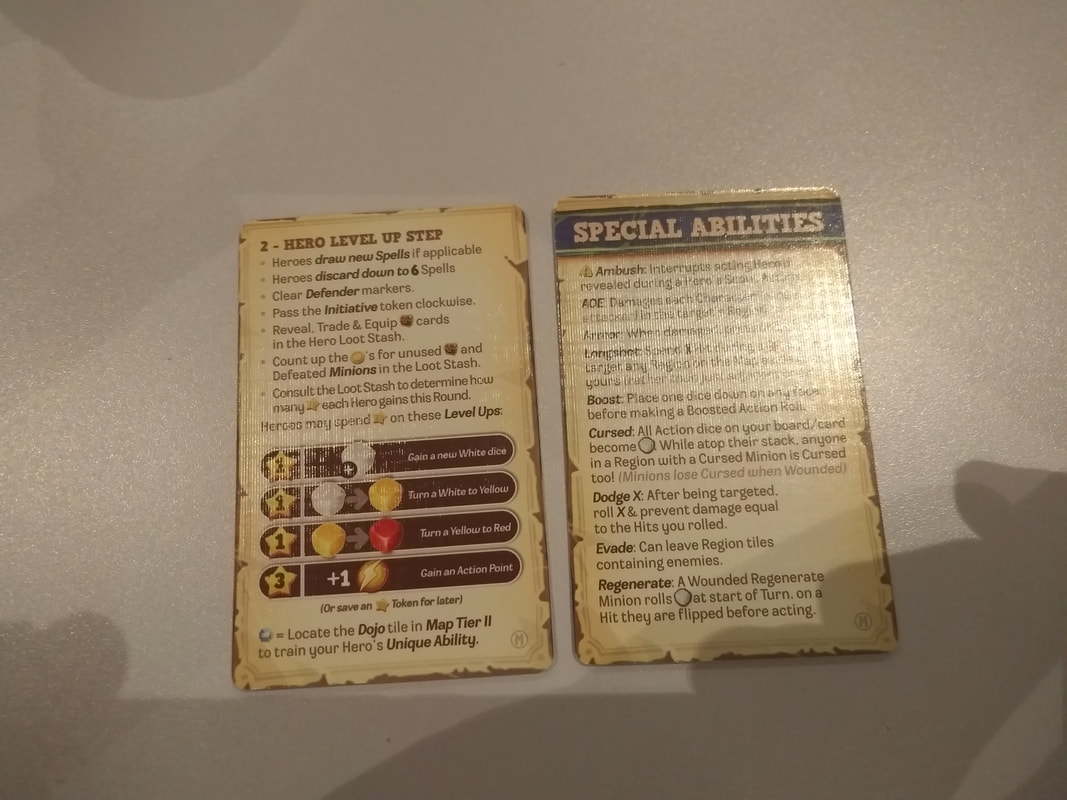
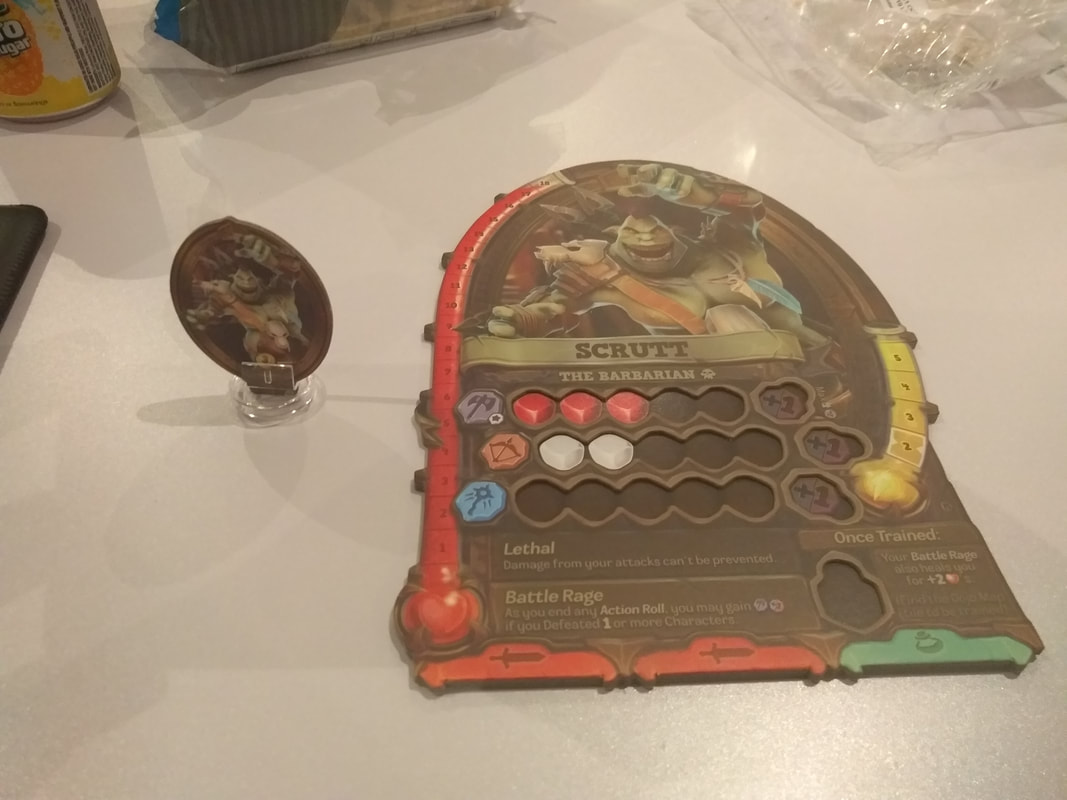
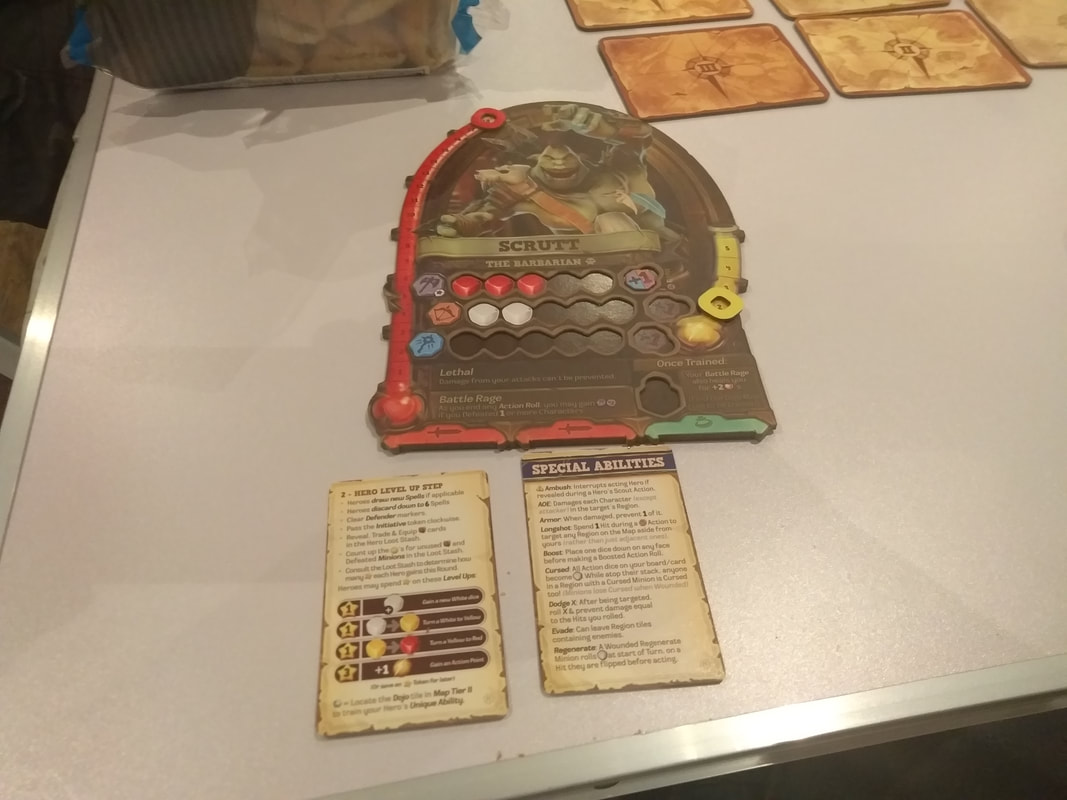
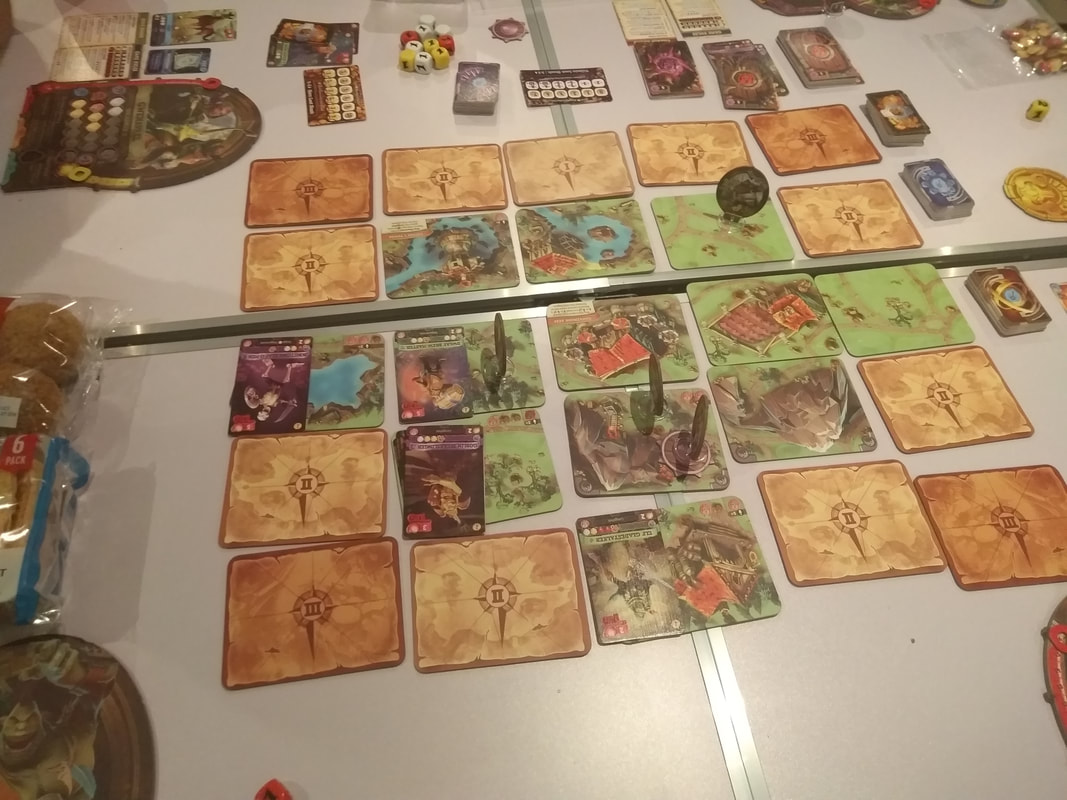
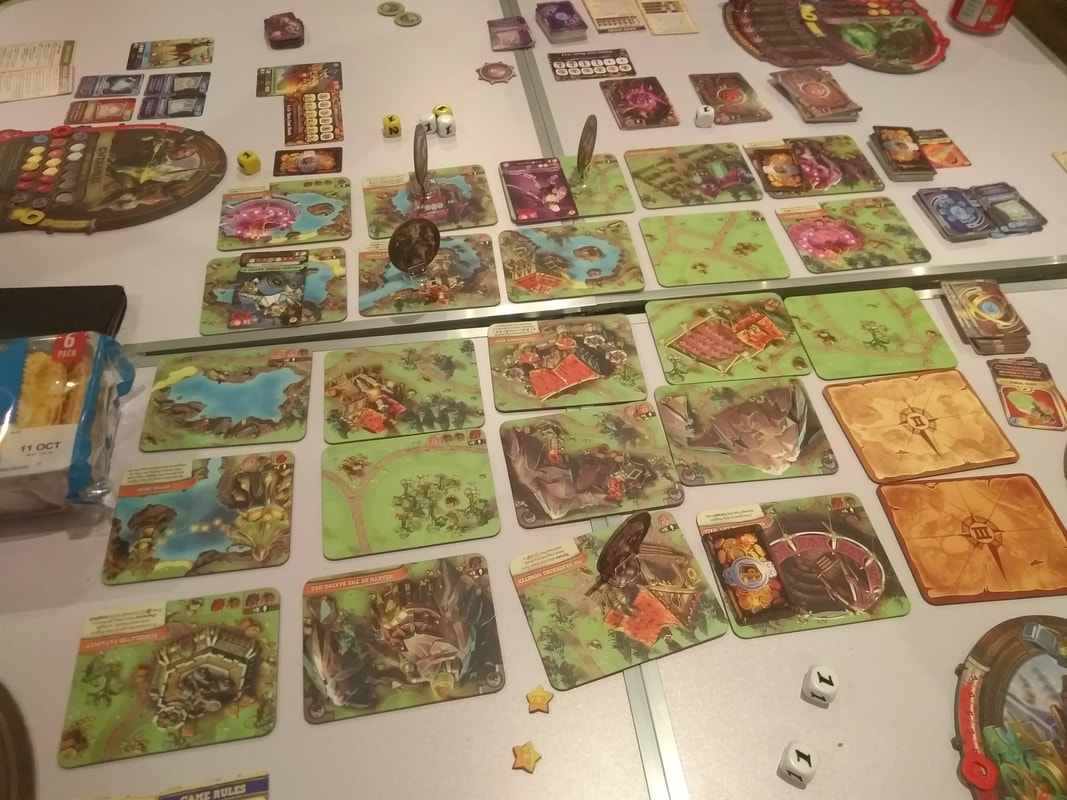
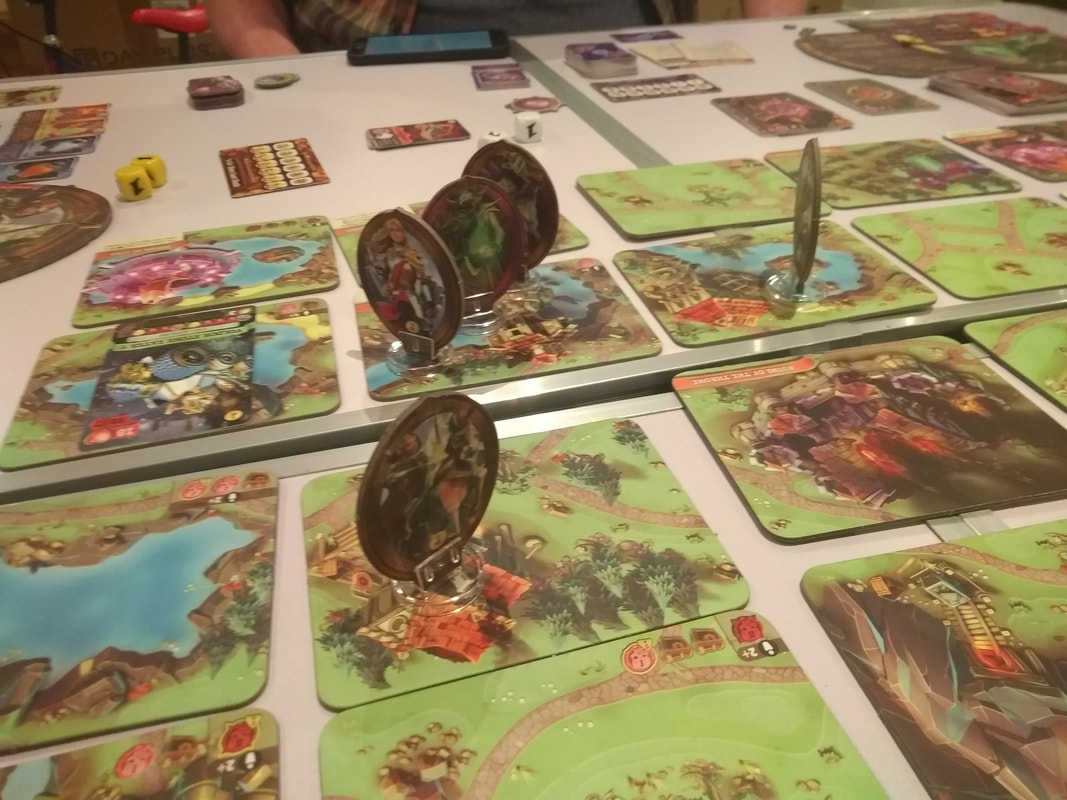
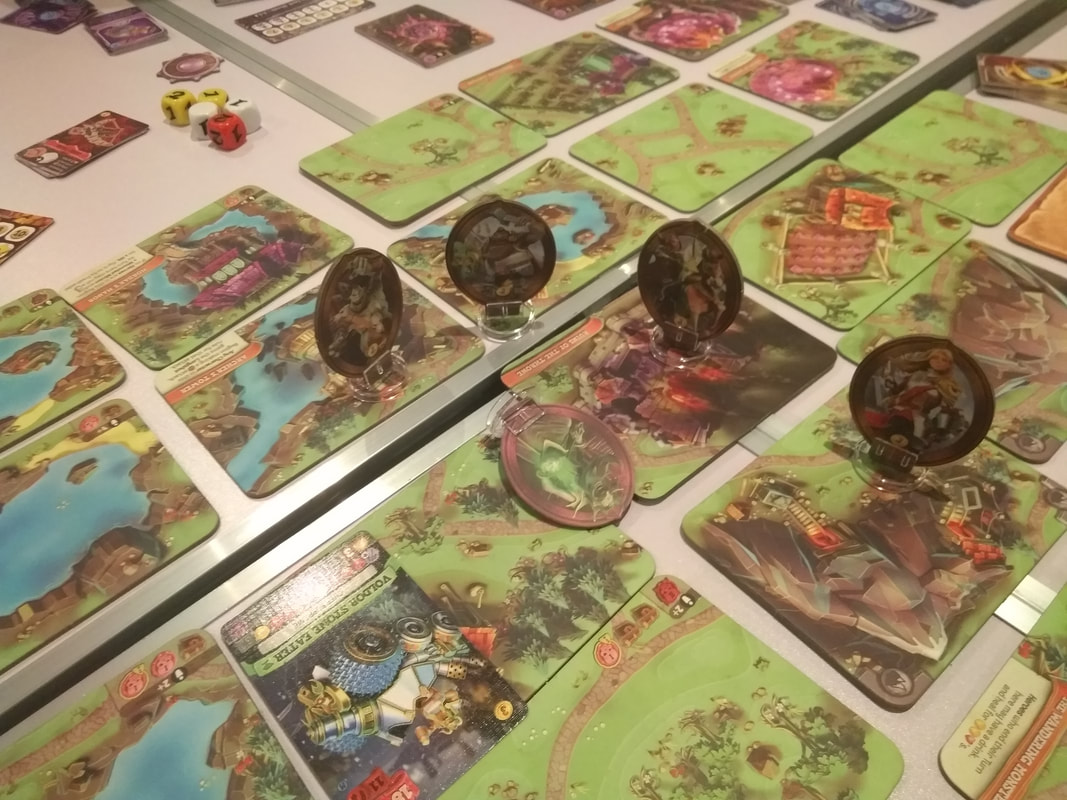
6th October 2021

Time for some midweek gaming! It's a Wednesday and we're round Simon's.

Valor & Villainy: Minions of Mordak is the game of the evening; an open-world styled, fantasy-themed, RPG-inspired exploration game with one player assuming the role of big-bad Mordak and the others taking on the mantle of heroes.

What's in a game?
Valor & Villainy is fairly involved game that features a lot of components.
  • Map tiles: Valor & Villainy uses a variety of map tiles, most of which are randomly placed. These tiles depict the landscape, they also detail encounters that the heroes will come across.
    Starting tiles: These 5 tiles depict; as you'd expect the game's starting area and will be the map's central tiles.
    Region tiles: These tiles are ranked from tier I to tier III on their backs. When the map is created, the lower tiered cards will be closer to the centre.
    Each tile also contains icons depicting what will be found on that tile, which can be minions, ambushes etc.
  • Hero boards: There is one of these thick card boards for each of the game's heroes. They are double-sided and on the back, each character's backstory is displayed.
    The front contains a portrait, as well as health and action point tracks. There are also a number of recessed tracks and spots in each board, into which various smaller components can be dropped and represent the characters increase in skills and training. Character's have tracks for melee, ranged and magic actions.
    The board also lists each character's unique ability and at the bottom has spaces for gear and equipment.
  • Standees: Each hero also has their own standee.
  • Mordak board: The Mordak player also has their own board which is very similar to the hero boards with a health and action tracker and recessed tracks to represent Mordak's increase in ability.
    Mordak possesses 1 extra ability; corruption.
    Procession of horrors tile: This tile slides into place next to the Mordak board and over the course of the game, allows Mordak to accrue power, it also serves as a round counter.
  • Mordak standee: Not to be outdone by the heroes, Mordak has his own standee.
  • Spell cards: Spell cards come in 3 types as explained below
    Arcane spell cards: These blue spells focus on attacks and tricks.
    Divine spell cards: These yellow spells provide support and healing.
    Void spell cards: These purple spells are used by Mordak and typically for the big-bad, they bring mayhem and ruin.
  • Treasure cards: Can be earned by players by defeating minions.
  • Loot stash cards: There are used to track minions that have defeated and treasure that's been earned by the heroes and by the Mordak player to track heroes that have been defeated!
  • Minion cards: These are different types of enemy that the heroes will fight, they come in 3 classes, Chump, Elite and Boss, each getting progressively tougher.
    Minion cards contain information such as movement, attacks, damage and health levels, each one is also double-sided and can be flipped to the other side to display different stats for a minion when they get wounded instead of outright killed. Some minions will get weaker when hurt, a few will get tougher.
    Like the heroes and Mordak, minions have actions and stats.
  • Covers: Each type of minion has it's own cover, used to hide what card is at the top of each minion card.
  • Dice: These six-siders come in 3 different colours and are not numbered from 1-6. Instead the colours represent different levels of ability: White is novice, yellow is adept and red is mastery, each colour has a different number distribution, with white having the lowest, ranging to red with the highest.
  • Ability tokens: These come in 3 colours that directly relate to skill dice. Players acquire these tokens for their abilities which in turn determine what dice are rolled by that player.
  • +1 tokens: Can be acquired by players through rolling well and used for one-off bonuses.
  • Initiative token: This double-sided first player token has Charge on one side and Hold on the other.
Valor & Villainy also has various other tokens for specific circumstances and situations including woeful sheep tokens!
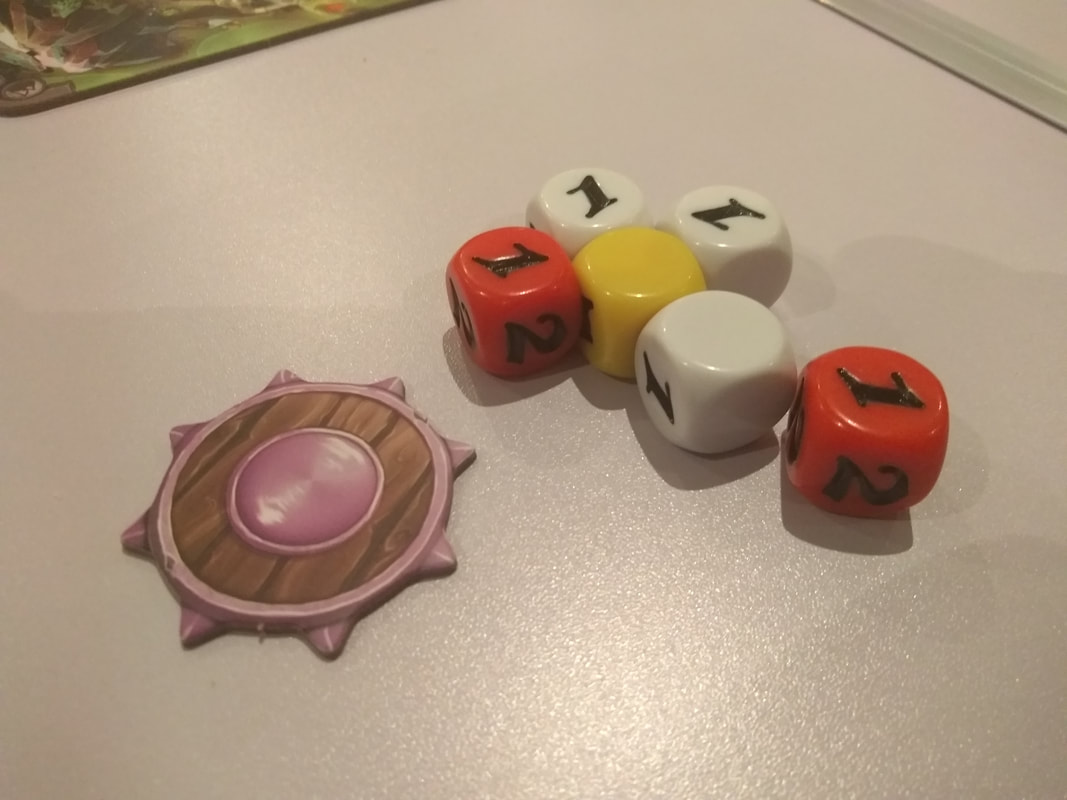
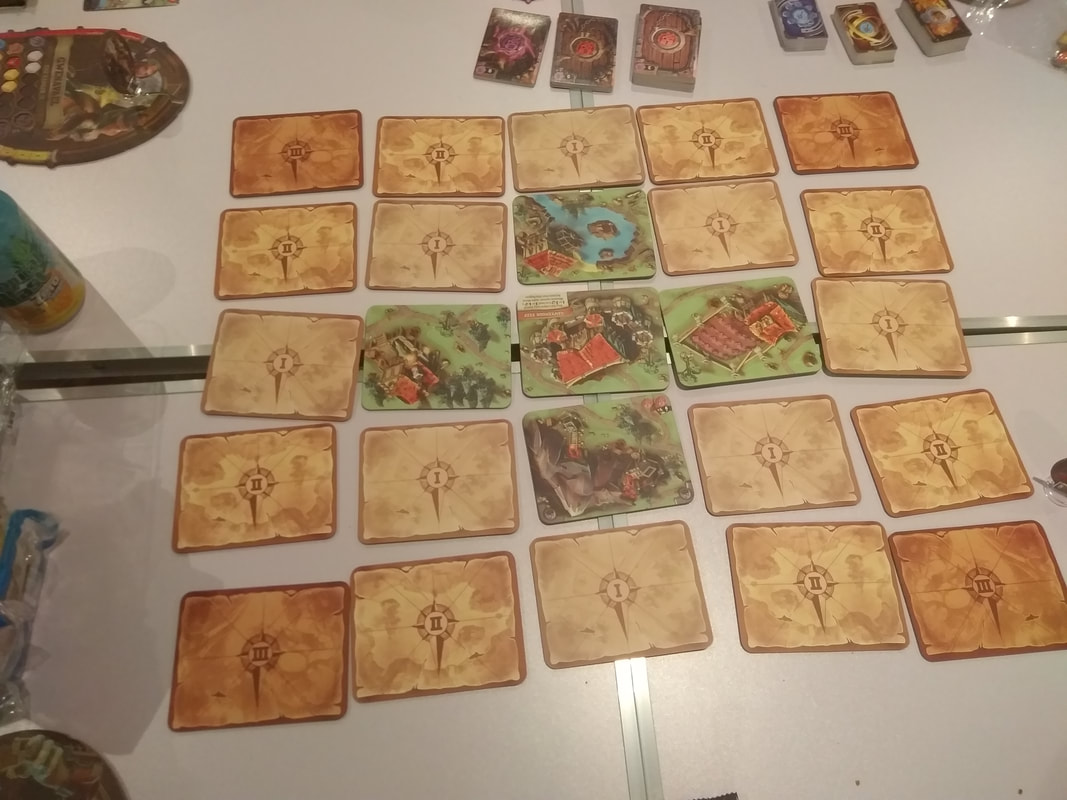
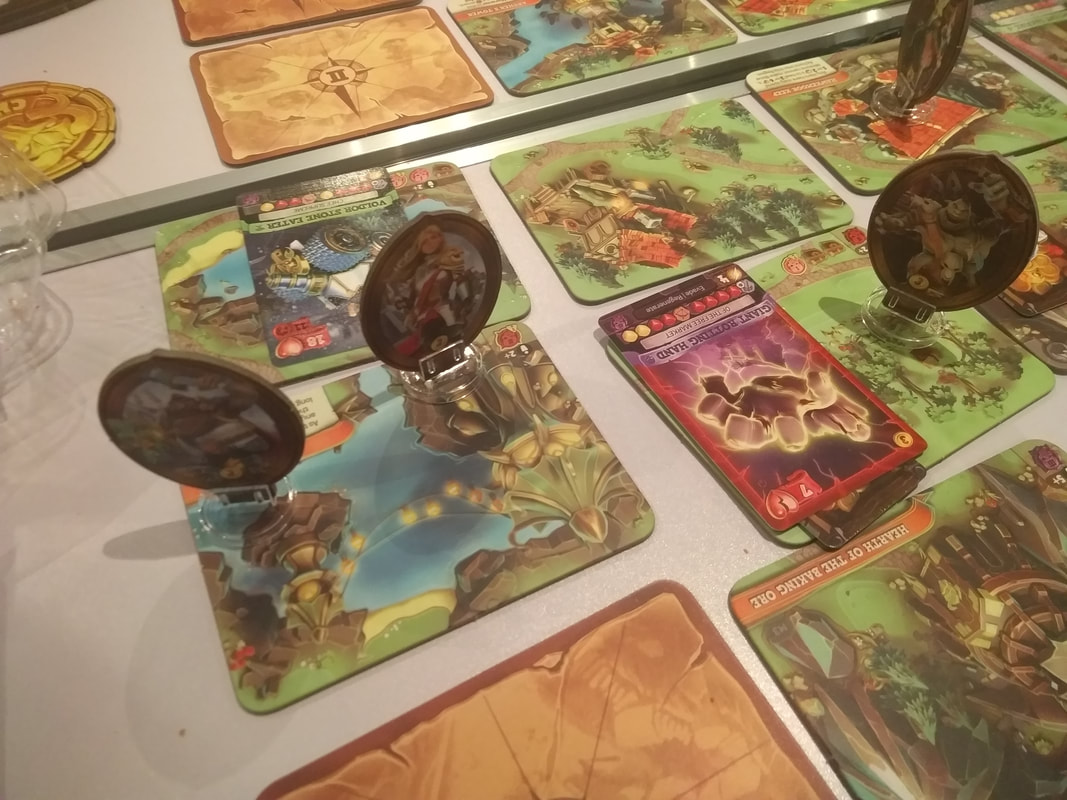
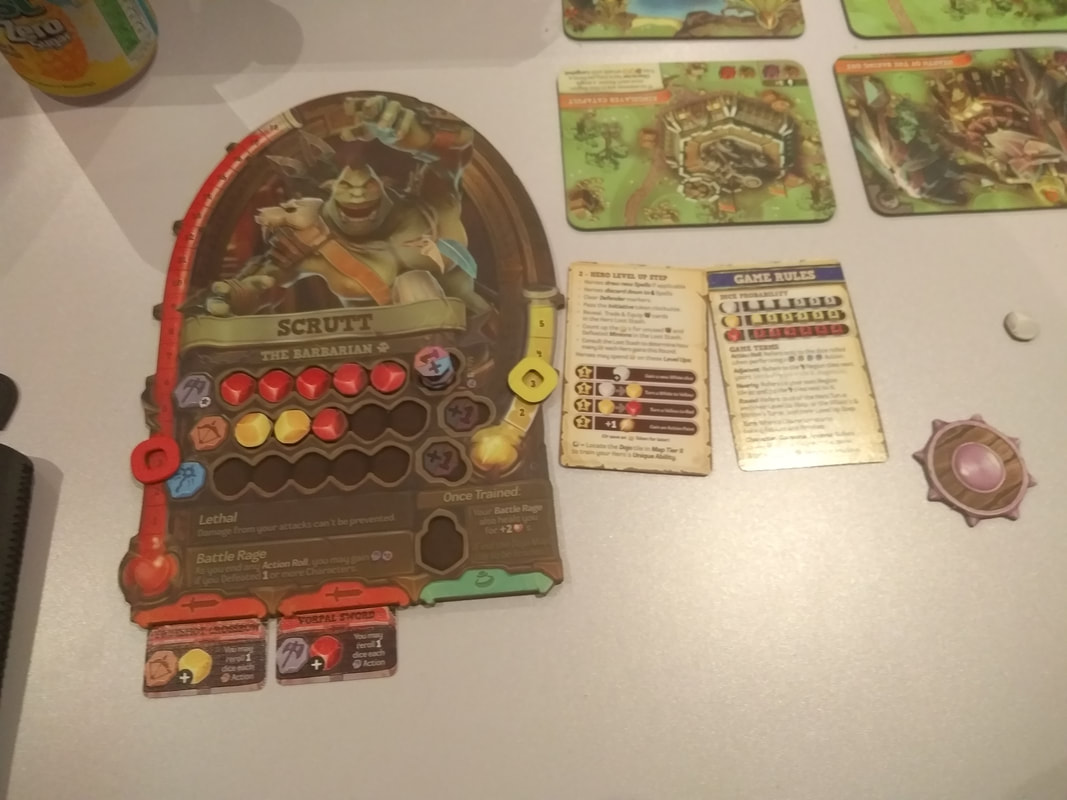
The components are all high quality, tiles and tokens are suitably thick and sturdy, as are the standees. The cards are all well made and the rounded plastic dice feel weighty enough but the standout components are the chunky recessed hero boards which feel solid and also fairly practical.

Artwork throughout the game is excellent. The landscapes on map tiles are well produced, clear but also colourful. Character illustrations are bold and slightly-cartoony, it's a style that gets used quite a lot in fantasy-themed games, but it looks good in Valor & Villains.

As you'd expect for a open world game like, Valor & Villainy uses a variety of icons and symbols, particularly on spell cards - which essentially are all different. For the most part, the iconography is intuitive and pretty straightforward to understand.


How's it play?
Setup
  • The Map: The 5 starting tiles are put out face-up in same position for every game, then, a number of map tiles are randomly drawn from each tier, although certain tiles (The 3 shrines.) must be included, then tiles in each tier are shuffled, some are randomly drawn and placed face-down around the starting tiles, the tier I tiles go closest to the starting tiles and the tire III the furthest away.
    Once all the tiles are placed, there will be a 5x5 grid of tiles, although in games will a lower player count, they'll be slightly less tiles.
  • Heroes: Give each player a hero board and associated standee, along with the requisite components to track health and action points, as well as a +1 token.
    Players' whose characters can cast spells should draw cards from the relevant deck.
  • Mordak: The Mordak player should take the Mordak board and set it up in a similar manner to the hero boards.
    The procession of horrors tile should be placed next to the Mordak board and the Mordak standee put on it.
  • Card decks: Shuffle the 3 magic decks into 3 face-down stacks, do the same with the treasure deck.
  • Minion decks: Shuffle the 3 minion decks into 3 face-down stacks, because these cards are double-sided, the relevant cover should be placed on the top of each minion deck. This ensures the Mordak player draws minions blindly.
  • Initiative: Give the initiative token to the starting player.
The game is now ready to begin

On to play
In Valor & Villainy, the hero players are trying to discover the 3 shrines hidden somewhere amongst the face-down tiles to weaken Mordak and the Mordak player will be trying to make it hard for the heroes to find them until he arrives on the map after the 6th round.
Heroes always act first with the starting player beginning, then going left. The Mordak player may then act after the hero players. The Mordak player essentially gets 2 turns to act, 1 for Mordak himself (Although Mordak doesn't have much to do in the early game.) and 1 for minions.
When players take their turns, they will have a number of actions points they can spend to move or act as they see fit, there are also some free actions that can be performed
  • Initiative: Who has the initiative token is the first player, they may choose to act first or last, in which case they flip the token to the Hold side.
  • Hero actions: Heroes may perform actions, these include the following:
    Scout: This is a free action. When a hero chooses to scout, they flip all adjacent face-down map tiles to their face-up side, this may reveal enemies, loot or trigger ambushes.
    Looting: If a player's character is in a region without enemies, they may loot any treasure as a free action. Treasre is not immediately acquired, instead it is placed on the pertinent loot card and divvied up at the end of the round.
    Movement: For an action point a hero may move to a adjacent tile that is already face-up. Characters may only orthogonally.
    Actions: All hero actions are performed using one of their 3 stats, generally this involves combat.
  • Mordak actions: In the early game, there's little Mordak can do to directly confront the heroes, although he can make life hard for them.
  • Minion actions: If there are any minion cards on the board, the Mordak player can use them to attack and harass the players. Minions move and attack in much the same way as players.
  • Combat: Combat plays a big part of Valor & Villainy:
    Melee: Melee occurs when enemies are on the same tile:
    Ranged: A character who decides to attack at range can only target enemies in adjacent tiles.
    Magic: Characters may spend their spell cards to cast spells.
    Defeat: Combat will generally result in one of the involved parties being defeated.
    Minions: When a minion is defeated, it is out of the game and added to the players loot stash
    Hero: When a hero is defeated, they are out of the current round and the Mordak player adds their standee to their loot stash. The standee is returned after the level-up phase has been completed
  • Level-up: Once all players have had their turns, the game proceeds to the level-up phase.
    Throughout the round, any loot players acquired or minions that were defeated are added to the hero loot stash. During the level-up phase, they earn the hero players experience points, the loot can then be divvied up between them as they decide and equipped.
    Similarly, the Mordak player will earn experience points for each hero that was defeated.
    Then players may spend XP to increase their skills by adding ability tokens to their boards, they may also spend XP to increase their action points.
  • Next round: The Mordak player moves their standee one space along the procession of horrors and the standee of any defeated hero is placed in the centre starting tile, ready for the next round. The initiative token is passed to the player on the left.
There's a bunch of other, mostly situational rules in Valor & Villainy, I'm not going to go into in further detail, since they don't always apply.

Endgame
Once 6 round have been completed (Or all 3 shrines have been discovered.), the game goes into The Final Battle!
During the final battle, Mordak himself will appear on the map and directly engage the hero players in combat.

Mordak has a large amount of health; 70-100. If the hero players reduce Mordak's health to 0, they win the game.
Conversely, if the Mordak player manages to defeat 3 heroes during the final battle, then the Mordak player wins the game.


Overall
There's a lot of charm to Valor & Villainy's presentation, especially the bold, chunky artwork for characters and minions.
Mechanically, the game is actually quite straightforward, unremarkable even (At least it is for the hero players.), although it does contain a fair amount of exception driven and situational rules. Using cards for minions makes it a little fiddly to move them around and handle, it also looks a little dull and flat (sic) but conversely, it makes it easy to track minion health and combat initiative.

Valor & Villlainy has several quibbles in my opinion
One of the most significant is the game's one-vs-many mechanic, these types of mechanic rarely work well in my opinion. Obviously the game will have been balanced to try and take this into account, but few games can balance the difference between 1 human brain versus 4 human brain and the hero players will always have this to their advantage. It almost feels like the game is set up to advantage hero players over the Mordak player.

The game also has a weird tonal shift thanks to this one-vs-many mechanic. For most of the game, the Mordak player will be a thorn in the players' sides,  a source of constant minor irritation. Then, during the endgame, it becomes straight up, directly confrontational PvP as Mordak appears on the map. It feels weirdly more aggressive.

For the heroes, the game is mostly about managing encounters as they appear, recognising and prioritising threats, then dealing with them using the most efficient method, allowing them the maximum opportunity to explore the tiles.
For the Mordak player, it's about exploiting any opening or weakness that the heroes present, not only defeating heroes but stymieing and thwarting them whenever possible.

Valor & Villainy is a open-world RPG-esque experience where a varied band of heroes, explore, fight monsters, acquire treasure and level up. The ingredients of an RPG are all there, but it doesn't feel quite right and I think there're a couple of reasons why.

There's a lack of storytelling to the game and variety to the encounters, there's randomness when setting up a map and not all tiles will appear in any single game, but they're just encounters, they feel a little bland and there's no sense of travelling, journeying or adventuring.

The normal map (For 4+ players) will have 20 face-down map tiles to scout, to explore all of them will require turning over 3-4 map tiles per round. Scouting tiles is actually a bit of a balancing act and one of the challenges the hero players face. if the heroes scout too slowly, they risk not finding all the shrines, if they do it too quickly, they risk revealing more minions than they can handle at once.
This will require players to head off in different directions and in an RPG you should never split the party!

In relation to combat, it seems the most efficient way for the Mordak player to accumulate experience points is to relentlessly pick on one player until they are defeated, then choose another player to pick on. It feels particularly un-RPG-like where combat tends to distributed amongst all heroes.
Even then, when a hero is defeated, on the next turn, the hero will reappear in the centre tile like it's a videogame spawn point.

All of this adds up to make Valor & Villainy feel disconnected from RPGs.

But for me, by far the biggest problem the game has, is its run time. We played with 5 players in total and a game took somewhere between 2-3 hours to play out. If felt like each player took about 4-5 mins to complete their turn and don't forget that the Mordak player essentially gets 2 turns in a row, 1 for themselves and 1 for their minions which makes a round 25-30 minutes long and that's before adding in The Final Battle. It also meant players had about 20 minutes of downtime between turns.
It's too much, if Valor & Villainy was an exceptional or engaging game, it wouldn't be such an issue, but it's not. It's not a bad game either, it's just slightly bland and slightly average. 

There's nothing wrong with an average game, so long as it doesn't outstay it's welcome.
The effort Valor & Villainy requires to play doesn't quite justify the experience it provides.
0 Comments

Betrayal at the House on the Hill

12/9/2021

0 Comments

 
11th September 2021

All day Saturday continues, the next game I played at Wogglecon was Betrayal at the House on the Hill.

​What's more fun than exploring the local haunted house with your disparate band of friends. I mean, what's the worst that could happen? It's not like one of them is going to betray you, right? It's not like it's in the game's title!

What's in a game?
  • Character tiles: These double-sided tiles have a distinct pentagonal shape, each side depicts a different character and each one of these characters has 4 stats, Might, Sanity, Speed and Knowledge. 2 are physical and 2 are mental, each stat has a differing sliding scale of values, the green number is the starting number. stats are used for certain rolls and may go up or down. When a character takes damage it will reduce stats.
    ​Character models: Each character has their own pre-painted plastic 3d model.


  • Room tiles: There is a starting tile along with another 44 other room tiles. Each tile depicts a room in the titular house, the back shows which of the house's 3 floors it belongs to.
  • Dice: Each one of these six-siders is numbered 0-2 twice.
  • Event cards: These are the encounters the characters will experience.
  • Item cards: Equipment and gear that characters will acquire during the game.
  • Omen cards: These don't sound like good news.
  • Tokens: The game has a lot of tokens, hundreds in fact and mostly for monsters!
  • Traitor's tome: This book is used during the 'haunt' stage.
  • Secrets of survival: Also used during the 'haunt' stage.
All of the game's tiles and tokens are constructed of thick and study card, the dice are also good quality. The cards are the expected standard quality.
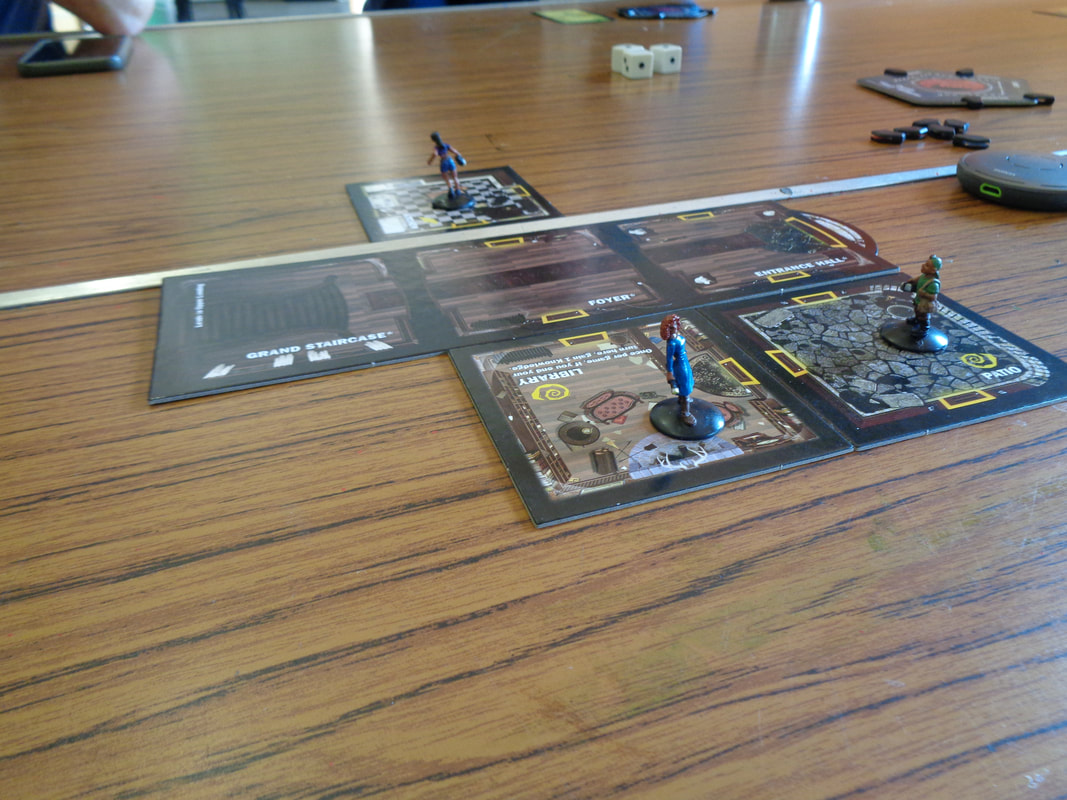
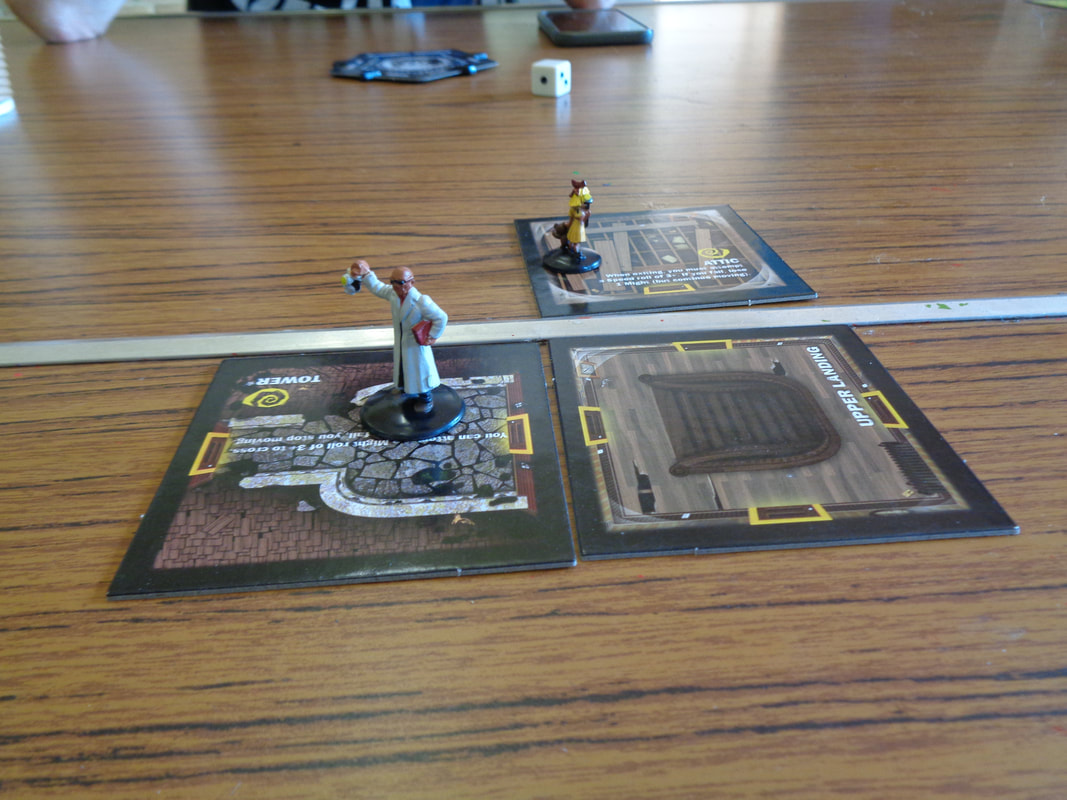
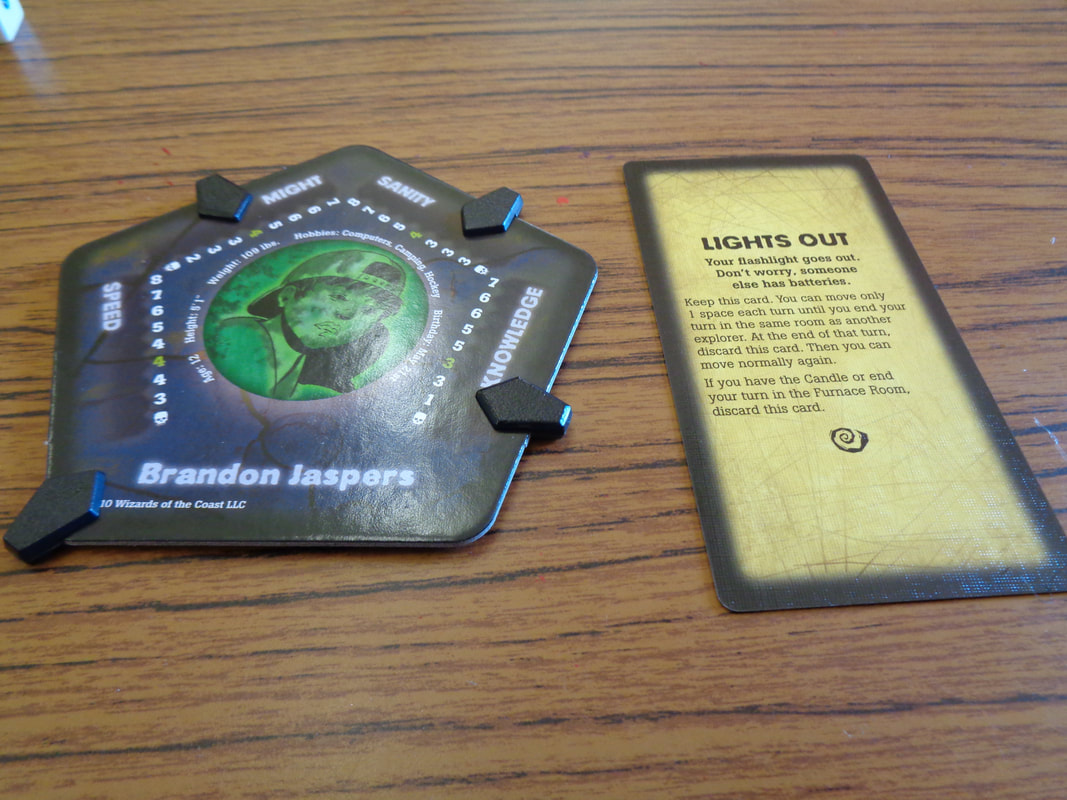
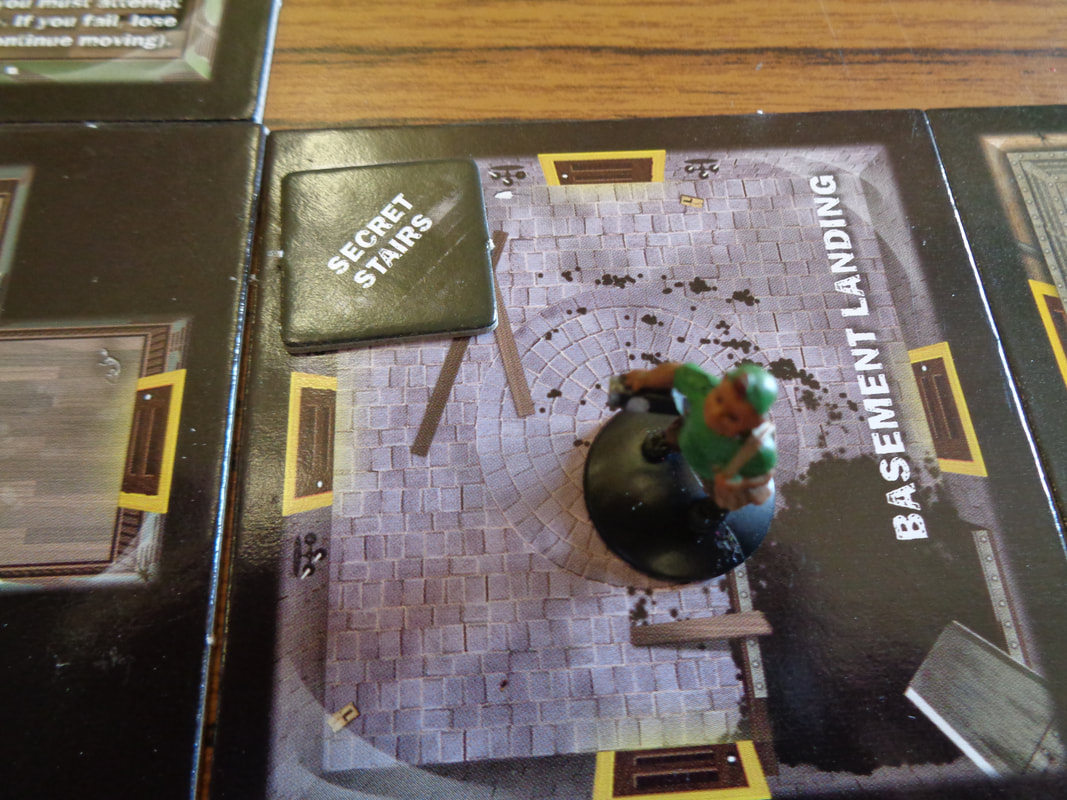
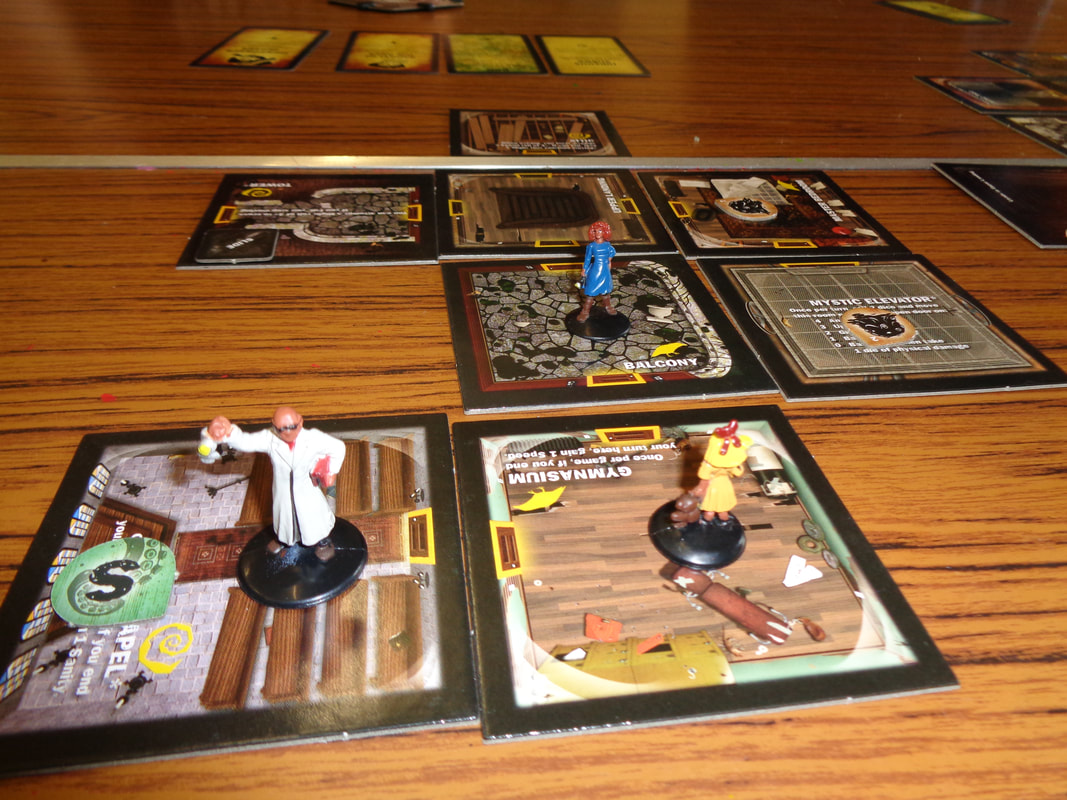
The character tiles are decorated in monochrome illustrations with one colour - the player's colour. Artwork used on the room tiles is a little plain but unobtrusive. The paintjobs on the models is nice addition. Thematically, it all fits though.
The game's iconography was straight forward.


How's it play?
Setup
  • Each player should take a character tile, choose a side and set up their starting stats.
  • Shuffle the event, item and omen cards face-down into their respective decks
  • Put out the starting room tile - the entrance hall, then shuffle the remaining room tiles into a face-down stack.
  • Determine the starting player.
On to play
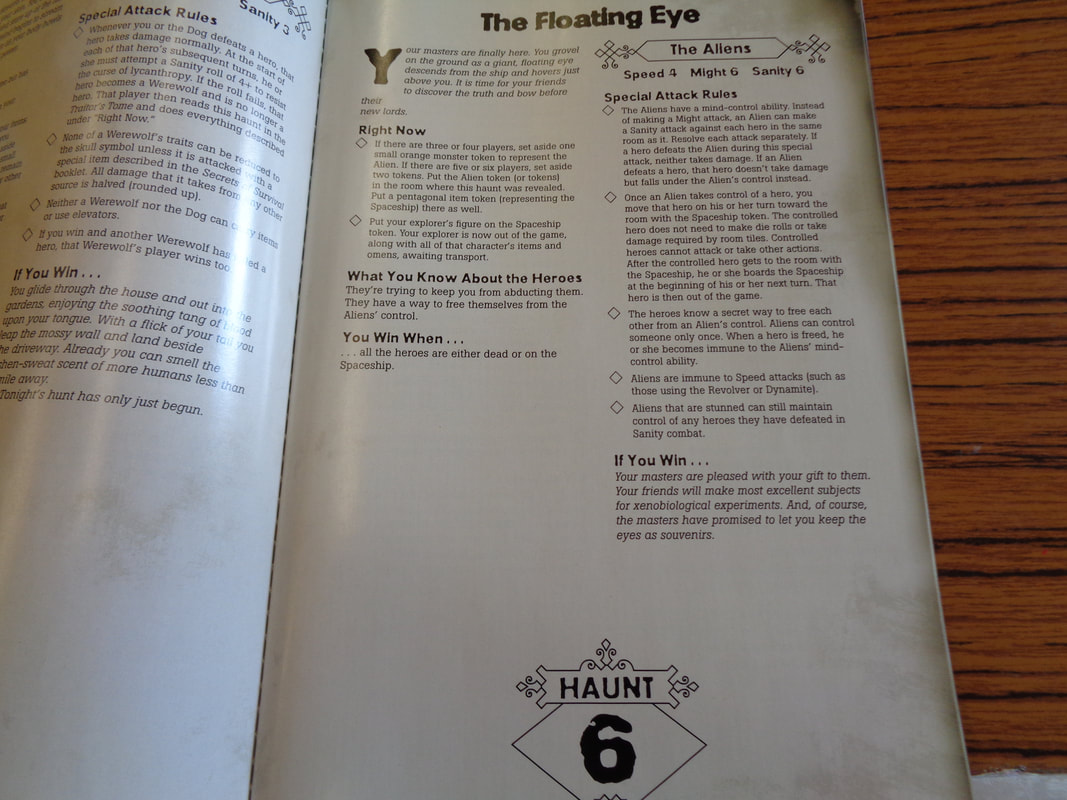
The objective in Betrayal at House on the Hill is to explore the house until the 'haunt' is discovered and then maybe defeat it!
Broadly speaking, the game is divided into 2 stages, the second stage begins once the 'haunt' has manifested.
On their turn, the active player can do the following:
  • Move: The active player may move through a number of room tiles equal to their speed stat.
  • Explore: When the active player would 'move off' the edge of the playing area, they draw a room tile, place it and move on to it. Their movement immediately ends, regardless of how far they've moved, then they must deal with the room's encounter.
    This involves drawing a card from either the event, item or omen decks.
    The 'house' in the game actually has 3 different floors which will lead to the creation of 3 different tile-maps.
    Event cards: Event cards may be beneficial or detrimental, at times this will involve making a roll using one of the character's 4 stats which may also result in beneficial or negative outcomes.
    Once an event has been encountered, the event card is discarded.
    Item card: This will a item the character may use and typically confers some sort of benefit on the character.
    Items are kept by the character and their benefit can be used once per the player's turn.
    Item cards are kept by the player.
    Omen cards: These are a bit like event and items cards. An omen card might require a player to make a roll or perform an action, but they are also kept by the player and can be used once per turn.
    Anytime an omen card is drawn, the active player must roll 6 dice, if the result is lower than the total number of omen cards that have been drawn, then the 'haunt' is triggered. More on this below.
  • The haunt: After the haunt is triggered, it can fundamentally alter the game. The active player looks at a chart in one of the books, it will determine who is revealed as the traitor and which of the game's 50 haunt scenarios will be played out.
    Traitor: The traitor player takes the Traitor's Tome and must move away from the other players, then they read the haunt scenario that was activated. It will tell the traitor what their objective is and why powers they may have acquired and what monsters they may control.
    Heroes: The remaining explorers now become the heroes, with the traitor out of earshot, they can read about the haunt in Secrets of Survival, learn their objectives and discuss their strategy.
    Turn order: Once all players have finished reading their pertinent information, a new turn order is established. Basically the traitor player goes last in the new order, any monsters the traitor controls go after them.
    Play pretty much continues pretty much as it did previously, heroes and the traitor can still move around, explore and draw cards. Crucially, though, heroes' stats may now be reduced to 0, resulting in their untimely demise.

Endgame
The heroes and the traitor continue taking their turns until one or the other complete their objective, in which case they win. 


Overall
Mechanically speaking, Betrayal at the House on the Hill is straightforward, especially in the first stage of the game. Players add tiles to the map and deal with whatever randomly comes with it, it's fun, but players are just reacting to encounters, all a bit unchallenging mentally.
When the traitor is revealed, this all changes though.

The heroes will find themselves having to complete their objectives while invariably having to keep out of the clutches of the traitor and their monstrous allies. They'll probably have to collaborate to have a chance of success.
Meanwhile, the traitor will have their own objectives, this may or may not involve capturing or defeating the heroes. The traitor can be sure that the heroes' objective will be bad news for them and will want to thwart them.
Betrayal at the House on the Hill has now become a very tense game of cat-and-mouse.

However, there are number of things about the game that irk me.
I'm not fond of traitor mechanics, nor am I fond of one-vs-many mechanics and Betrayal at the House on the Hill uses both! It's a bit of a put-off for me, obviously, YMMV.

Additionally, when the haunt is revealed, all the players must split up to secretly read their objective and in the case of the heroes; discuss their actions while the traitor sits around waiting. This creates a strange, pace-breaking awkward pause to the game.

Finally, having the playing area actually split into 3 playing areas, one for each of the house's floors feels somewhat clumsy to me, it's not a dealbreaker, but it does take up table-space.

There's nothing wrong with the game, it's just not really for me and isn't a game I'd pick to play.
If the haunted house theme appeals and you're happy to play with traitor mechanics, Betrayal at the house on the hill will probably be an enjoyable experience.
0 Comments

    Author

    I play, I paint.
    ​This is where I talk about what I play.

    Archives

    March 2025
    March 2024
    April 2023
    March 2023
    February 2023
    January 2023
    December 2022
    November 2022
    October 2022
    September 2022
    August 2022
    July 2022
    June 2022
    May 2022
    April 2022
    March 2022
    February 2022
    January 2022
    December 2021
    November 2021
    October 2021
    September 2021
    August 2021
    July 2021
    June 2021
    May 2021
    April 2021
    March 2021
    February 2021
    January 2021
    December 2020
    November 2020
    October 2020
    September 2020
    August 2020
    July 2020
    June 2020
    May 2020
    April 2020
    March 2020
    February 2020
    January 2020
    December 2019
    November 2019
    October 2019
    September 2019
    August 2019
    July 2019
    June 2019
    May 2019
    April 2019
    March 2019
    February 2019
    January 2019

    Categories

    All
    2 Player Only
    50 Fathoms
    Abstract
    Annual Quiz
    Area Control
    Asymmetrical Play
    Auctioning
    Black Hack
    Bluffing
    Board Game
    Campaign Play
    Card Game
    Clockwork & Chivalry
    Cooperative
    Cthulhu Hack
    Deck/Bag Builder
    Deduction
    Dice Game
    Drafting
    Engine Builder
    Hand Management
    Hidden Movement
    Hidden Role
    In Darkest Warrens
    Legacy
    Merry Outlaws
    One Vs Many
    Oubliette
    Party Game
    Programming
    Push Your Luck
    Real Time
    Renaissance
    Resource Management
    Roll And Move
    Roll And Write
    Route Builder
    RPG
    Sand Box
    Savage Worlds
    Set Collecting
    Storytelling
    Tableau Builder
    Team Based
    The Month In Gaming
    The Year In Gaming
    Tile Placement
    Trading
    Traitor
    Trick Taking
    Voting
    Wargame
    Wasted Hack
    WFRP
    Wogglecon
    Word Game
    Worker Placement

    RSS Feed

Powered by Create your own unique website with customizable templates.
  • Home
  • Special Effect
    • Special Effect
    • The Final Return of The Indiana Jones Charity Globe Trot
    • The Warlock of Firetop Mountain Challenge
    • Return of The Indiana Jones Charity Globe Trot
    • Bard's Tale Challenge
    • Fighting Fantasy Challenge
    • The Indiana Jones Charity Globe Trot
    • Mirkwood Charity Walk
    • Middle-earth Charity Walk
    • Dungeon Daze
  • RPGs
    • The One Ring
    • The Evils of Illmire
    • Beach Patrol
    • The Surrendered Lands
  • Game Blogs
    • RPG Blog
    • Gaming Blog
  • Painting Blog
  • Contact